
listVue Firebase Masterclass
เพิ่ม ดู Order, Dashboard ที่ Backoffice
สารบัญ
ทีนี้กลับมาที่ Backoffice กันบ้าง (เพื่อทำ project ให้สมบูรณ์) เราจะทำเพิ่มอีก 2 อย่างคือ
- ทำหน้า list / detail order ใน admin ดึงข้อมูลออกมาให้ถูกต้อง
- ดึง stat มาแสดงหน้า Dashboard (เราจะสร้าง key ผ่าน Realtime database ผ่าน key: stats)
เชื่อม order ที่ admin
สิ่งที่เราจะทำ
- เชื่อม order firestore เข้า store order
- ส่งข้อมูลแสดงออกมาที่ ListView และ DetailView ของ Order
- เปลี่ยนมาใช้ id แทน index (เหมือนเคส product)
stores/admin/order.js
Note
- เพิ่ม
loadOrder()เข้ามาสำหรับ load จาก Firestore
import { defineStore } from 'pinia'

import {
  collection,
  getDocs,
  doc,
  getDoc
} from 'firebase/firestore'

import { db } from '@/firebase'

export const useOrderStore = defineStore('order', {
  state: () => ({
    list: []
  }),
  actions: {
    // เพิ่ม loadOrder เข้ามาสำหรับ load Data
    async loadOrder () {
      const orderRef = collection(db, 'orders')
      const orderSnapshot = await getDocs(orderRef)
      const orderList = orderSnapshot.docs.map(doc => {
        let convertedData = doc.data()
        convertedData.createdAt = convertedData.createdAt.toDate()
        convertedData.orderId = doc.id
        return convertedData
      })
      this.list = orderList
    },
    async getOrder (orderId) {
      try {
        const orderRef = doc(db, 'orders', orderId)
        const orderSnapshot = await getDoc(orderRef)
        return orderSnapshot.data()
      } catch (error) {
        console.log('error', error)
      }
    }
  }
})
views/admin/order/ListView.vue
Note
- เพิ่ม async การโหลดเข้าไปตอน loadOrder
- เปลี่ยนจากส่ง index เป็น order Id
<script setup>
import { onMounted } from 'vue'
import { RouterLink } from 'vue-router'

import { useOrderStore } from '@/stores/admin/order'
import AdminLayout from '@/layouts/AdminLayout.vue'

const orderStore = useOrderStore()

onMounted(async () => {
  // เพิ่มเป็น async load แทน
  await orderStore.loadOrder()
})
</script>

<template>
  <AdminLayout>
    <div class="flex-1  pt-8 px-6 bg-base-100">
      <div class="card w-full p-6 mt-2">
        <div class="text-xl font-semibold inline-block">
          Order
        </div>
        <div class="divider mt-2"></div>
        <div class="h-full w-full pb-6 bg-base-100">
          <div class="overflow-x-auto w-full">
            <table class="table w-full">
              <thead>
                <tr>
                  <th>Customer Name</th>
                  <th>Price</th>
                  <th>Status</th>
                  <th>Updated At</th>
                  <th></th>
                </tr>
              </thead>
              <tbody>
                <tr v-for="(order, index) in orderStore.list" :key="index">
                  <td>
                    <div class="font-bold">
                      {{ order.name }}
                    </div>
                  </td>
                  <td>{{ order.totalPrice }} ฿</td>
                  <td>
                    <div class="badge">
                      {{ order.status }}
                    </div>
                  </td>
                  <td>{{ order.createdAt }}</td>
                  <td>
                    <!-- ส่ง order id แทน index -->
                    <RouterLink :to="{ name: 'admin-order-detail', params: { id: order.orderId }}">
                      <button class="btn">
                        See detail
                      </button>
                    </RouterLink>
                  </td>
                </tr>
              </tbody>
            </table>
          </div>
        </div>
      </div>
    </div>
  </AdminLayout>
</template>
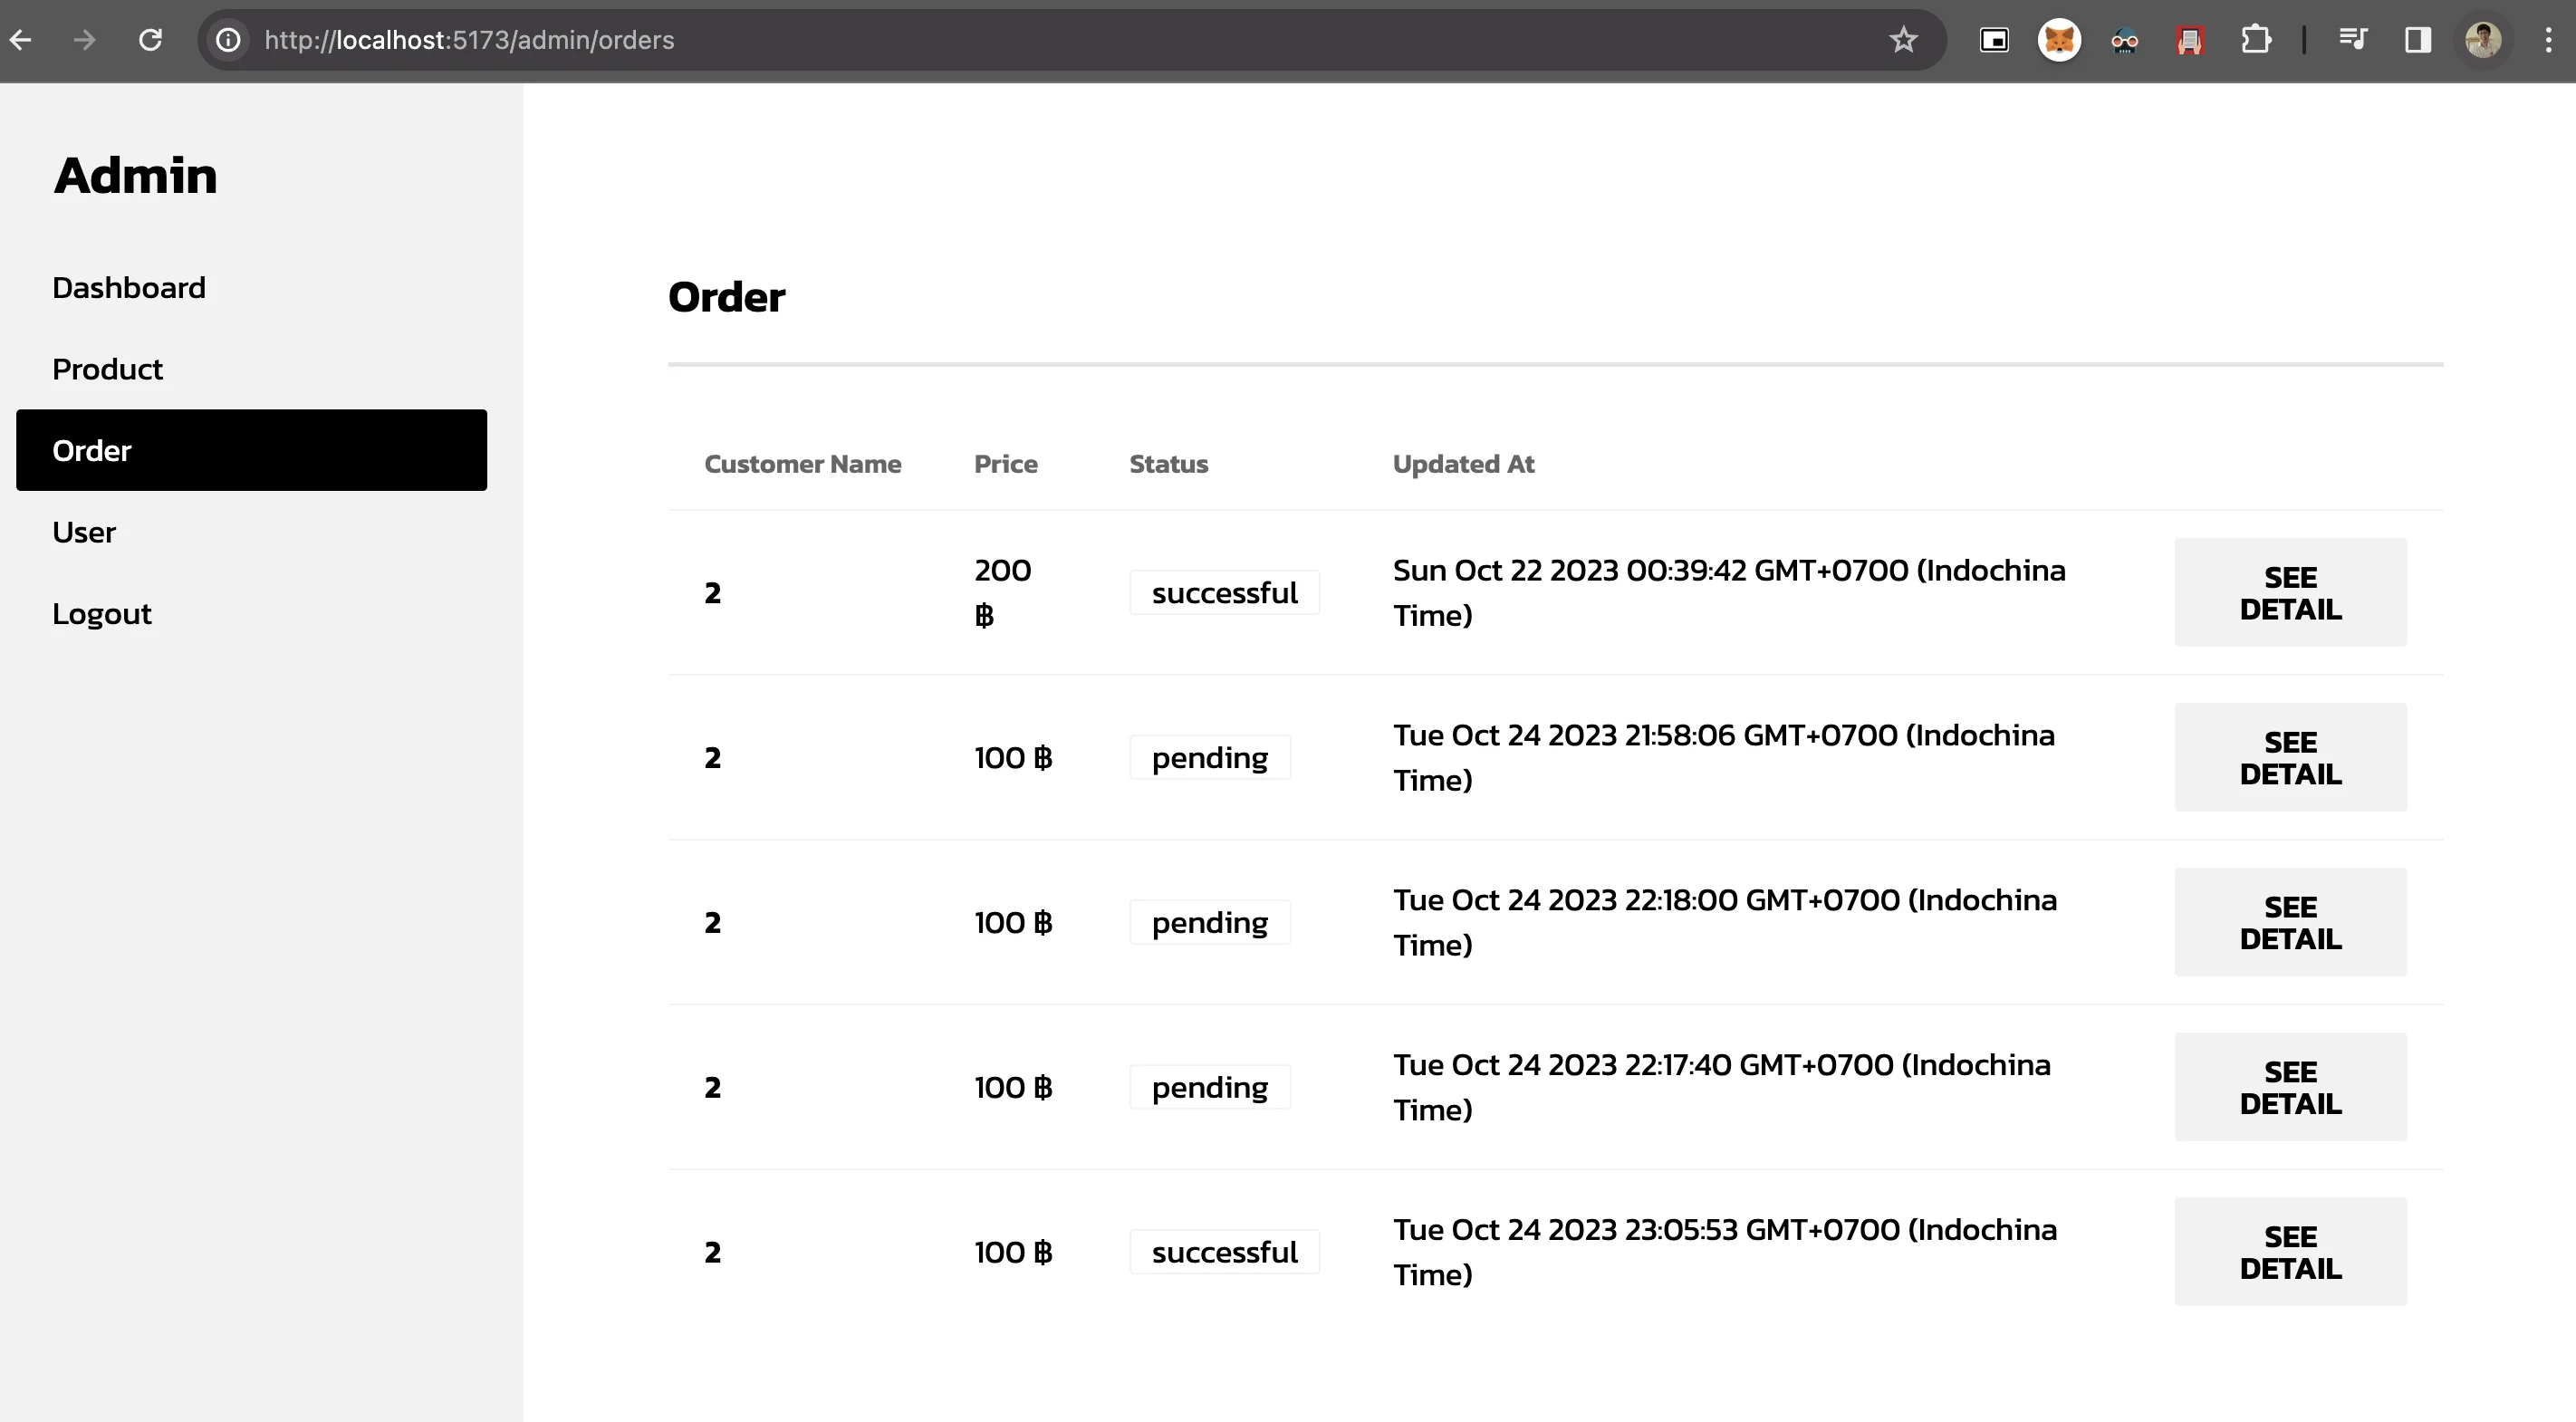
ผลลัพธ์ของการเชื่อม
views/admin/order/DetailView.vue
<script setup>
import { onMounted , ref } from 'vue'
import { useRoute } from 'vue-router'
import { useOrderStore } from '@/stores/admin/order'

import AdminLayout from '@/layouts/AdminLayout.vue'

const route = useRoute()
const orderStore = useOrderStore()

const orderId = ref(-1)
let orderData = ref({
  products: []
})

// เพิ่มเป็น async, await
onMounted(async () => {
  if (route.params.id) {
    orderId.value = route.params.id
    orderData.value = await orderStore.getOrder(orderId.value)
  }
})
</script>
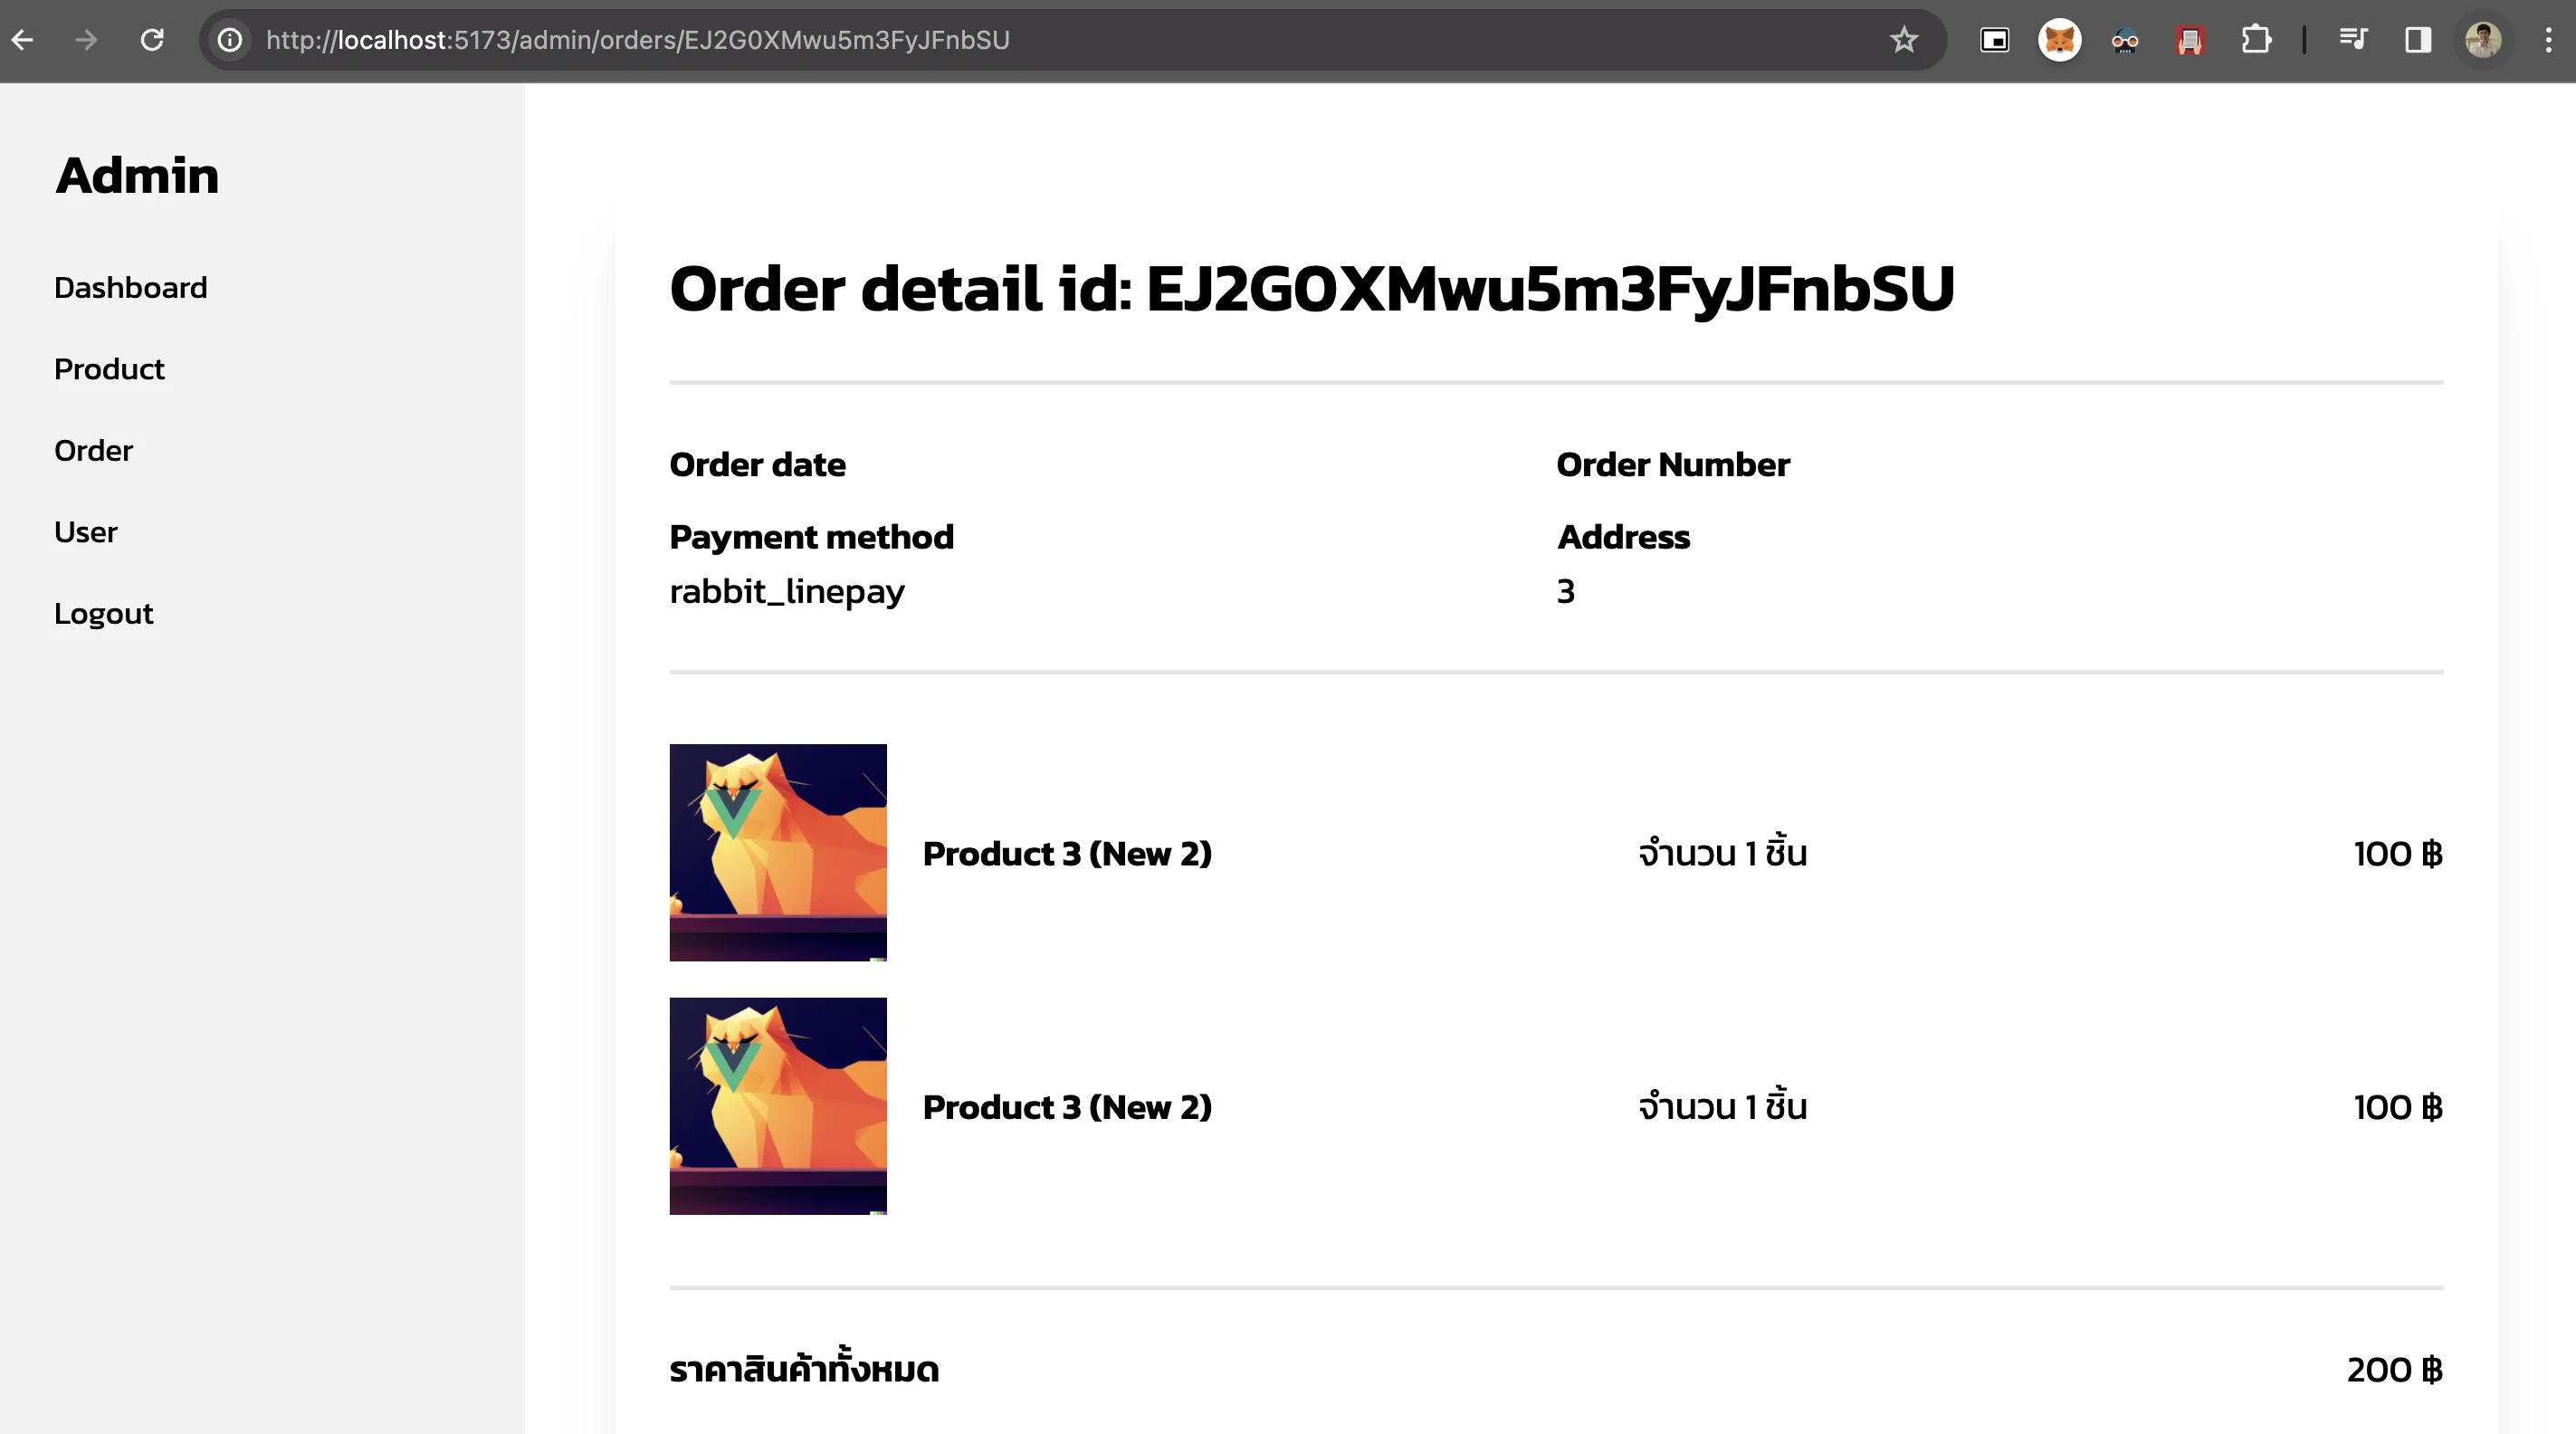
และนี่คือผลลัพธ์ของทั้งหมด
เพิ่มดึง stat ที่ Dashboard
ในส่วนของ Dashboard นั้น เราจะมีข้อมูลสรุปจากหลายชุดข้อมูลตั้งแต่
- orders = จำนวน order ทั้งหมดของระบบ
- products = จำนวน product ทั้งหมดของระบบ
- users = จำนวน user ทั้งหมดของระบบ
เราจะ
- ดึงผ่าน realtime database (เพื่อประหยัด read)
- เพิ่ม security rule เพื่อความแน่ใจว่ามีแค่ admin ที่ดูได้
สร้าง data ที่ realtime database และ security rule
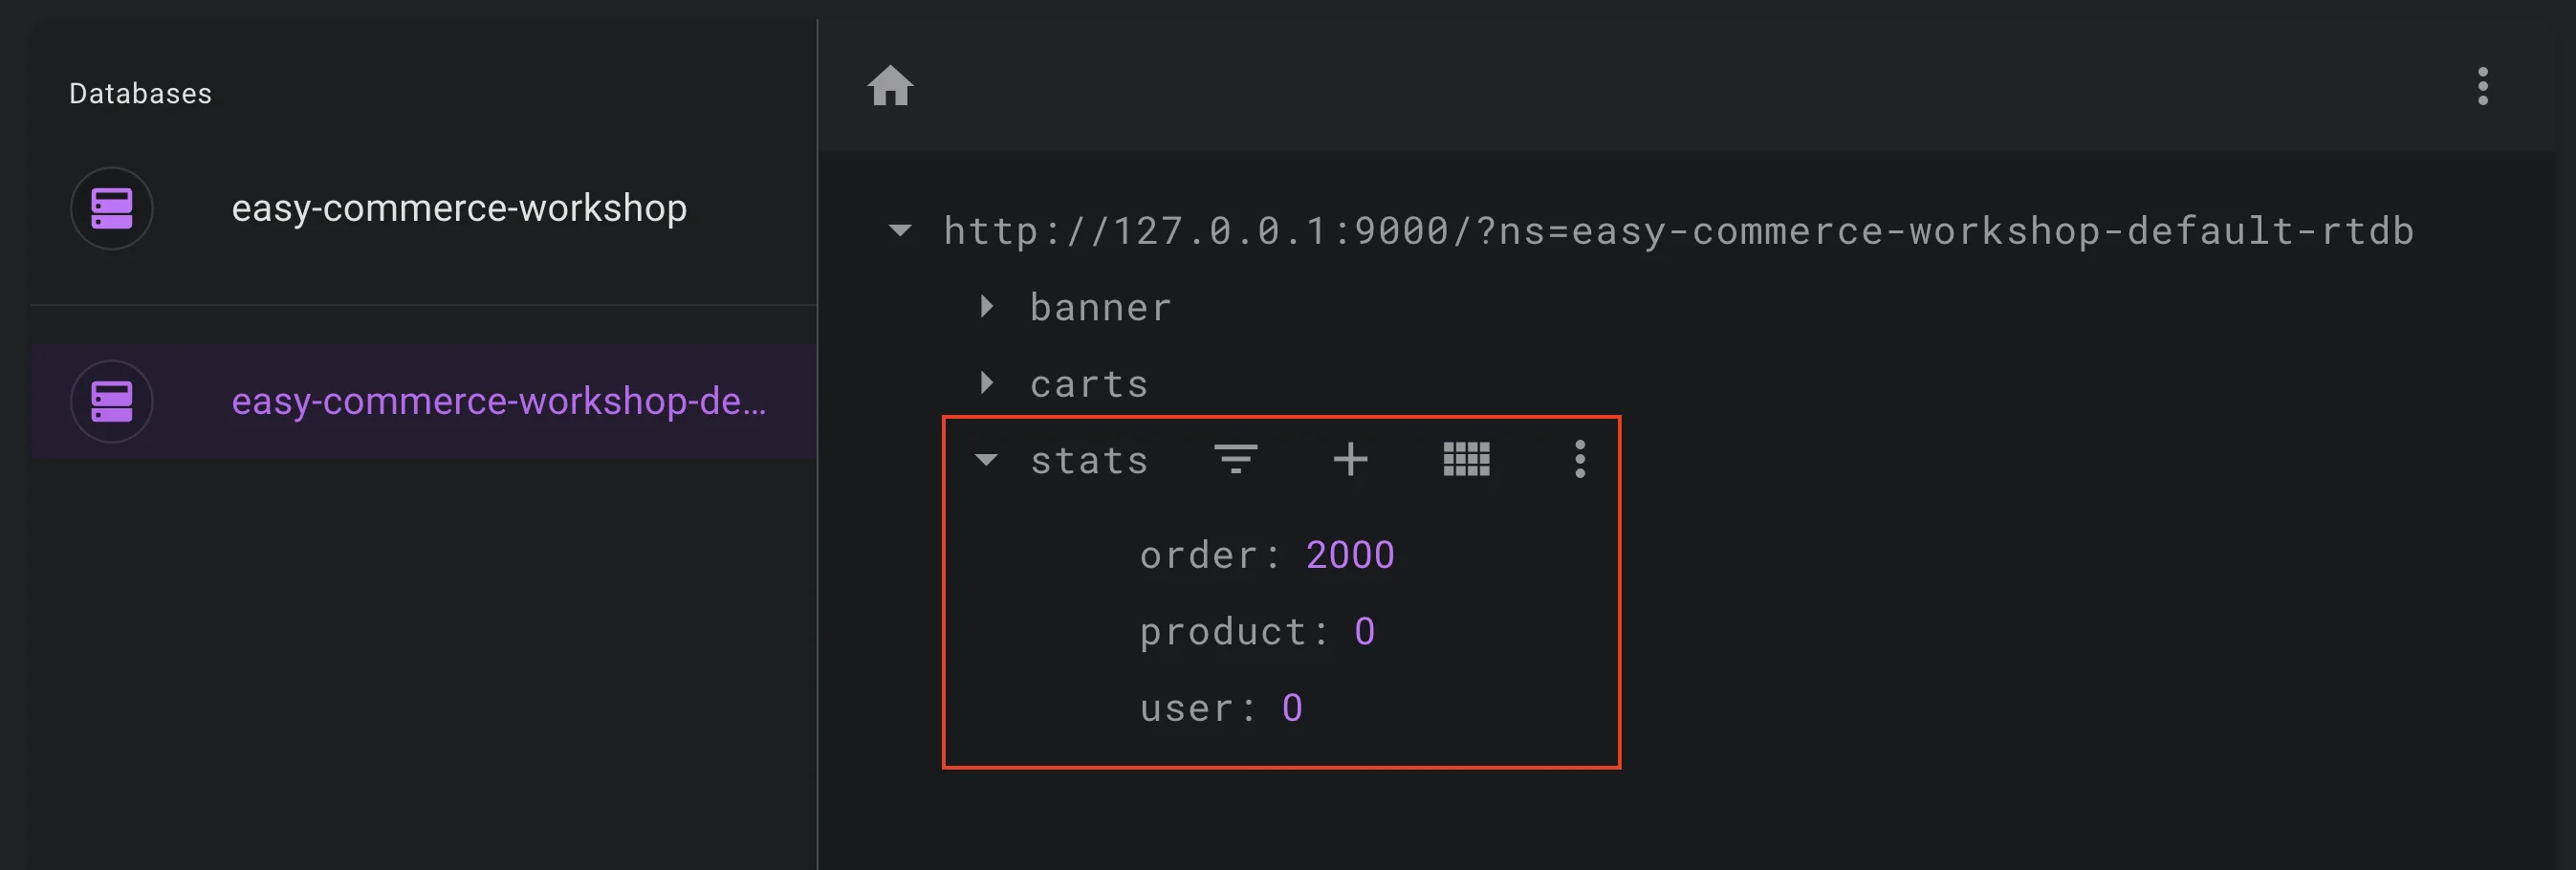
อย่างแรก เราจะสร้าง key stats เอาไว้ใน realtime database สำหรับให้ Dashboard ดึง
หลังจากนั้นทำการเพิ่ม security rule โดย
- ไม่อนุญาตให้เขียนทับได้เลย (แต่อย่างที่เคยบอก Firebase admin มีความสามารถทะลุ security rule ได้ = เราสามารถ update ผ่าน firebase admin ใน cloud function ได้)
- อนุญาตให้อ่านได้เฉพาะคนที่เป็น admin โดยเราจะเพิ่ม flag
isAdminคู่ไปใน Firebase Authentication
database.rules.json
{
  "rules": {
    "stats": {
      ".read": "auth != null && auth.isAdmin == true",
      ".write": false
    }
  }
}
Document ต้นฉบับ: https://firebase.google.com/docs/auth/admin/custom-claims
หลังจากนั้นไปเพิ่ม isAdmin ใน Firebase Authentication ตรง Custom claims (optional)
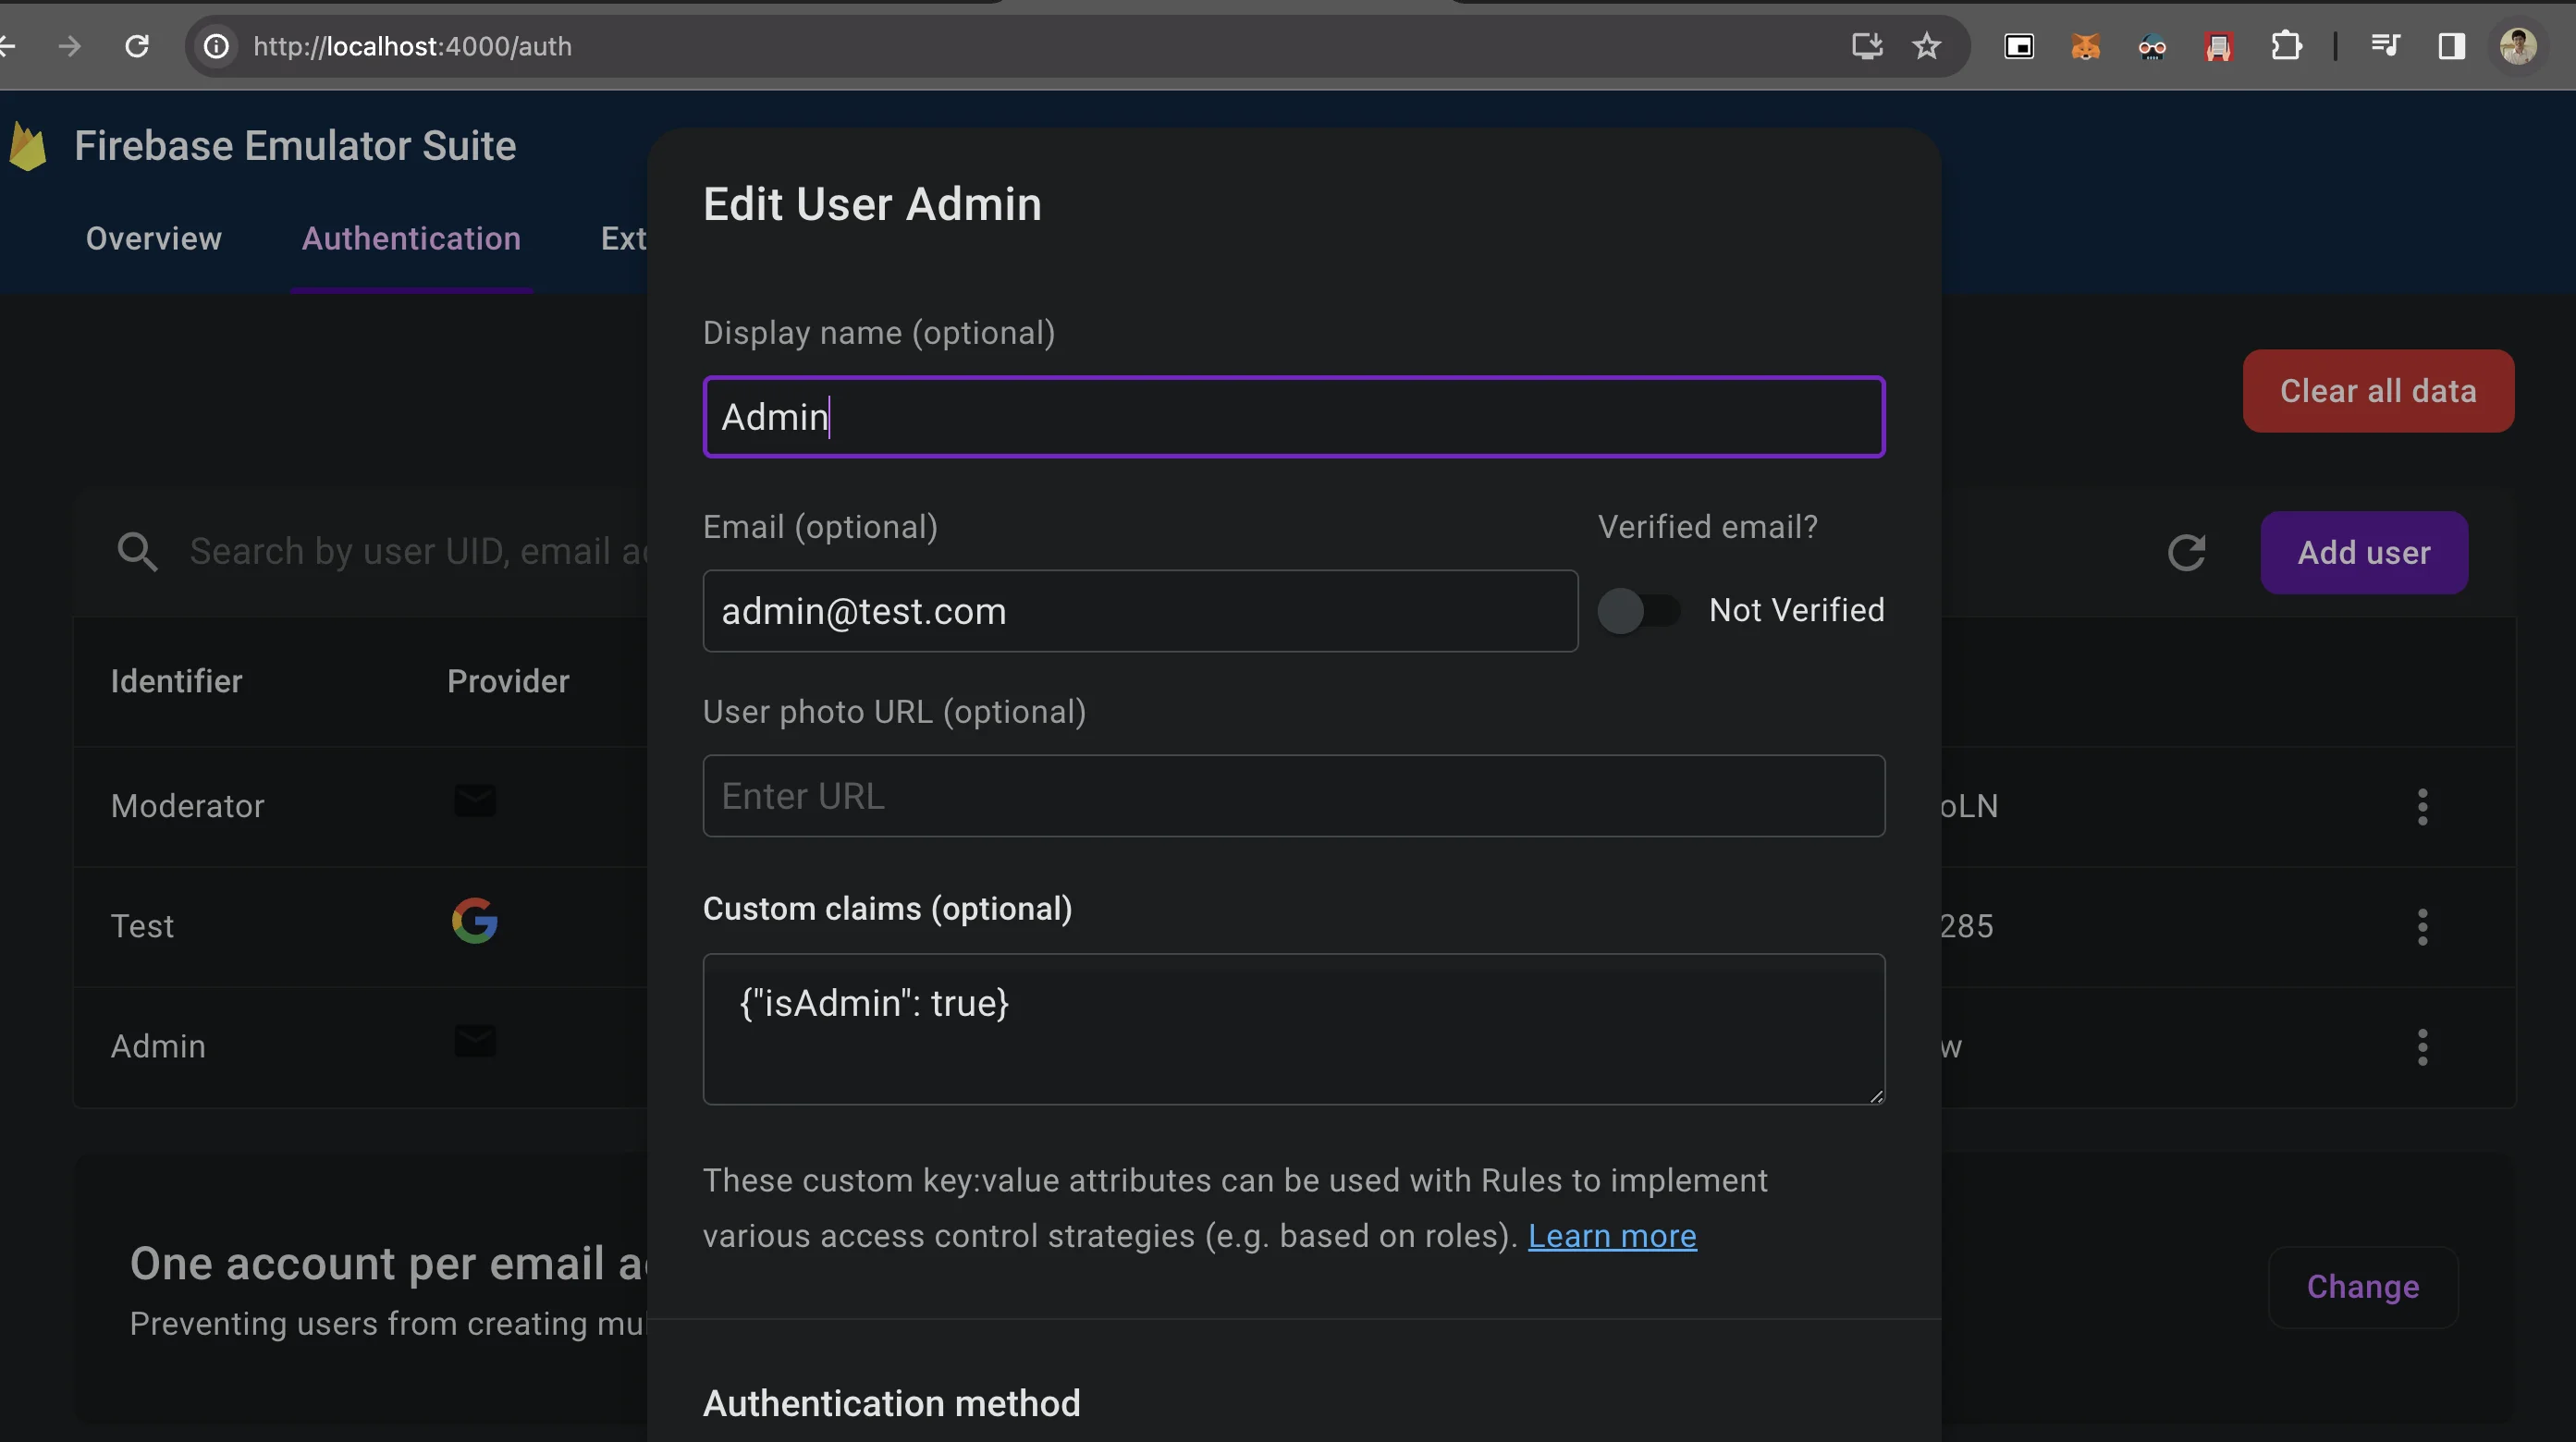
จะสามารถเรียกใช้จาก Firebase security ใน Service แต่ละตัวได้ (เป็น optional ให้สำหรับคนที่ไม่อยากให้มีการ check access ผ่าน Firestore)
ทำการดึงข้อมูลเข้า Dashboard
- สร้าง store ใหม่ ชื่อ
stores/admin/dashboard.jsขึ้นมาสำหรับจัดการ dashboard - ดึงข้อมูลผ่าน key stats ของ Realtime database
- นำไปแสดงที่
DashboardView.vue
ที่ stores/admin/dashboard.js
import { defineStore } from 'pinia'

import {
  realtimeDB
} from '@/firebase'

import {
  ref,
  get
} from 'firebase/database'

export const useDashboardStore = defineStore('dashboard', {
  state: () => ({
    stats: {
      order: 0,
      product: 0,
      user: 0
    }
  }),
  actions: {
    async loadDashboard () {
      try {
        const dashboardRef = ref(realtimeDB, 'stats')
        const dashboardData = await get(dashboardRef)
        this.stats = dashboardData.val()
      } catch (error) {
        console.log('error', error)
      }
    }
  }
})
ที่ DashboardView.vue
<script setup>
import { onMounted } from 'vue'
import AdminLayout from '@/layouts/AdminLayout.vue'

import { useDashboardStore } from '@/stores/admin/dashboard'

const dashboardStore = useDashboardStore()

onMounted(async () => {
  await dashboardStore.loadDashboard()
})

// Mock only
const barOption = {
  options: {
    chart: {
      id: 'vuechart-example'
    },
    xaxis: {
      categories: [1991, 1992, 1993, 1994, 1995, 1996, 1997, 1998]
    }
  },
  series: [{
    name: 'series-1',
    data: [30, 40, 45, 50, 49, 60, 70, 91]
  }]
}

const donutOption = {
  options: {},
  series: [44, 55, 41, 17, 15]
}
</script>

<template>
  <AdminLayout>
    <h1 class="text-4xl mb-4">Dashboard</h1>
    <div class="flex mb-4">
      <div class="stats w-full shadow">
        <div class="stat">
          <div class="stat-figure text-secondary">
            <svg xmlns="http://www.w3.org/2000/svg" height="1em" viewBox="0 0 320 512"><!--! Font Awesome Free 6.4.2 by @fontawesome - https://fontawesome.com License - https://fontawesome.com/license (Commercial License) Copyright 2023 Fonticons, Inc. --><path d="M144 0c-17.7 0-32 14.3-32 32V64H37.6C16.8 64 0 80.8 0 101.6V224v41.7V288 406.3c0 23 18.7 41.7 41.7 41.7H112v32c0 17.7 14.3 32 32 32s32-14.3 32-32V448h32c61.9 0 112-50.1 112-112c0-40.1-21.1-75.3-52.7-95.1C280.3 222.6 288 200.2 288 176c0-61.9-50.1-112-112-112V32c0-17.7-14.3-32-32-32zM112 128v96H64V128h48zm64 96V128c26.5 0 48 21.5 48 48s-21.5 48-48 48zm-64 64v96H64V288h48zm64 96V288h32c26.5 0 48 21.5 48 48s-21.5 48-48 48H176z"/></svg>
          </div>
          <div class="stat-title">Orders</div>
          <div class="stat-value">{{ dashboardStore.stats.order }}</div>
        </div>
        <div class="stat">
          <div class="stat-figure text-secondary">
            <svg xmlns="http://www.w3.org/2000/svg" height="1em" viewBox="0 0 448 512"><!--! Font Awesome Free 6.4.2 by @fontawesome - https://fontawesome.com License - https://fontawesome.com/license (Commercial License) Copyright 2023 Fonticons, Inc. --><path d="M448 80v48c0 44.2-100.3 80-224 80S0 172.2 0 128V80C0 35.8 100.3 0 224 0S448 35.8 448 80zM393.2 214.7c20.8-7.4 39.9-16.9 54.8-28.6V288c0 44.2-100.3 80-224 80S0 332.2 0 288V186.1c14.9 11.8 34 21.2 54.8 28.6C99.7 230.7 159.5 240 224 240s124.3-9.3 169.2-25.3zM0 346.1c14.9 11.8 34 21.2 54.8 28.6C99.7 390.7 159.5 400 224 400s124.3-9.3 169.2-25.3c20.8-7.4 39.9-16.9 54.8-28.6V432c0 44.2-100.3 80-224 80S0 476.2 0 432V346.1z"/></svg>
          </div>
          <div class="stat-title">Products</div>
          <div class="stat-value">{{ dashboardStore.stats.product }}</div>
        </div>
        <div class="stat">
          <div class="stat-figure text-secondary">
            <svg xmlns="http://www.w3.org/2000/svg" fill="none" viewBox="0 0 24 24" class="inline-block w-8 h-8 stroke-current"><path stroke-linecap="round" stroke-linejoin="round" stroke-width="2" d="M12 6V4m0 2a2 2 0 100 4m0-4a2 2 0 110 4m-6 8a2 2 0 100-4m0 4a2 2 0 110-4m0 4v2m0-6V4m6 6v10m6-2a2 2 0 100-4m0 4a2 2 0 110-4m0 4v2m0-6V4"></path></svg>
          </div>
          <div class="stat-title">Users</div>
          <div class="stat-value">{{ dashboardStore.stats.user }}</div>
        </div>
      </div>
    </div>
    <div class="flex flex-col md:flex-row gap-2">
      <div class="flex-1">
        <div class="card w-full p-6 bg-base-100 shadow-xl">
          <h1>ยอดขาย</h1>
          <apexchart type="bar" :options="barOption.options" :series="barOption.series"></apexchart>
        </div>
      </div>
      <div class="flex-1">
        <div class="card w-full p-6 bg-base-100 shadow-xl">
          <h1>ประเภทการขาย</h1>
          <apexchart type="donut" :options="donutOption.options" :series="donutOption.series"></apexchart>
        </div>
      </div>
    </div>
  </AdminLayout>
</template>
เพียงเท่านี้เราจะสามารถดึงข้อมูลผ่าน realtime database ได้แล้ว