

Redux และ React
/ 18 min read
 สามารถดู video ของหัวข้อนี้ก่อนได้ ดู video
Redux คืออะไร
Redux คือ open source Javascript library ที่ใช้สำหรับจัดการ state ภายใน application โดยเป็นการนำ state มาไว้เป็นศูนย์กลางของการเก็บข้อมูลแทน โดยปกติจะใช้ร่วมกับ Single page web applications (SPA) และบ่อยครั้งก็ใช้ร่วมกับ framework อย่าง React ที่แม้ React จะมี library หลายตัว support ก็ตาม แต่ Redux ก็ยังคงเป็น 1 library ที่ยังคงสามารถจัดการ State ได้ดีเช่นกัน
Idea ใหญ่ๆของ Redux คือการจัดการ state ภายใน application โดยจะเป็นตัวทั้งจัดการและ update state ทั้งหมดภายใน application เพื่อให้ state นั้นเกิดความ consistent กันทั้ง application ออกมาได้ (ให้อารมณ์เหมือนมีคนจัดการข้อมูลอยู่ตรงศูนย์กลาง และเมื่อมีการเรียกใช้หรือแก้ไขข้อมูลอะไร ก็จะต้องแก้ข้อมูลจากศูนย์กลางนั้น) โดย core priciples หลักๆของ Redux จะมีประมาณนี้
- Single Source of Truth โดย application อะไรก็ตามที่ใช้ Redux ทั้ง application จะเปลี่ยนมาจัดการ state ผ่าน redux โดยใช้ Javascript object ที่เรียกกันว่า
storeเพื่อให้ทั้ง application มีศูนย์กลางในการจัดการข้อมูลเพียงที่เดียว และมีข้อมูลเพียงชุดเดียวที่ใช้สำหรับการจัดการ application ออกมาได้ - State ที่ถูกสร้างมาเพื่อ Read-Only โดยใน Redux นั้นจะไม่สามารถแก้ไข state ของ redux (store) โดยตรงได้ โดยจะต้องทำผ่านการส่ง action (dispatch) เพื่อเป็นการสื่อสารไปยัง store ว่าจะขอแก้ไข และจัดการผ่าน Reducer ที่ทำหน้าที่ในการ handle action ที่ส่งเข้ามาและทำการ modified เป็น state ใหม่ออกมาแทนการแก้ไข store ตรงๆออกมาได้ = ส่งผลทำให้มีเพียงแค่การส่ง action เท่านั้นที่สามารถแก้ไข store ได้ ทำให้ code ระหว่าง store และ component แยกส่วนในการจัดการออกจากกันได้
- ให้การเปลี่ยนแปลงเป็น Pure function โดย Reducers นั้นถูก design ให้มาเป็น pure function ที่จะทำการนำ state ปัจจุบัน และ action ทางเข้าเป็น input เข้ามาใหม่เพื่อนำข้อมูลมาทำเป็น state ใหม่โดยไม่จำเป็นต้องแก้ไข state ปัจจุบันได้
- รวมถึง มีอุปกรณ์ที่สามารถ Debug การเดินทางของข้อมูลผ่าน Redux’s architecture ได้ โดยสามารดูจากการใช้เครื่องมือ record กับ replay action ออกมาได้
โดยการใช้ Redux นั้นจะเป็นการกำหนด
- action เพื่ออธิบายว่าระบบนี้สามารถทำอะไรได้บ้าง (action คือสิ่งที่สามารถแก้ไข store ได้)
- reducer ที่สามารถระบุได้ว่า state สามารถเปลี่ยนแปลงไปยังไงได้บ้างจาก action
- store เพื่อทำการเก็บ application state เอาไว้
โดยการใช้ redux นั้นสามารถช่วยในการจัดการ application ที่มีการจัดการ state ที่ซับซ้อนได้ โดยการให้ state รวมจัดการที่ store ที่ดียวกัน และจัดการ application ภายในที่เดียวกันได้ ซึ่งนี่คือข้อดีเทียบกับการใช้ state แยกแต่ละ Component ทำให้การ debug state ของ application มาอยู่ที่ Redux ที่เดียวได้นั่นเอง
องค์ประกอบของ Redux
เพื่อให้เป็นภาพชัดมากขึ้นเรื่อง store, action, reducer เรามาดูภาพรวมองค์ประกอบของ Redux กันก่อน
graph LR
    A[Action] -->|dispatched| S[Store]
    S -->|current state| V[View]
    V -->|dispatch action| A
    S -->|new state| R[Reducer]
    R -->|defines how state changes| S
จาก diagram นี้เรามารู้จักแต่ละองค์ประกอบแบบไล่ flow ไปกัน
1. Store และ Reducer
เริ่มต้นที่ Store และ Reducer กันก่อน
- Store คือส่วนที่เก็บข้อมูลไว้เป็นส่วนกลางเป็น Javascript Object ที่ทำการเก็บ application state เอาไว้ โดยใน Redux นั้นจะมีเพียงแค่ store เดียวที่ทำการเก็บ state ทั้งหมดของ appilcation ไว้ โดย store นั้นจะโดนส่งต่อไปยัง reducer เพื่อให้ reducer สามารถจัดการร่วมกับ action ต่อได้ รวมถึงสามารถ subscribe เพื่อตรวจจับ change ที่เกิดขึ้นใน state ปัจจุบันได้ โดย store นั้นมีหน้าที่ในการรวม action และ reducer เข้าด้วยกัน
- Reducer คือ pure function ที่นำ state ปัจจุบันของ application และข้อมูลที่ส่งผ่าน action เข้ามา (โดยปกติจะเรียกว่า payload) เพื่อนำมา return กัลบมาเป็น state ใหม่ออกมาได้ โดย reducer นั้นทำหน้าที่ในการจัดการเปลี่ยน state ตาม action ที่กำหนดไว้ใน reducer ได้ โดย Reducer นั้นต้องเป็น pure function เพื่อไม่ให้เกิด site effect จากการดึงข้อมูลภายนอกมาใช้ได้ (ต้องป้องกันไม่ให้มีการ modified state โดยตรง)
เพื่อให้เห็นภาพมากขึ้นเรามาดูผ่าน code ตัวอย่างของ store และ reducer กัน
import { INCREMENT, DECREMENT, SET_COUNT } from "../actions/counterActions";
const initialState = {  count: 0,};
const counterReducer = (state = initialState, action) => {  switch (action.type) {    case INCREMENT:      return {        ...state,        count: state.count + 1,      };    case DECREMENT:      return {        ...state,        count: state.count - 1,      };    case SET_COUNT:      return {        ...state,        count: action.payload, // Set the count directly from the action's payload      };    default:      return state;  }};
export default counterReducer;
จาก code ด้านบนนี่ เรามีการประกาศใช้ counterReducer สำหรับ Redux store ที่ใช้สำหรับจัดการ state ของ counter ภายใน application ตัวนี้ เมื่อเราลอง break down แต่ละส่วนออกมา จะมีองค์ประกอบตามนี้
- มี
initialStateตั้งค่าสถานะเริ่มต้นของ counter โดยมีการกำหนดcountเริ่มต้นที่0โดย state นี้จะถูกใช้จากการที่ reducer ถูกเรียกครั้งแรกและทำการส่งออกเป็นจาก default ของ reducer ออกมา (เป็น state เริ่มต้นของ counter ใน application) - มี Reducer function
counterReducerเป็นการกำหนดว่า state สามารถเปลี่ยนแปลงยังไงได้บ้างจาก action ที่ส่งเข้ามา เพื่อเปลี่นแปลงค่าต่อไปยัง store โดยstateนั้นคือ state ปัจจุบันของ application และ การ return คือการส่ง state ใหม่โดยแยกตามเคสของ action แต่ละตัวออกมา - อย่างที่เห็นใน Reducer เราจะมีการแยก case แต่ละ action ออกมา โดย
actionคือ object ที่นำเสนอถึง action ที่สามารถส่งเข้ามายัง reducer ได้ โดยactionจะต้องกำหนดtype(ประเภทของ action ที่ส่งเข้ามา) และpayload(ข้อมูลที่ส่งเข้ามาคู่กับ action) - โดย
switch caseนั้น เราจะเรียกว่า Action Handling คือการใช้ switch ในการแยกเส้นทางของ action เพื่อเป็นการกำหนดการ update state ออกมา โดยตัวอย่างจากในเคสนี้คือ- action
INCREMENTสำหรับ เพิ่ม count ใน state ไป 1 - action
DECREMENTสำหรับ ลด count ใน state ไป 1 - action
SET_COUNTสำหรับ update count ตามค่าที่ส่งมาผ่านpayloadใน action
- action
- โดยเพื่อให้ action นั้นมีการจัดการจากที่เดียวกัน ทั้งจากฝั่งแยก case ของ action (ที่ Reducer ใช้) และ case ของ component (ฝั่งที่ส่ง action เข้ามาที่ reducer) เราจะมีการสร้างไฟล์ action แยกออกมา เพื่อให้ action มี spec ที่ตรงกันได้ ผ่านไฟล์
counterAction.js(เดี๋ยวเราจะพูดในหัวข้อต่อไป)
และ ท้ายที่สุดเมื่อทำการสร้าง reducer เรียบร้อย เราจะต้องนำ reducer นั้นส่งไปยัง process ของการสร้าง store โดยเราจะทำการส่ง counterReducer ไป register store ผ่าน คำสั่ง createStore ใน Redux เช่นแบบนี้
import { createStore } from "redux";import counterReducer from "./reducers/counterReducer";
const store = createStore(counterReducer);
คำสั่งนี้ก็จะเป็นคำสั่งที่สามารถทำให้เรียกใช้ store counter จาก Redux ได้
2. Actions
Action คือ Javascript object ที่นำเสนอ intention (ระบุสิ่งที่จะทำ) ของการเปลี่ยนแปลง state ของ application โดย Action นั้นจะต้องประกอบด้วย
typeเพื่อเป็นการบอกประเภทของ action ที่จะทำ (intention) โดยจะเป็นการระบุเป็น string constantspayload(optional) คือ data หรือข้อมูลที่จะส่งร่วมกับ action ประเภทนั้น โดย Action เป็น “ทางเดียว” ที่สามารถส่ง data เข้าไปยัง store ได้ (อย่างที่บอก store จะไม่มีวิธีแก้ไขโดยตรงได้นอกเหนือจากการส่งผ่าน action) โดย payload นั้นจะเป็นข้อมูลประกอบเพื่อให้สามารถแปลง store เป็นยัง state ต่อไปได้
นี่คือตัวอย่าง code ของ Action
// Existing Action Typesexport const INCREMENT = "INCREMENT";export const DECREMENT = "DECREMENT";
// New Action Typeexport const SET_COUNT = "SET_COUNT";
// Existing Action Creatorsexport const increment = () => ({  type: INCREMENT,});
export const decrement = () => ({  type: DECREMENT,});
// New Action Creator with Payloadexport const setCount = (count) => ({  type: SET_COUNT,  payload: count,});
องค์ประกอบของแต่ละส่วนประกอบด้วย
- Action Types
- จุดประสงค์ ประเภทของ Action คือค่า constant แทนชนิดของ Action ที่สามารถส่งไปยัง Redux store เพื่อกระตุ้นให้เกิดการเปลี่ยนแปลง state ของ Redux ซึ่งช่วยทำให้ชื่อ Action ต่างๆ เป็นไปในทางเดียวกัน และลดความเสี่ยงที่จะพิมพ์ชื่อ Action ผิดในหลายๆ ส่วนของ application
- โดยประเภทของ Action ที่กำหนดไว้ใน code นี้จะมี
INCREMENTแทนประเภทของ Action ที่ใช้ในการเพิ่มค่า counterDECREMENTแทนประเภทของ Action ที่ใช้ในการลดค่า counterSET_COUNTประเภทของ Action ใหม่สำหรับกำหนดค่า counter ให้มีค่าเป็นตัวเลขตามที่ส่งค่าเข้ามา
2. Action Creators
- จุดประสงค์ Action Creator เป็น function ที่สร้างและ return Object ของ Action จากนั้น Object เหล่านี้จะถูกส่งไปยัง Redux store เพื่อกระตุ้นให้เกิดการเปลี่ยนแปลง state ขึ้นมาใน Reducer
- โดย function ที่มีจาก code นี้จะมี
increment()สร้าง Action เพื่อเพิ่มค่า counter และ return Object ของ Action ที่มีประเภท INCREMENTdecrement()สร้าง Action เพื่อลดค่า counter และ return ของ Action ที่มีประเภทเป็น DECREMENTsetCount(count)สร้าง Action เพื่อกำหนดค่า counter เป็นตัวเลขตามที่ส่งค่าเข้ามา (ซึ่งก็คือ count ใน parameter) และ return object ของ Action ที่มีประเภทเป็น SET_COUNT และมี payload เป็นค่า count ที่ส่งเข้ามา
- ท้ายที่สุด return ของ Action Creator ก็จะโดนส่งต่อไปยัง function ของ Reducer และทำงานต่อใน Reducer ได้
3. Dispatch
dispatch ที่มีอยู่บน store นั้นทำหน้าที่เหมือน “พนักงานส่งข้อความ” คอยส่ง “คำสั่ง” (action) ไปยัง store โดยคำสั่งเหล่านี้เป็นเพียง Object JavaScript ธรรมดาที่บอกให้ application เปลี่ยนแปลงสถานะตัวเอง
พูดอีกอย่างคือ dispatch คือ “ช่องทางเดียว” ที่ทำให้ state ของ application Redux เปลี่ยนแปลงได้
เมื่อมีคำสั่งถูกส่งออกไป (dispatch) Redux จะส่งคำสั่งนั้นไปยังฟังก์ชัน reducer ที่เกี่ยวข้องกับ store โดย reducer จะทำหน้าที่ตัดสินใจว่าจะเปลี่ยนสถานะอย่างไร ขึ้นอยู่กับ “ประเภท” ของคำสั่ง (ที่มีการ handle ผ่าน switch case ใน reducer ไว้และบางครั้งอาจขึ้นอยู่กับข้อมูลอื่นๆ ในคำสั่งด้วย เช่น payload)
สิ่งสำคัญคือ สถานะของ Redux นั้นเป็นแบบ immutable ไม่สามารถแก้ไขโดยตรง ดังนั้น reducer จะต้องสร้างอ็อบ Object ขึ้นมาแทนที่ของเดิมเสมอ เพื่อแสดงถึงสถานะใหม่ของ application
เปรียบเทียบง่ายๆ คิดว่า dispatch เหมือนกับพนักงานส่งคำสั่งไปยังแผนกต่างๆ ในบริษัท แผนกเหล่านั้น (reducer) ก็จะรับคำสั่งไปปรับเปลี่ยนวิธีการทำงานของตัวเองตามความเหมาะสม และผลลัพธ์สุดท้ายจะสะท้อนออกมาเป็นการเปลี่ยนแปลงของบริษัทโดยรวม (สถานะทั้งหมดของ application)
นี่คือ code ตัวอย่างของ dispatch
import React, { useState } from "react";import { useSelector, useDispatch } from "react-redux";import { increment, decrement, setCount } from "../actions/counterActions";
const Counter = () => {  const count = useSelector((state) => state.count);  const dispatch = useDispatch();  const [newCount, setNewCount] = useState(0); // Local state to hold the input value
  return (    <div>      <h2>Counter: {count}</h2>      <button onClick={() => dispatch(increment())}>Increment</button>      <button onClick={() => dispatch(decrement())}>Decrement</button>      <div>        <input          type="number"          value={newCount}          onChange={(e) => setNewCount(Number(e.target.value))}        />        <button onClick={() => dispatch(setCount(newCount))}>Set Count</button>      </div>    </div>  );};
export default Counter;
code นี้เป็นตัวอย่างการใช้งาน Redux ใน React เพื่อจัดการ state ของ counter ซึ่งเป็นส่วนประกอบที่แสดงจำนวนนับ (count) ที่มีความสามารถในการเพิ่ม ลด และตั้งค่าจำนวนนับตามค่าที่ผู้ใช้กำหนด โดย
- มี
useSelectorใช้เพื่อเข้าถึงสถานะใน store ของ Redux ในตัวอย่างนี้ถูกใช้เพื่ออ่านค่าcountจา ก state ปัจจุบันเข้ามาที่ Component - มี
useDispatchfunction ที่ให้ใช้ในการส่ง action (dispatch) ไปยัง store ของ Redux ซึ่งในที่นี้จะใช้เพื่อเรียก action ทั้ง 3 ตัว (เหมือนกับตัวอย่างก่อนหน้า) คือincrement,decrement, และsetCount - เมื่อผู้ใช้คลิกปุ่ม “Increment” หรือ “Decrement”
dispatchจะถูกเรียกพร้อมกับ actionincrement()หรือdecrement()ตามลำดับ ซึ่งจะส่ง action ไปยัง store และทำให้ค่าcountใน state เพิ่มขึ้นหรือลดลง (จาก reducer) - ส่วนที่เกี่ยวกับการใส่ค่าเลขจาก user เมื่อ user ใส่ค่าและคลิกปุ่ม “Set Count” action
setCount(newCount)จะถูกส่งไปยัง store ด้วยค่าnewCountที่ผู้ใช้กำหนด ซึ่งจะ update ค่าcountใน state เป็นค่าที่ผู้ใช้กำหนดได้
การใช้ dispatch ใน Redux คือหัวใจหลักในการเปลี่ยนแปลง state ของ application มันช่วยให้สามารถจัดการการ update state ได้อย่างเป็นระเบียบและมีประสิทธิภาพ โดยทำให้กระบวนการเปลี่ยนแปลง state นั้นสามารถคาดการณ์ได้และง่ายต่อการติดตาม นอกจากนี้ยังช่วยให้สามารถแยกความรับผิดชอบของการอ่าน state (ผ่าน useSelector) และการ update state (ผ่าน dispatch) ออกจากกัน ทำให้ code ดู clean มากขึ้นและ maintain ง่ายมากขึ้นเช่นเดียวกัน
นี่คือตัวอย่างภาพรวมของ Redux การส่งข้อมูลจาก view > dispatch > action > reducer > state > view อย่างที่เห็น เมื่อมีการใช้ Redux จะเป็นการ handle state ภายในระบบทางเดียว และจะมีเพียงวิธีเดียวที่สามารถเปลี่ยนข้อมูลใน state ได้ ดังนั้น การ design Redux application เองจะคำนึงถึงการสร้าง action และ reducer (store) เป็นหลักว่าจะใช้ในจุดไหนของ application บ้าง โดยจะ “ไม่ขึ้นอยู่กับ View ที่เรียกใช้” เดี๋ยวเราลองมาดูตัวอย่างที่ลึกซึ้งขึ้นอีกนิดจากตัวอย่างในบทความนี้กัน
มาลองใช้ Redux กัน
ตัวอย่างที่หยิบมาทำกัน จะเป็นการจำลองระบบ user management ขึ้นมา โดย
- มีหน้า list user ทั้งหมดออกมา
- สามารถเข้าไปดูและแก้ไข user แต่ละตัวได้
- ต่อเข้ากับ Mock API (โดยใช้ redux-thunk เป็น middleware สำหรับต่อ API ได้)
เพื่อให้เห็นภาพการใช้งาน action, reducer, store มากขึ้น มาเริ่ม setup project กันโดย
- เราจะใช้ vite สร้าง react ขึ้นมา (เพื่อเริ่มต้น project ตั้งแต่แรกโดยไม่มี template อื่นๆเข้ามาเกี่ยวข้องกัน)
- ใช้ tailwind และ เพิ่ม router เข้ามา (react-router-dom) เพื่อให้สามารถไปมาระหว่างหน้าได้ (ทั้งหมดนี้ ผมเคยแชร์ไว้เรียบร้อยในหัวข้อ React Hook และ Component สามารถไปอ่านเพิ่มเติมได้เช่นกันนะครับ)
เริ่มต้นให้ start project react จาก vite มา
# Start project react ด้วย Vitenpm create vite@latest my-redux-app -- --template react
# ทำการลง package ที่เกี่ยวกับ redux และยิง APInpm i redux react-redux redux-thunk axios react-router-dom
นี่คือโครงสร้างไฟล์ทั้งหมดของ project นี้ (เฉพาะส่วนที่เกี่ยวข้อง)
├── package.json├── src│ ├── App.jsx│ ├── actions│ │ └── userActions.js│ ├── main.jsx│ ├── pages│ │ ├── UserEdit.jsx│ │ └── UserList.jsx│ ├── reducers│ │ └── userReducer.js│ └── store.js├── tailwind.config.js└── vite.config.jsSetup Redux store - action - reducer
อย่างที่เห็นเรามีการแยก 3 files ออกจากกันคือ
store.jsสำหรับ register store เข้า reduxactions/userActions.jsสำหรับประกาศ action type ของ user เอาไว้reducers/userReducer.jsสำหรับวาง reducer ของ user เอาไว้
เมื่อเรามาดูจากที่ actions/userActions.js กัน ก็จะเจอ source code หน้าตาประมาณนี้
import axios from "axios";
export const ActionTypes = {  FETCH_USERS: "FETCH_USERS",  FETCH_USER: "FETCH_USER",  CREATE_USER: "CREATE_USER",  EDIT_USER: "EDIT_USER",  DELETE_USER: "DELETE_USER",};
const apiUrl = "https://65a25d5342ecd7d7f0a771bd.mockapi.io/users";
export const fetchUsers = () => async (dispatch) => {  const response = await axios.get(apiUrl);  dispatch({ type: ActionTypes.FETCH_USERS, payload: response.data });};
export const fetchUser = (userId) => async (dispatch) => {  const response = await axios.get(`${apiUrl}/${userId}`);  dispatch({ type: ActionTypes.FETCH_USER, payload: response.data });};
export const createUser = (user) => async (dispatch) => {  try {    const response = await axios.post(apiUrl, user);    dispatch({ type: ActionTypes.CREATE_USER, payload: response.data });    return { success: true };  } catch (error) {    return { success: false, message: error.message };  }};
export const editUser = (user) => async (dispatch) => {  try {    const response = await axios.put(`${apiUrl}/${user.id}`, user);    dispatch({ type: ActionTypes.EDIT_USER, payload: response.data });    return { success: true };  } catch (error) {    return { success: false, message: error.message };  }};
export const deleteUser = (userId) => async (dispatch) => {  await axios.delete(`${apiUrl}/${userId}`);  dispatch({ type: ActionTypes.DELETE_USER, payload: userId });};
Code ด้านนี้เป็นตัวอย่างของ action creators ใน Redux ที่ใช้สำหรับจัดการกับการเรียก API เพื่อดำเนินการกับข้อมูลผู้ใช้ (users) โดยมีการใช้ axios เพื่อทำการเรียก API (ที่เดี๋ยวจะไปใช้ร่วมกับ middleware อย่าง Redux Thunk สำหรับการจัดการกับ asynchronous actions) โดย Action Type ประกอบด้วย
FETCH_USERSใช้สำหรับเรียกดูข้อมูลผู้ใช้ทั้งหมดจาก APIFETCH_USERใช้สำหรับเรียกดูข้อมูลผู้ใช้ตามuserIdที่ระบุCREATE_USERใช้สำหรับสร้างผู้ใช้ใหม่ใน APIEDIT_USERใช้สำหรับแก้ไขข้อมูลผู้ใช้ที่มีอยู่ใน APIDELETE_USERใช้สำหรับลบผู้ใช้จาก API
และ Action
- fetchUsers เป็น function ที่ทำการเรียกข้อมูลผู้ใช้ทั้งหมดจาก API แล้วส่งข้อมูลผู้ใช้ที่ได้ไปยัง reducer ผ่าน
dispatch - fetchUser เป็น function ที่เรียกข้อมูลผู้ใช้เฉพาะตาม
userIdจาก API แล้วส่งข้อมูลนั้นไปยัง reducer - createUser เป็น function ที่สร้างผู้ใช้ใหม่บน API ด้วยข้อมูลผู้ใช้ที่ส่งเข้ามาผ่าน
payloadโดยหาก API ทำส่งข้อมูลสร้างสำเร็จ จะส่งข้อมูลผู้ใช้ใหม่ไปยัง reducer - editUser เป็น function ที่แก้ไขข้อมูลผู้ใช้ที่มีอยู่บน API ด้วยข้อมูลใหม่ส่งเข้ามาผ่าน
payload - deleteUser เป็น function ที่ลบผู้ใช้จาก API ตาม
userIdที่ระบุและไม่มีการส่งข้อมูลกลับไปยัง reducer นอกจากuserIdเพื่อยืนยันการลบว่าลบสำเร็จเรียบร้อย
และ ต่อมาที่ reducer ไฟล์ reducers/userReducer.js
import { ActionTypes } from "../actions/userActions";
const initialState = {  users: [],  currentUser: null,};
const userReducer = (state = initialState, action) => {  switch (action.type) {    case ActionTypes.FETCH_USERS:      return { ...state, users: action.payload };    case ActionTypes.FETCH_USER:      return { ...state, currentUser: action.payload };    case ActionTypes.CREATE_USER:      return { ...state, users: [...state.users, action.payload] };    case ActionTypes.EDIT_USER:      return {        ...state,        users: state.users.map((user) => (user.id === action.payload.id ? action.payload : user)),      };    case ActionTypes.DELETE_USER:      return {        ...state,        users: state.users.filter((user) => user.id !== action.payload),      };    default:      return state;  }};
export default userReducer;
จาก code ด้านบนเป็นการประกาศ Reducer สำหรับจัดการข้อมูลผู้ใช้ (users) โดยมีหน้าที่รับ action เพื่อ update state ของ store ตาม logic ที่กำหนดไว้ โดยตัว reducer จะจัดการกับหลาย actions ที่เกี่ยวข้องกับการดึงข้อมูลผู้ใช้, การสร้างผู้ใช้ใหม่, การแก้ไข, และการลบผู้ใช้ (ตาม action type ที่ส่งเข้ามา) โดย
- มี initialState ที่มี
**users**เป็น array ว่างเปล่า สำหรับเก็บ list ของ user และcurrentUserสำหรับเก็บข้อมูล user ที่กำลังดูอยู่
และ action กับ state ก็จะมีตามนี้
- FETCH_USERS เมื่อ action นี้ถูก dispatch reducer จะ update state
usersด้วย list user ที่ได้มาจาก payload (ค่าที่ส่งต่อมาจาก API) - FETCH_USER เมื่อ action นี้ถูก dispatch reducer จะ update
currentUserด้วยข้อมูล user ตาม id ที่ได้มาจาก payload (ค่าที่ส่งต่อมาจาก API) - CREATE_USER เมื่อมีการสร้างผู้ใช้ใหม่ state
usersจะถูก update โดยการเพิ่มผู้ใช้ใหม่นั้นเข้าไปในusersarray ของ state - EDIT_USER สำหรับการแก้ไขผู้ใช้ reducer จะทำการค้นหาผู้ใช้ใน array
usersโดยใช้idและ update ข้อมูลของผู้ใช้นั้นด้วยข้อมูลใหม่จาก payload (ค่าที่ส่งต่อมาจาก API) - DELETE_USER เมื่อต้องการลบผู้ใช้ reducer จะกรอง
usersarray เพื่อลบผู้ใช้ที่มีidตรงกับที่ส่งมาใน payload (ที่ confirm จาก API มาแล้วว่าลบเรียบร้อย)
และที่ store.js ทำการ register reducer เข้า store เข้าไป
import { createStore, combineReducers, applyMiddleware } from "redux";import { thunk } from "redux-thunk";import userReducer from "./reducers/userReducer";
const rootReducer = combineReducers({  user: userReducer,});
const store = createStore(rootReducer, applyMiddleware(thunk));
export default store;
โดยเราจะนำสิ่งนี้มาช่วยสำหรับการ register store ที่มีการยิง API (asynchronous) นั่นก็คือ Redux Thunk
Redux Thunk เป็น middlewareที่ใช้กับ Redux ซึ่งช่วยให้เราสามารถเขียน action creators ที่ส่งกลับ function แทนที่จะเป็น action objects ได้ ความสามารถนี้ทำให้เราสามารถจัดการกับ action ที่มีลักษณะ asynchronous ได้ เช่นการเรียกข้อมูลจาก API ซึ่งไม่สามารถทำได้โดยใช้ Redux แบบทั่วไปที่สนับสนุนเฉพาะ synchronous actions เท่านั้น (เลยจะแตกต่างกับตัวอย่างก่อนหน้าที่ไม่ต้องใช้ Redux Thunk ก็ได้)
ลองส่งข้อมูลและดึงข้อมูลผ่าน Redux
เมื่อลองมาดูที่ pages/UserList.jsx โดยในหน้านี้จะเป็นตัวแทนของการดึง list ของ user ออกมา โดยในหน้านี้
- ต้องสามารถดึงข้อมูล user ทั้งหมดออกมาได้
- ต้องสามารถยิงคำสั่งลบ user ตาม id ของแต่ละคนได้
และนี่คือ code ของไฟล์นี้
import { useEffect } from "react";import { useSelector, useDispatch } from "react-redux";import { fetchUsers, deleteUser } from "../actions/userActions";import { Link } from "react-router-dom";
const UserList = () => {  const dispatch = useDispatch();  const users = useSelector((state) => state.user.users);
  useEffect(() => {    dispatch(fetchUsers());  }, [dispatch]);
  return (    <div className="container mx-auto p-4">      <h3 className="mb-4 text-lg font-semibold">User List</h3>      {users.map((user) => (        <div key={user.id} className="flex items-center justify-between border-b py-2">          <div>            <p>Name: {user.name}</p>            <p>Email: {user.email}</p>            <p>Phone: {user.phoneNumber}</p>          </div>          <div>            <button              className="mr-2 rounded bg-red-500 px-3 py-1 text-white"              onClick={() => dispatch(deleteUser(user.id))}            >              Delete            </button>            <Link to={`/edit/${user.id}`}>              <button className="rounded bg-blue-500 px-3 py-1 text-white">Edit</button>            </Link>          </div>        </div>      ))}    </div>  );};
export default UserList;
อย่างที่เห็นจาก code ว่า
- มีการ import action เข้ามาคือ
fetchUsers,deleteUserซึ่งก็คือ action creator (ที่มี action type อยู่ในตัว) ที่ใช้สำหรับการดึง list user และ ลบ user - โดยคำสั่งของ Redux นั้นได้เตรียมคำสั่ง Redux Hook เอาไว้ โดยมี 2 คำสั่งคือ
useSelectorสำหรับการเข้าถึง state จาก Redux store และuseDispatchสำหรับการ dispatch action (ไปยัง reducer) - เมื่อมีการ render component ขึ้นมา (ใช้ useEffect ดักจับกับ dispatch ไว้จาก
**useDispatch**) เพื่อทำการ dispatchfetchUsersaction เพื่อทำการ load user list เข้ามาจาก API โดยใน component นี้มีการ access เข้าถึง users array เอาไว้จากuseSelector - หลังจากที่
**fetchUsers**เรียบร้อย reducer ก็จะทำการ update state ใน store และตัว**useSelector**ก็จะรับรู้ว่ามี store เปลี่ยนแปลงค่าอยู่ก็จะทำการเปลี่ยนแปลงค่า state ใน component ผ่าน Hook ของ**useSelector**ก็จะส่งผลทำให้แสดง list user จาก user store ออกมาได้ - เช่นเดียวกันกับ
**deleteUser**เมื่อมีการกดลบ user จาก list ไปก็จะมีการ dispatchdeleteUserพร้อมกับ**user.id**ส่งไปเพื่อเป็นการบอก**user.id**ใน action creator ว่าจะต้องส่งไปบอกทั้ง API และ reducer ว่า หาก API เรียบร้อยให้ลบออกจาก store และ เมื่อทำการลบเรียบร้อย ก็จะบอกผ่าน**useSelector** ตัวเดิมหลังจากที่ update user list เรียบร้อย Component นี้ก็จะได้ user list set ใหม่ออกมาได้นั่นเอง
sequenceDiagram
    participant C as Component
    participant A as Actions
    participant R as Reducer
    participant S as Store

    C->>+A: dispatch(fetchUsers())
    A->>+R: FETCH_USERS action
    R->>-S: Update users in store
    S->>+C: useSelector() updates UI

    C->>+A: dispatch(deleteUser(id))
    A->>+R: DELETE_USER action
    R->>-S: Update users in store (remove user)
    S->>+C: useSelector() updates UI
และที่ pages/UserEdit.jsx โดยหน้านี้จะต้องทำทั้งหมด 2 โจทย์คือ
- createUser เมื่อเข้ามาหน้านี้แบบไม่มี parameter user id อะไร จะต้องรับข้อมูลจาก form และสร้าง user ใหม่ได้
- editUser เมื่อเข้ามาหน้านี้แบบมี parameter user id จะต้องดึงข้อมูลผ่าน fetchUser และต้องสามารถแก้ไข user คนนั้นตาม user id ที่ส่งมาได้
และนี่คือ code ของไฟล์นี้
import { useState, useEffect } from "react";import { useDispatch, useSelector } from "react-redux";import { createUser, editUser, fetchUser } from "../actions/userActions";import { useParams } from "react-router-dom";
const UserEdit = () => {  const [userData, setUserData] = useState({    name: "",    email: "",    phoneNumber: "",  });  const [message, setMessage] = useState("");  const [isError, setIsError] = useState(false);  const dispatch = useDispatch();  const { id } = useParams();  const currentUser = useSelector((state) => state.user.currentUser);
  useEffect(() => {    if (id) {      dispatch(fetchUser(id));    }  }, [id, dispatch]);
  useEffect(() => {    if (currentUser) {      setUserData(currentUser);    }  }, [currentUser]);
  const handleSave = async () => {    const result = userData.id      ? await dispatch(editUser(userData))      : await dispatch(createUser(userData));
    if (result.success) {      setMessage("User saved successfully.");      setIsError(false);      history.push("/"); // Redirect after successful save    } else {      setMessage(result.message || "An error occurred.");      setIsError(true);    }  };
  const handleChange = (e) => {    setUserData({ ...userData, [e.target.name]: e.target.value });  };
  return (    <div className="container mx-auto p-4">      <input        type="text"        name="name"        value={userData.name}        onChange={handleChange}        placeholder="Name"        className="mb-2 w-full rounded border p-2"      />      <input        type="email"        name="email"        value={userData.email}        onChange={handleChange}        placeholder="Email"        className="mb-2 w-full rounded border p-2"      />      <input        type="text"        name="phoneNumber"        value={userData.phoneNumber}        onChange={handleChange}        placeholder="Phone Number"        className="mb-4 w-full rounded border p-2"      />      {message && <div className={isError ? "text-red-500" : "text-green-500"}>{message}</div>}
      <button onClick={handleSave} className="rounded bg-green-500 px-4 py-2 text-white">        Save      </button>    </div>  );};
export default UserEdit;
อย่างที่เห็นจาก code จะคล้ายๆหน้า UserList คือ
- ตอนเปิดหน้าใหม่มีการดักจับ useEffect ไว้ว่า หากมี id ใน parameter ออกมา ให้ทำการ dispatch ไปยัง fetchUser(id) โดยทำการส่ง id นั้นไป
- เมื่อมีการ ดึงข้อมูลจาก API (ที่ Action Creator) และ update จาก reducer เรียบร้อย ก็จะ update ข้อมูลผ่าน useSelector โดยจะส่งมาผ่าน state currentUser ที่อยู่ใน user store และเมื่อ useEffect ดักจับได้ว่ามี currentUser โผล่เข้ามาก็จะนำข้อมูลนั้นมา set เป็น state ที่ใช้ใน Form Component ใน Component นี้ต่อไปนั่นเอง
- ท้ายที่สุดสำหรับปุ่ม Save ก็มีการ handle เอาไว้ว่า
- ถ้ามี id = dispatch editUser
- ถ้าไม่มี id = dispatch createUser
- และทั้ง 2 การ dispatch ก็จะส่งข้อมูล user เข้าไปเป็น parameter เพื่อไปเป็น payload ในการส่งที่ action creator และนำไปส่ง API และ reducer ต่อไป
sequenceDiagram
    participant C as UserEdit Component
    participant R as React Router
    participant D as useDispatch
    participant A as Actions (Redux)
    participant S as Redux Store
    participant U as useSelector

    R->>C: Provides userId via useParams()
    C->>D: dispatch(fetchUser(userId))
    D->>A: Invokes fetchUser action
    A->>S: Request user data
    S-->>U: Update currentUser in state
    U-->>C: Reflect currentUser data in component

    C->>C: User edits form fields
    C->>D: dispatch(editUser(userData)) / dispatch(createUser(userData))
    D->>A: Invokes editUser / createUser action
    A->>S: Update / Create user data
    S-->>U: Update users in state
    U-->>C: Show success/error message & possibly redirect

    Note over C: Conditional rendering based on operation success or error
และที่ App.jsx ทำการเรียกใช้ทุกหน้าออกมา
import { useRoutes } from "react-router-dom";import UserEdit from "./pages/UserEdit";import UserList from "./pages/UserList";
function App() {  const element = useRoutes([    { path: "/", element: <UserList /> },    { path: "/create", element: <UserEdit /> },    { path: "/edit/:id", element: <UserEdit /> },  ]);  return element;}
export default App;
และนี่คือผลลัพธ์ของ code นี้
สังเกตจาก sequence diagram จะเห็นว่า
- เมื่อทำการ design application ด้วย Redux นั้นเส้นทางการเดินข้อมูลจะเหลือเพียงเส้นทางเดียว แทนที่ปกติจะเป็นการ handle state กันไปมา
- ซึ่งด้วยหลักการนี้ ทำให้เราสามารถ design state ของ application ได้ง่ายขึ้นจากการที่เราสามารถคาดเดา state ที่เกิดขึ้นได้ว่าสามารถเกิดขึ้นจาก action อะไรได้บ้าง (จากแต่เดิมที่เราจะเขียนแก้จาก hook กันโดยตรงนั่นเอง)
Redux toolkit
Redux Toolkit (RTK) เป็นชุดเครื่องมืออย่างเป็นทางการจากทีมงาน Redux ที่มีจุดมุ่งหมายเพื่อทำให้การทำงานกับ Redux ง่ายขึ้น มีประสิทธิภาพมากขึ้น และลดความซับซ้อนในการเขียน code ของ Redux ลง โดย RTK ได้รวมเอา practices และ patterns ที่แนะนำในการใช้งาน Redux มาไว้ในตัว เพื่อช่วยให้ developer สามารถจัดการ state ใน application ได้ดียิ่งขึ้น
ทำไม Redux Toolkit ถึงดีกว่า Redux แบบดั้งเดิม
- ลดความซับซ้อนใน code RTK มี
createSliceที่ช่วยให้สามารถรวม reducers, action types และ actions ไว้ในที่เดียวกัน ซึ่งช่วยลดจำนวน code และความซับซ้อนในการจัดการกับไฟล์เหล่านี้ได้ให้เหลืองเพียงแค่ไฟล์เดียว - มี Middleware สำหรับการจัดการ Asynchronous Logic RTK มาพร้อมกับ Redux Thunk เป็น middleware โดยตั้งค่าเริ่มต้น ทำให้สามารถจัดการกับ logic ที่เป็น asynchronous ได้ง่ายขึ้นโดยไม่ต้องตั้งค่าเพิ่มเติม
- Simplifies State Mutations ใช้ Immer ภายใน
createSliceซึ่งช่วยให้สามารถเขียน logic ที่เปลี่ยนแปลง state ได้ง่ายดาย โดยเขียนเหมือนกับว่ากำลังเปลี่ยนแปลง state โดยตรง แต่จริงๆ แล้วเป็นการทำ immutable update ซึ่งปลอดภัยมากขึ้น - มี
configureStoreที่ทำให้การตั้งค่า store ของ Redux เป็นเรื่องง่าย โดยมีการตั้งค่า middleware และ reducers ได้โดยอัตโนมัติ - DevTools Extension ที่ปรับปรุงแล้ว โดยมีการตั้งค่า Redux DevTools ทำได้ง่ายขึ้น ด้วยการตั้งค่าอัตโนมัติใน
configureStoreของ RTK
มาลองเปลี่ยน Redux เป็น Redux Toolkit กัน
.├── src│ ├── App.jsx│ ├── main.jsx│ ├── pages│ │ ├── UserEdit.jsx│ │ └── UserList.jsx│ ├── reducers│ │ └── userSlice.js│ └── store.js├── tailwind.config.js└── vite.config.jsสิ่งที่เราทำคือ เราทำการรวม action และ reducer มาใหม่ใน file reducers/userSlice.js
import { createSlice, createAsyncThunk } from "@reduxjs/toolkit";import axios from "axios";
const apiUrl = "https://65a25d5342ecd7d7f0a771bd.mockapi.io/users";
export const fetchUsers = createAsyncThunk("users/fetchUsers", async () => { const response = await axios.get(apiUrl); return response.data;});
export const fetchUser = createAsyncThunk("users/fetchUser", async (userId) => { const response = await axios.get(`${apiUrl}/${userId}`); return response.data;});
export const createUser = createAsyncThunk("users/createUser", async (user) => { const response = await axios.post(apiUrl, user); return response.data;});
export const editUser = createAsyncThunk("users/editUser", async (user) => { const response = await axios.put(`${apiUrl}/${user.id}`, user); return response.data;});
export const deleteUser = createAsyncThunk("users/deleteUser", async (userId) => { await axios.delete(`${apiUrl}/${userId}`); return userId;});
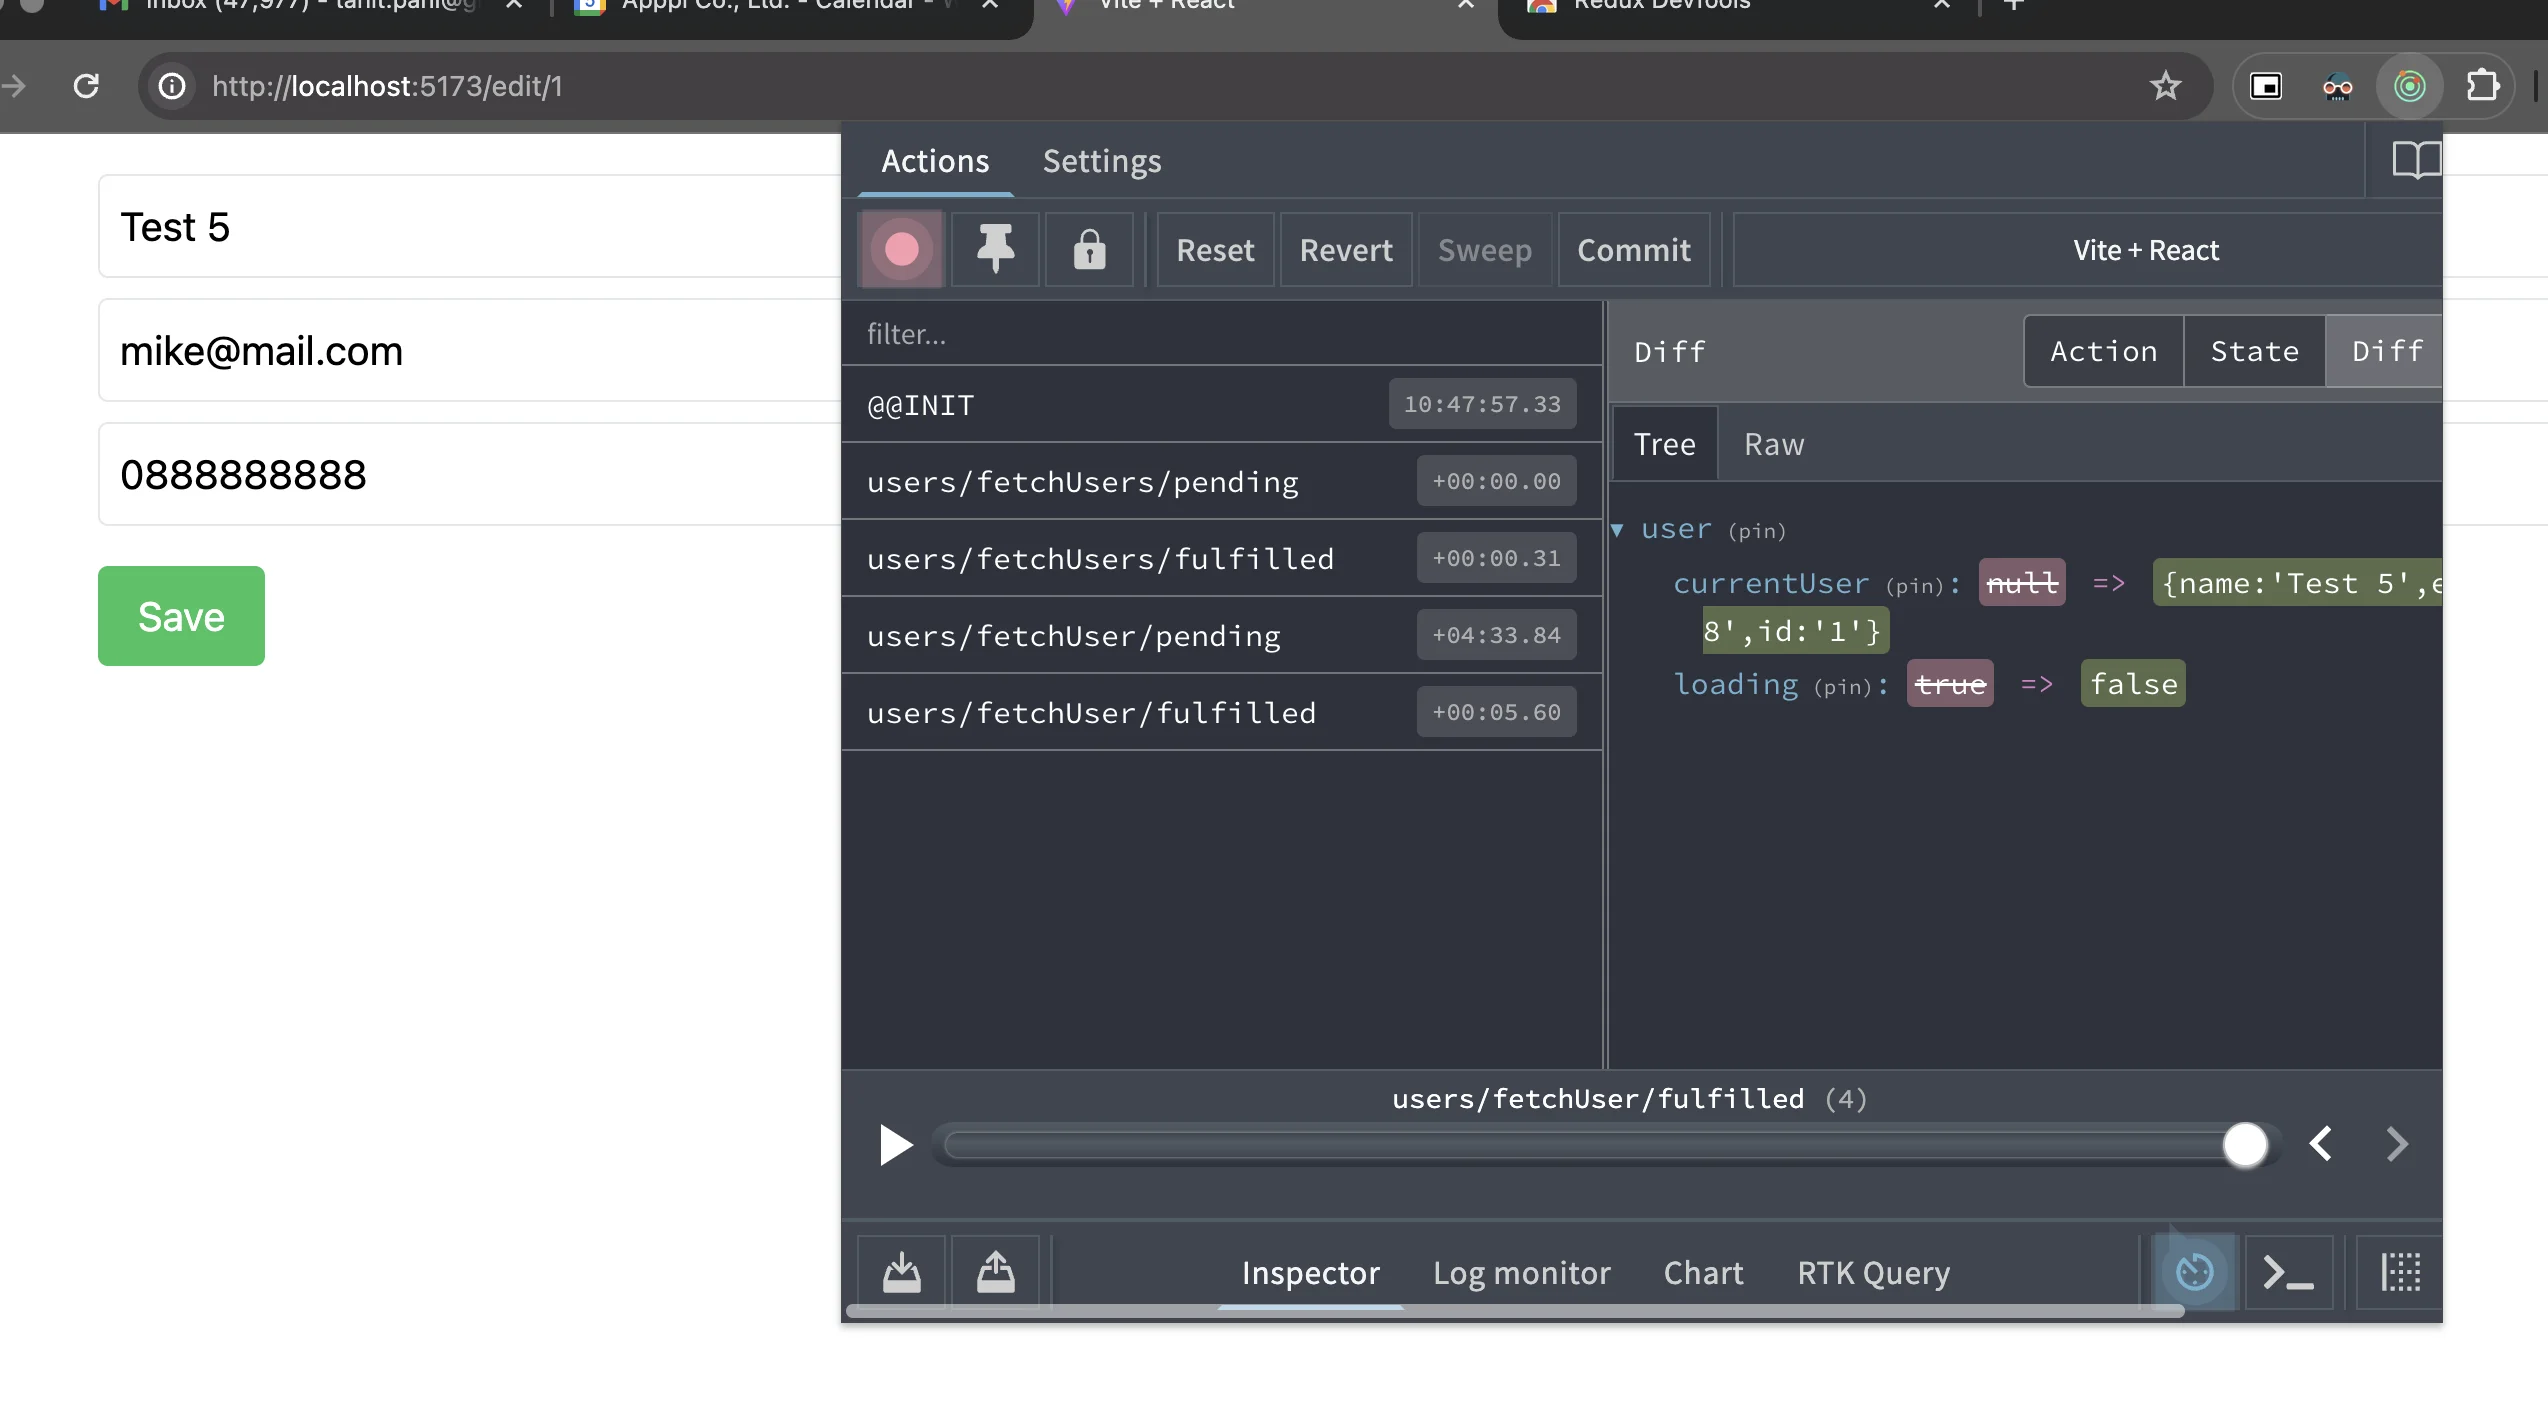
const userSlice = createSlice({ name: "user", initialState: { users: [], currentUser: null, loading: false, error: null, }, extraReducers: (builder) => { builder .addMatcher( (action) => action.type.endsWith("/pending"), (state) => { state.loading = true; state.error = null; }, ) .addMatcher( (action) => action.type.endsWith("/fulfilled"), (state, action) => { state.loading = false; if (action.type.includes("fetchUsers")) { state.users = action.payload; } else if (action.type.includes("fetchUser")) { state.currentUser = action.payload; } else if (action.type.includes("createUser")) { state.users.push(action.payload); } else if (action.type.includes("editUser")) { const index = state.users.findIndex((user) => user.id === action.payload.id); if (index !== -1) { state.users[index] = action.payload; } } else if (action.type.includes("deleteUser")) { state.users = state.users.filter((user) => user.id !== action.payload); } }, ) .addMatcher( (action) => action.type.endsWith("/rejected"), (state, action) => { state.loading = false; state.error = action.error.message; }, ); },});
export default userSlice.reducer;จาก code ด้านบนนี้
- มีการใช้
createSliceและcreateAsyncThunkจาก@reduxjs/toolkitร่วมกับaxiosเพื่อดึงข้อมูลจาก API และ update state ใน store ของ Redux createAsyncThunkใช้สำหรับการดำเนินการแบบ Asynchronous เช่นเคส API (เปรียบเสมือนการใช้ redux thunk โดยตรงได้ทันที) โดย API นั้นก็จะเป็น set เดิมกับที่ใช้ใน Redux แค่เปลี่ยนมาใช้createAsyncThunkแทน (รวมถึงไม่ต้องมี try, catch ด้วยเช่นกันเพราะ function นี้จัดการให้หมดแล้วเรียบร้อย)createSliceใช้สำหรับจัดการ State โดย- กำหนด
initialStateที่มีusers,currentUser,loading, และerrorเพื่อเก็บข้อมูลผู้ใช้, สถานะการโหลด และ error เอาไว้ extraReducersใช้addMatcherเพื่อจัดการกับสถานะต่างๆ ของ action ที่ส่งมาจากcreateAsyncThunkโดย- เมื่อ action สิ้นสุดด้วย
/pendingแสดงว่ากำลังโหลดข้อมูล - เมื่อ action สิ้นสุดด้วย
/fulfilledแสดงว่าดำเนินการสำเร็จ และจะ update ข้อมูลใน state ตามข้อมูลที่ส่งมา - เมื่อ action สิ้นสุดด้วย
/rejectedแสดงว่ามีข้อผิดพลาดเกิดขึ้น - ซึ่งทั้ง 3 อันนี้
createAsyncThunkเป็นตัวจัดการให้ทั้งหมด และaddMatcherเป็น function ที่สามารถ group reducer โดยทำการ group ตาม action ที่ต้องการโดยเลือก filter ตาม pending, fulfilled, rejected ตามที่createAsyncThunkส่งมา - ก็จะส่งผลทำให้เราสามารถสร้าง
reducerสำหรับจัดการ loading case และ error case แบบรวมกันได้ และสามารถจัดการ success case แยกกันในแต่ละเคสของ API ออกจากกันออกมาได้
- กำหนด
ถ้าทุกคนลองเทียบกับ code redux ทั่วไปดูจะเจอว่า
- เราไม่จำเป็นต้องประกาศ action type มาประกอบรายตัวอีกต่อไป (ใช้ function เป็นตัวแทนของ action type ไปเลย)
- ไม่จำเป็นต้อง handle API เนื่องจาก error จากจัดการผ่าน reducer ทำให้สามารถ handle error ผ่าน reducer ได้ทันที โดยไม่จำเป็นต้องประกาศ action มาเพิ่มเพื่อจัดการเรื่องนี้ (ถ้าเป็น redux ทั่วไปต้องแยกเคส action type หมดตั้งแต่ loading, error, success)
จาก 2 อย่างนี้เองจึงส่งผลทำให้ code ของ redux ไม่เกิดความซ้ำซ้อน และยังคงได้คุณสมบัติของ redux เช่นเดิมออกมาได้
มาที่ **store.js** เปลี่ยนมา register store ด้วย userSlice ผ่าน **configureStore** แทน
import { configureStore } from "@reduxjs/toolkit";import userReducer from "./reducers/userSlice";
export const store = configureStore({  reducer: {    user: userReducer,  },});
ที่เหลือทั้ง **UserList.jsx** และ **UserEdit.jsx** ปรับตำแหน่งจากแต่เดิมเรียก action มาเรียกผ่าน **userSlice** แทน (ใช่ครับ ปรับแค่นี้เลย)
import { fetchUsers, deleteUser } from "../reducers/userSlice";
// UserEdit.jsximport { createUser, editUser, fetchUser } from "../reducers/userSlice";
เพียงเท่านี้ก็จะได้ผลลัพธ์เหมือนๆกันออกมาได้ ใน code ที่สั้นลงกว่าเดิม !
เพิ่มเติมการ debug redux
นอกเหนือจากการช่วยงาน development แล้ว ยังมี Plugin ที่สามารถช่วย Debug ได้นั่นคือ Redux Devtools
https://chromewebstore.google.com/detail/redux-devtools/lmhkpmbekcpmknklioeibfkpmmfibljd
Redux DevTools เป็นเครื่องมือที่ช่วยให้ developer สามารถติดตามการเปลี่ยนแปลงใน state ของ web application ที่ใช้ Redux ได้ โดยมันจะช่วยให้เราสามารถดู history ของ actions ที่ถูก dispatch ไปยัง store, สถานะปัจจุบันของ store และแม้กระทั่ง “ย้อนเวลา” กลับไปยังสถานะก่อนหน้า เพื่อทำการ debug ออกมาได้ด้วยเช่นกัน
คุณสมบัติหลักของ Redux DevTools
- Inspection ของ Actions และ State เราสามารถดูรายละเอียดของแต่ละ action ที่ถูก dispatch รวมถึง state ก่อนและหลังการเปลี่ยนแปลงได้
- Time Travel Debugging feature นี้ช่วยให้เราสามารถ “ย้อนเวลา” กลับไปยังจุดใดจุดหนึ่งใน history ของ actions ได้ เพื่อดูว่า web application ของเรามีกำลังทำงานกับ store อย่างไรในขณะนั้นๆ
- การเปลี่ยนแปลง State แบบ Real-time เราสามารถแก้ไข state โดยตรงจาก DevTools และดูผลลัพธ์ที่เกิดขึ้นใน application ของแบบ real-time ได้
ตัวอย่างก็จะเป็นประมาณนี้
หรือสามารถกดดู diff state ที่ละช็อตก็ได้เช่นกัน
สรุป
การใช้ Redux ในการพัฒนา web application นั้นถือเป็นอีกตัวเลือกที่ค่อนข้างยอดนิยมในการพัฒนา web application ด้วย Javascript และ React โดยข้อดีใหญ่ๆของการใช้ Redux ก็คือ
- ความสามารถในการจัดการ State แบบ Centralized
- การทำ Predictable State Updates ที่สามารถใช้ pure functions ในการ update state อย่าง reducer
- การทำงานร่วมกับ DevTools และ Time Travel Debugging ที่ทำให้ debug กับการเปลี่ยนแปลงของ state ได้ง่ายขึ้น
- รวมถึงสามารถใช้งานร่วมกับ Middleware เพื่อเพิ่มความสามารถในการดำเนินการก่อนที่ action จะถึง reducer ได้ซึ่งช่วยอำนวยเคสเพิ่มเติมอย่างการเพิ่ม logic asynchronous หรือ การบันทึก log ได้ด้วยเช่นกัน
จากประสบการณ์ที่เจอมานั้น คนส่วนใหญ่ (รวมถึงตัวผมเอง) เหตุผลใหญ่ๆที่มักเลือกใช้ Redux (ตัว Centralized state management) แทนการใช้ Hook (จัดการ state ผ่าน Component กันเอง) จะมี use case อยู่ประมาณนี้
- web application มีความซับซ้อนสูง ถ้า web application ของคุณมีหลาย components ที่ต้องการเข้าถึงและแก้ไข state ร่วมกัน Redux จะช่วยให้การจัดการ state เป็นไปได้อย่างเป็นระเบียบมากขึ้น
- ต้องการความสามารถในการ debug ที่ดี ด้วย Redux DevTools และความสามารถในการย้อนเวลาของ state ทำให้การ debug web application สามารถทำได้ง่ายขึ้น
- Team development Redux ช่วยให้สามารถกำหนดรูปแบบการทำงานร่วมกันในทีมได้ง่ายขึ้น ด้วย pattern และ practices ที่ชัดเจน
หวังว่าบทความนี้จะเป็นส่วนหนึ่งที่ทำให้คนที่กำลังสนใจ Redux เข้าใจ Redux มากขึ้น และมีโอกาสได้นำ Redux ไปใช้กับ project ในอนาคตกันนะครับ 😁
Github source code
https://github.com/mikelopster/react-redux-example
Reference
- https://react-redux.js.org/
- https://redux.js.org/tutorials/fundamentals/part-5-ui-react
- https://redux.js.org/introduction/why-rtk-is-redux-today
- มารู้จักกับ gRPC และ Go กันมี Video
เรียนรู้การใช้งาน gRPC กับ Go ตั้งแต่การสร้าง Protocol Buffers, การทำ Server/Client และการจัดการ Error รวมถึง Best Practice ในการใช้ API Gateway

-

- รู้จักกับ Drizzle ORM ผ่าน Next.jsมี Video
มาทำความรู้จัก Drizzle ORM กัน ว่ามันคืออะไร และทำไมถึงเป็นที่นิยมในวงการนักพัฒนา และลองเล่นกับ Next.js ด้วยกัน

- NestJS และ Mongoมี Video
เรียนรู้การผสานพลังระหว่าง NestJS framework ยอดนิยมฝั่ง Node.js กับ MongoDB ฐานข้อมูล NoSQL สุดทรงพลังกัน