

มาแก้ปัญหา Firestore กับปัญหาราคา Read pricing สุดจี๊ด
/ 7 min read
 สามารถดู video ของหัวข้อนี้ก่อนได้ ดู video
บทความต้นฉบับ (ย้ายมาจาก medium) https://blog.mikelopster.dev/3426619fc2ab
วันนี้พามาชวนคุยเรื่องเทคโนโลยีสุดฮิตอย่าง Firebase กัน สำหรับใครก็ตามที่กำลังเริ่มเขียนเว็บ หรือ เขียนเว็บมาระดับนึงแล้วคงจะเคยผ่าน Firebase กันมาบ้าง Firebase เป็นเทคโนโลยีที่เรียกได้ว่าเป็น Backend as a Service หากใครก็ตามต้องการระบบหลังบ้านสักตัว และไม่ต้องการที่จะมา setup เองจากจุดเริ่มต้น Firebase ก็ถือเป็นสิ่งที่ตอบโจทย์ในเรื่องนี้ มีหมดตั้งแต่ Database, Realtime Database, Authenticaion รวมถึง Backend function อย่าง Cloud function อยู่ด้วย
ทีนี้ พอตอนที่จะเอาไปใช้จริง คนส่วนนึงมาจมอยู่กับปัญหา Firestore Pricing มันแพง (Firestore คือ เทคโนโลยี NoSQL ของ Firebase) เนื่องจาก การคิด Firestore นั้น จะคิดทั้งหมดตั้งแต่ read, write ยั้น delete แน่นอนว่าเมื่อ user เพิ่มขึ้น มันก็เลี่ยงไม่ได้ที่จำนวน read มันจำเพิ่มขึ้นตามจำนวนคนที่เพิ่มขึ้น
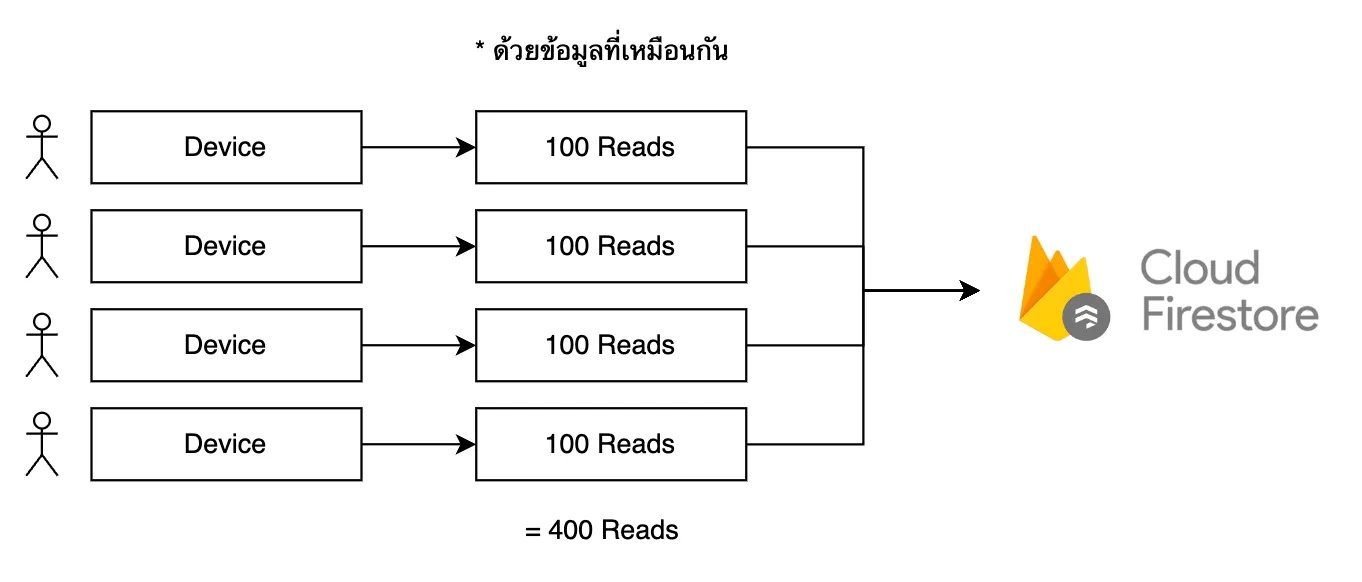
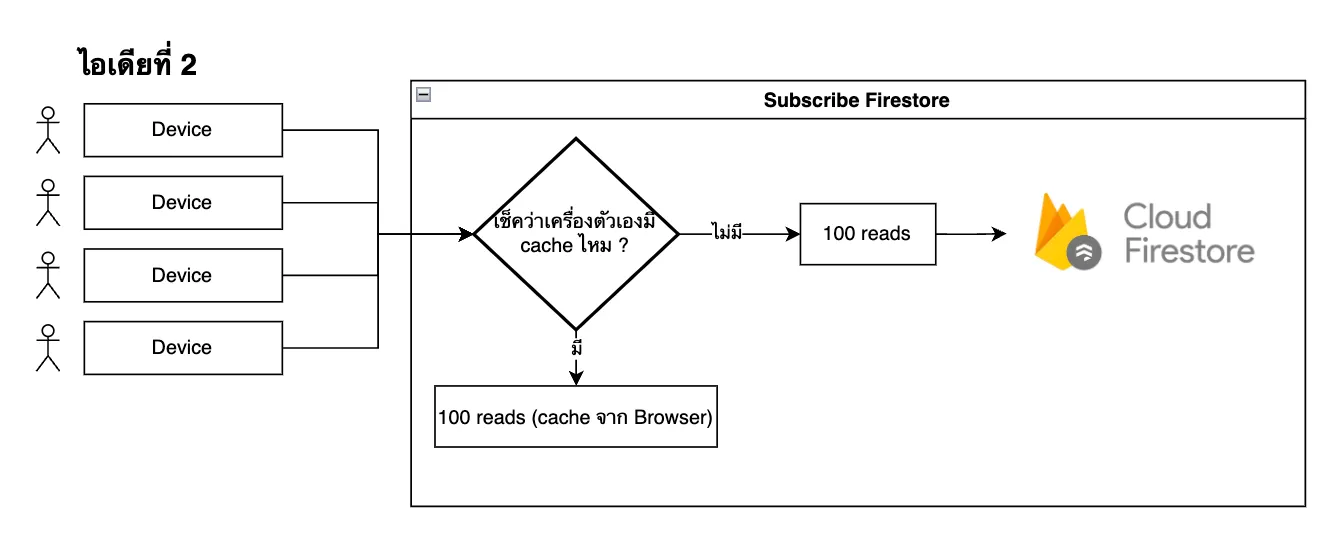
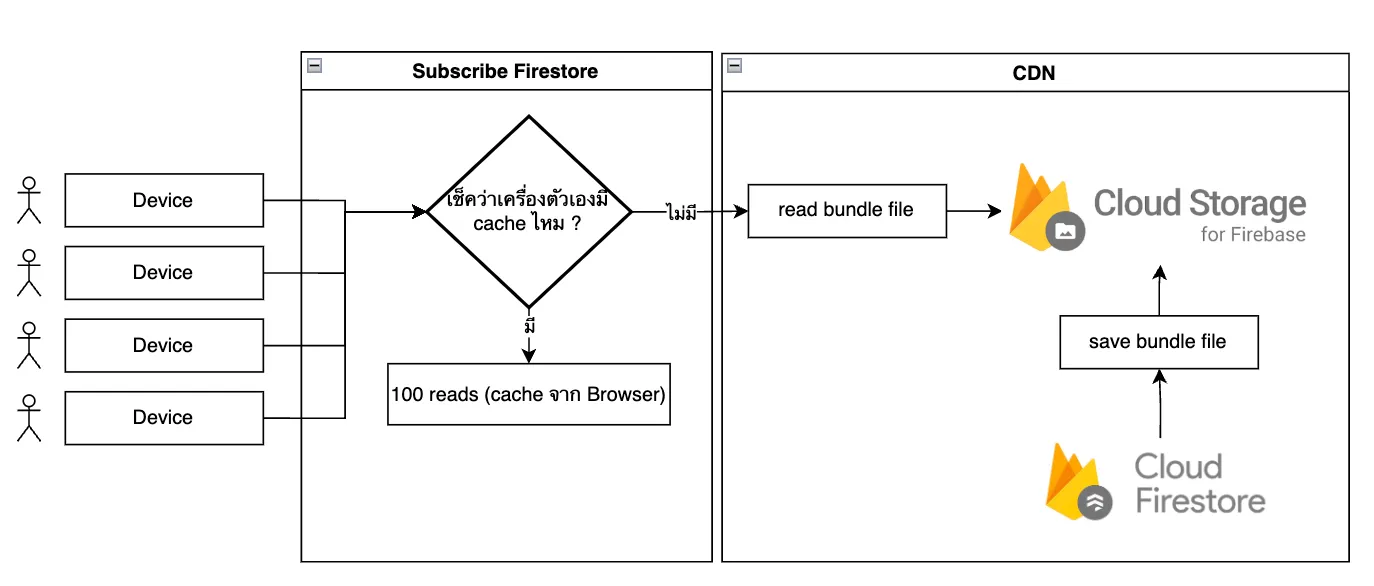
เพื่อให้เห็นภาพมากขึ้น สมมุติว่าเรามี user 4 คน และตอนนี้ข้อมูลระบบเรามี 100 documents ที่จะต้อง read มาให้ user เห็น เมื่อ user เปิดเว็บขึ้นมา แต่ละ user ก็จะเกิดการ read ครั้งละ 100 documents (ตามภาพด้านบน) = ถ้า user ยิ่งเปิดเยอะ หรือ ถ้าจำนวน user ยิ่งเยอะขึ้น (โดยที่เราไม่ได้ทำอะไรเลย) Pricing ก็จะโดนคิดเพิ่มไปเรื่อยๆตามจำนวน Read ที่เพิ่มขึ้น ทีนี้เราจะทำยังไงกับเรื่องนี้ดี
เราจะลองมาหาไอเดียในการลด Pricing กัน
ในฐานะที่เป็นผู้ใช้ Firebase เหมือนกัน เรามาลองชวนคุยกันดีกว่า ว่าเราจะสามารถหาวิธีลด Pricing หรือจำนวนการ read ของ Firestore ได้ยังไงกันบ้าง โดยข้อจำกัดของผมคือ ผมจะใช้แค่เทคโนโลยีภายใน Firebase เท่านั้น ผมเลยเกิดเป็น 2 ไอเดียนี้ขึ้นมาคือ
- ไอเดียที่ 1 ใช้ Firebase firestore แพ็คเป็น bundle ไว้ แล้วค่อยนำ bundle นั้นโหลดมาใช้ทีเดียว (อารมณ์ zip file แล้วโหลดมาเป็น file ใหญ่ทีเดียวเพื่อใช้)
- ไอเดียที่ 2 ใช้ Firestore PersistentLocalCache จะได้ไม่ต้อง read ซ้ำบ่อยๆ
โดยตัวอย่างที่ผมจะหยิบมาใช้นั้น ผมจะลองเลียนแบบ Social network อย่างง่ายโดย เราจะใช้ Firebase Firestore เก็บ content ซึ่งจะเก็บแค่ description, category และ tag (เป็น Array) ไว้
ไอเดียที่ 1 ใช้ Firebase firestore bundle ร่วมกับ Cloud storage
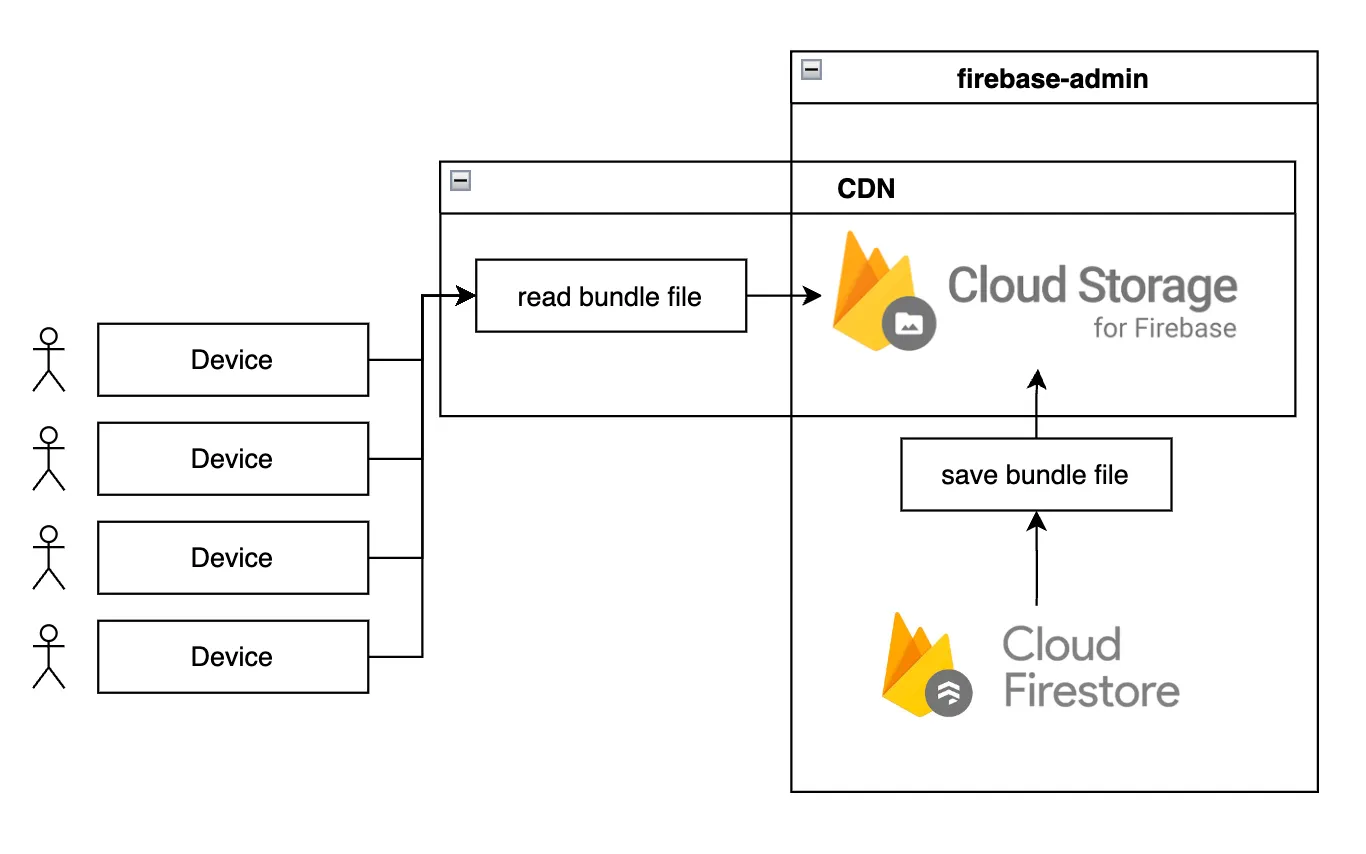
ไอเดียนี้ เราจะเปลี่ยนจากส่งเป็น document เปลี่ยนมาเป็นส่งมาเป็น file แทน วิธีการคือ
ฝั่ง Backend
- เราจะทำการ read ข้อมูลออกมาครั้งหนึ่งเอาไว้ (อาจจะเป็นจังหวะหลังแก้ไฟล์ก็ได้ แต่ในตัวอย่างนี้ผมจะ seed file เข้าไปแล้ว save bundle เลย)
- หลังจากนั้น เอาข้อมูลที่ read ได้มา save เป็น bundle file (Firestore มี feature ที่ทำแบบนี้ได้นะ) เก็บใส่ Cloud storage ไว้
ฝั่ง Frontend
- ทำการโหลด bundle จาก path file
- แล้วใช้คำสั่งของ Firestore (loadBundle) ทำการโหลดข้อมูลจาก bundle file เข้ามาไว้ในตัวแปรของ Firestore ไว้
ไอเดียจะเป็นประมาณภาพด้านล่างนี้
เราจะลองมา code กัน จะมีทั้งหมด 2 ฝั่งคือ
- ฝั่งที่ทำการ save bundle (ขาที่มีการ update ข้อมูล) = ฝั่ง Backend ผมจะใช้เป็น Nodejs ต่อกับ firebase-admin เพื่อทำการ read / write ทั้ง Cloud storage และ Firestore
- ฝั่งที่ทำการใช้ bundle (ดึงมาใช้) = ฝั่ง Frontend

เริ่มจากฝั่ง Backend ก่อน ผมสร้าง functions/firebaseConfig.js ขึ้นมาเพื่อใช้เป็นตัวแปรกลางสำหรับการเรียกใช้ Firestore (db) และ Cloud storage (storage) ขึ้นมา
const admin = require("firebase-admin");admin.initializeApp({  projectId: "bundle-firebase-test",});
const db = admin.firestore();const storage = admin.storage();
module.exports = { db, storage };
มาที่ไฟล์หลัก functions/server.js ผมจะแบบออกเป็น 2 path ก่อนคือ
- ผมจะทำการเพิ่ม code ส่วนการ seed data ก่อน (เพราะตอนนี้เรายังไม่มี data อะไรเลย) ผมก็ใช้ไอเดียง่ายๆเลยว่า เราจะสร้าง list ของ category, tag ขึ้นมาและทำการวนลูปสร้างสัก 100 ตัวขึ้นมา
// import ตัวแปร db (firestore) และ storage (cloud storage) เข้ามาconst { db, storage } = require("./firebaseConfig");
// ผมใช้ library lorem-ipsum สำหรับ gen ข้อมูลทั่วไปconst LoremIpsum = require("lorem-ipsum").LoremIpsum;const lorem = new LoremIpsum({  sentencesPerParagraph: {    max: 8,    min: 4,  },});
// ลองทำลองใส่ category, tag มาให้มันมีข้อมูลconst categoriesList = ["programming", "firebase", "flutter", "golang"];const tagsList = ["a", "b", "c", "d", "e", "f", "g", "h"];
// เพิ่มตัวแปร post collection reference มาconst postsRef = db.collection("posts");
const generatePosts = async () => {  const uid = "test";  const description = lorem.generateSentences(5);
  for (let i = 0; i < 100; i++) {    const category = categoriesList[Math.floor(Math.random() * categoriesList.length)];    const tags = [      tagsList[Math.floor(Math.random() * tagsList.length)],      tagsList[Math.floor(Math.random() * tagsList.length)],    ];
    await postsRef.add({      uid,      category,      description,      tags,    });  }};
const main = async () => {  await generatePosts();};
main();
ผมใช้ Firebase Emulator ในการรัน project นี้ ทีนี้ผมลองรันดูก็จะได้ผลลัพธ์ประมาณนี้ออกมา ตามด้านล่างนี้
- ok ข้อมูลพร้อมและ เรามาสร้าง code สำหรับสร้าง bundle กัน ไอเดียคือ เราจะดึงข้อมูล posts ออกมาทั้งหมดและนำไป save bundle file ไว้ที่ cloud storage
// import ตัวแปร db (firestore) และ storage (cloud storage) เข้ามาconst { db, storage } = require('./firebaseConfig')
// กำหนดค่าเริ่มต้นชื่อ Bucket และ postsRef สำหรับ Reference ไปยัง collection ของ postsconst BUCKET_NAME = 'test'const postsRef = db.collection('posts')const bundle = db.bundle()
const generatePosts = async () => { ... (code ด้านบน) }
// สร้าง function generate bundle ขึ้นมาconst generateBundle = async () => {  // ดึงข้อมูลทั้งหมดจาก collection post ออกมาและนำไป save ใหม่เป็นรูปแบบของ bundle (pack file)  let querySnapshot = await postsRef.get()  const bundleBuffer = bundle.add('posts-bundle', querySnapshot)  const timestamp = Date.now()  const buffer = await bundleBuffer.build()
  // นำตัวแปร buffer (ที่ได้จากการเขียน pack) มาเขียนใส่ไฟล์  const bundledFilePath = `./test/${timestamp}.txt`  fs.writeFileSync(bundledFilePath, buffer)
  // นำไฟล์ upload ไปยัง cloud storage  const destination = `firestore-data-bundles/bundles.txt`  await storage.bucket(BUCKET_NAME).upload(bundledFilePath,    {      destination,      public: true,      metadata: { cacheControl: `public, max-age=60` }    })
  // แล้วก็เป็นอันเสร็จสิ้น path ก็จะไปโผล่ตำแหน่งตามนี้ออกมาได้  console.log(`uploaded to https://storage.googleapis.com/${BUCKET_NAME}/${destination}`)}
const main = async () => {  await generatePosts()  await generateBundle()}
main()
เมื่อลองรัน code ดูเราจะได้ file bundle ออกมา และมันก็ได้ถูก upload ขึ้น cloud storage เป็นที่เรียบร้อย

ok Backend เรียบร้อย move มาฝั่ง Frontend เราจะ set src/config.js ไว้แบบนี้ เพื่อทำการใช้งาน Firestore (ฝั่ง Frontend จะใช้แค่ตัวนี้)
/ file: src/config.js
// Import the functions you need from the SDKs you needimport { initializeApp } from "https://www.gstatic.com/firebasejs/10.1.0/firebase-app.js"import {  getFirestore} from 'https://www.gstatic.com/firebasejs/10.1.0/firebase-firestore.js'

// Your web app's Firebase configurationconst firebaseConfig = {  apiKey: "APIKEY...",  databaseURL: "...",  projectId: "...",  appId: "..."}
// Initialize Firebaseconst app = initializeApp(firebaseConfig)const db = getFirestore(app)
export {  db}
ที่ไฟล์หลัก src/script.js เราจะลองทดสอบเรียกใช้ bundle ดูได้การระบุ path bundle เข้าไปตรงๆ
// สมมุติว่า เราเก็บ config ใส่ และ export เฉพาะ db (firestore) ออกมา// และ มีการ import axios จากที่อื่นมาแล้วimport { db } from "./config.js";
let posts = [];
const loadPostsBundle = async () => {  // จิ้มไปยัง url ของตำแหน่ง bundle (ที่ upload file bundle ในฝั่ง Backend)  let urlBundle = "http://127.0.0.1:9199/test/firestore-data-bundles/bundles.txt";
  // ดึงข้อมูล bundle ออกมา และทำการ loadBundle เข้า Browser (เพื่อ save เป็น cache ใน Browser ไว้)  const response = await axios.get(urlBundle);  await loadBundle(db, response.data);
  // ดึงข้อมูลจาก bundle ออกมาทั้งหมดด้วย query ที่ save ผ่าน bundle ไว้  const query = await namedQuery(db, "posts-bundle");  const snaps = await getDocsFromCache(query);
  // และข้อมูลก็ครบเรียบร้อย ได้ posts collection มาโดยไม่ต้องแตะ Firestore เลย!  posts = snaps.docs.map((snap) => snap.data());  console.log("=== load posts", posts);};
loadPostsBundle();
และนี่ก็คือผลลัพธ์ของการ load ผ่าน bundle และข้อมูลที่ได้ออกมา
จะเห็นว่าเราสามารถหยิบผลลัพธ์ที่เรา save ใน bundle ออกมาได้เรียบร้อย เราจะต๊ะจุดนี้กันไว้ก่อน เราจะไปต่อที่วิธีที่ 2 กันก่อน
ไอเดียที่ 2 ใช้ PersistentLocalCache ของ Firebase firestore
ผมลองนั่งดู และก็ไปเจอว่า Firebase Firestore มี feature อย่าง persistentLocalCache ที่ช่วยทำให้ข้อมูล Firestore สามารถมา save เป็น cache ใน local browser ได้ ซึ่งมันจะมีวิธี สามารถโหลดมาแค่รอบแรกครั้งเดียว และจะนับ cost แค่ตอน snapshot sync (ตอนที่มีข้อมูลใหม่เพิ่มมา) ได้
ก็จะอารมณ์ประมาณภาพล่างนี้
มาลองปรับ src/config.js ให้เป็นตามนี้กัน รอบนี้ส่วนที่แก้จะมีแค่
...// เปลี่ยนจาก// const db = getFirestore(app)
// ให้เพิ่ม persistentCache แทนconst db = initializeFirestore(app, {localCache:  persistentLocalCache({    tabManager: persistentMultipleTabManager()  }),})
export { db }
กลับมาที่ src/script.js เราจะเพิ่ม function loadPost() เข้ามาสำหรับดึงข้อมูล Posts ออกมาทั้งจาก cache / server ด้วยคำสั่ง onSnapshot (ใส่ includeMetadataChanges เพื่อให้จังหวะแรกสุดดึงข้อมูลออกมาทั้งหมดได้ และถ้ามี cache มันก็จะเลือกดึงมาจาก cache มาแทน)
import { db } from './config.js'
// import snapshot มาเพิ่มimport {  ...,  onSnapshot} from 'https://www.gstatic.com/firebasejs/10.1.0/firebase-firestore.js'
let posts = []
// สร้าง function สำหรับ load มา (เราจะใช้ collection history)const loadPosts = async () => {  const q = collection(db, 'posts')  onSnapshot(q, { includeMetadataChanges: true }, (snapshot) => {    // สามารถบอกได้ว่ามาจาก source ไหน ถ้า fromCache เป็น true = มาจาก cache    const source = snapshot.metadata.fromCache ? 'local cache' : 'server'    console.log('source: ', source)    let currentPost = []    snapshot.docChanges().forEach((change) => {      currentPost.push(change.doc.data())      // ทุกครั้งที่มีข้อมูลเปลี่ยน จะนำข้อมูลต่อกลับ array      posts.push(change.doc.data())    })
    console.log('== current post', currentPost)    console.log('== posts', posts)  })}
loadPosts()
นี่คือผลลัพธ์ของเรื่องราวดีๆนี้
จากด้านบนนี้ ผมลอง clear cache ทิ้งก่อนเริ่ม และทำการเริ่มใช้ function loadPosts()
- ครั้งแรก ข้อมูลจะโหลดจาก server มาก่อน ทั้ง 100 ตัว
- แต่พอ refresh อีกรอบ ข้อมูลจะโหลดจาก cache มาแทนทั้ง 100 ตัวแล้ว = browser ได้ save สิ่งนี้เก็บไว้แล้วเรียบร้อย
ความดีงามของวิธีนี้คือ มันจะทำการ handle เรื่อง cache ให้เองได้เลย โดยเพิ่มเพียงแค่ config Firestore เองนี่แหละ
คำถามคือ เราควรเลือกใช้ bundle หรือ PersistententLocalCache ดี ?
ก่อนที่เราจะตอบคำถามนี้ เราจะพาทุกคนมาลองวิเคราะห์ pricing ของแต่ละวิธีกันก่อน
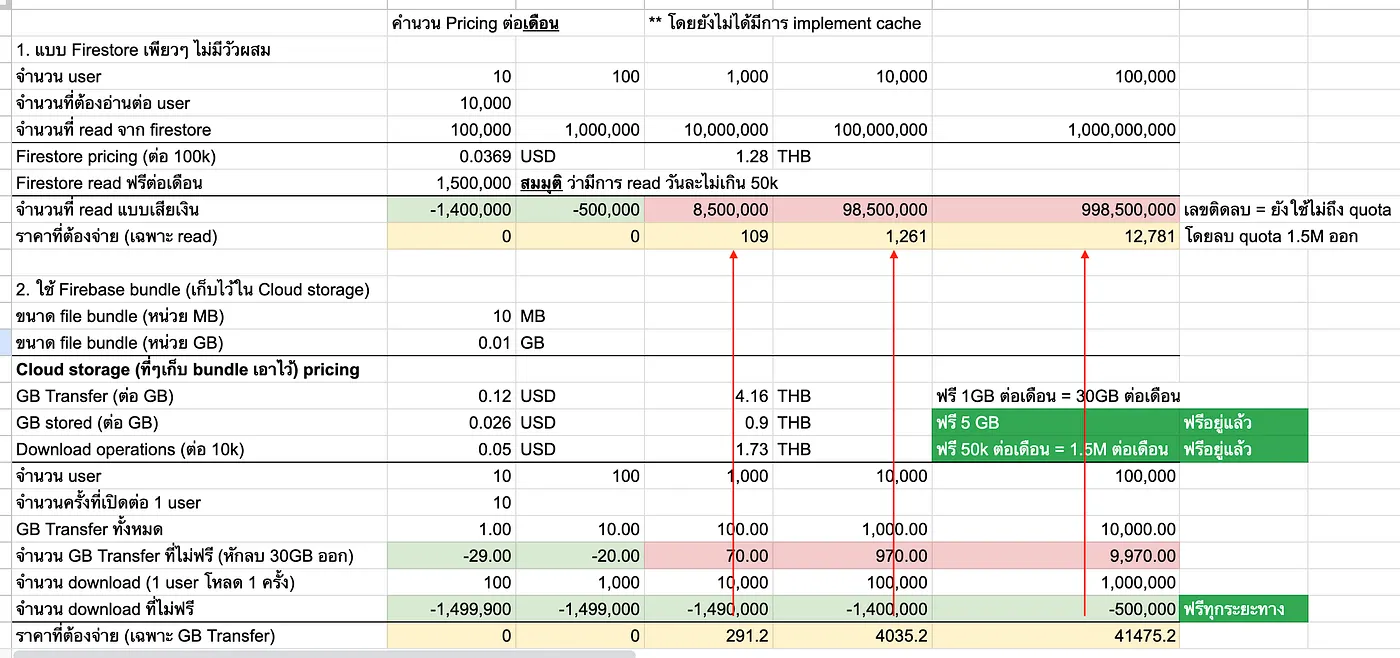
นี่คือไอเดียที่เรามี ทีนี้ผมจะลองแตกการคำนวนบางอย่างออกมาเพื่อให้เห็นว่า ถ้าใช้ Firestore ตามปกติ และ ถ้าใช้ Cloud storage เทียบกัน ราคาจะต่างกันประมาณไหน
ภาพการคำนวณด้านล่างนี้คือ
- สมมุติ Firestore: user 1 คนที่ปริมาณการ read ที่ 10k ต่อเดือน
- สมมุติ Cloud storage: user 1 คนจะโหลด bundle มาใหม่ เดือนละ 1 ครั้ง
- ตรงที่ระบายสีเหลือง = ราคา ของ Firestore กับ Cloud storage เทียบในโจทย์เดียวกัน ซึ่งจะสังเกตุเห็นว่าด้วยสมมุติฐานนี้ Cloud storage จะที่ pricing ที่ถูกกว่า

ดูเผิน way ของ Cloud storage เหมือนจะราคาดีกว่า แต่ว่า ราคาจะแพงขึ้นมากเมื่อเราต้องมีการโหลด bundle แบบถี่ๆ เช่น ถ้าเกิด 1 เดือนเรามี update 10 ครั้ง แปลว่า user ต้องโหลด bundle มาใหม่ 10 รอบ จะกลายเป็นว่าวิธี bundle จะแพงกว่าแทน
ทีนี้ ผมก็เลยทดลองเพิ่มอีก 1 อย่าง ผมสงสัยว่า “แล้วตอนโหลด bundle มา มันได้ทำการเก็บ cache ไว้ไหม ?” คำตอบของเรื่องนี้คือ “มันจะเก็บไว้เมื่อเราเปิด mode cache ด้วย PersistententLocalCache” ผมจะลองยกตัวอย่างจาก code ตัวนี้ ผมลองปรับ code src/script.js เพื่อลองทดสอบ assumption นี้
import {  ...,  getDocsFromCache} from 'https://www.gstatic.com/firebasejs/10.1.0/firebase-firestore.js'
const loadPostsBundle = async () => { ... (function แบบเดียวกับด้านบนเลย) }
const loadPostsFromCache = async () => {  // getDocsFromCache คือคำสั่งที่ get document มาจาก cache เท่านั้น  const snaps = await getDocsFromCache(collection(db, 'posts'))    posts = snaps.docs.map(snap => snap.data())    console.log('== load posts from cache', posts)  }}
const main = async () => {  await loadPostsBundle()  await loadPosts()}
main()
และนี่คือผลลัพธ์ของเรื่องนี้
ผลลัพธ์นี้คือ
- ผมได้ทำการทดสอบรัน loadPostsFromCache() ก่อนหนึ่งรอบ เพื่อ recheck ก่อนว่า ข้อมูลไม่ได้มีอยู่ใน cache จริงๆ (ผมทำการ clear cache ทิ้งก่อน)
- จากนั้น ผมได้ทำการ loadPostsFromBundle() → loadPostsFromCache() ก็จะเจอว่าทั้ง 2 คำสั่งได้ข้อมูลชุดเดียวกันออกมาได้ = จังหวะโหลด bundles มันได้ save ลง cache ไว้แล้วเรียบร้อย
แน่นอนครับว่า ผลลัพธ์นี้เป็นจริงกับคำสั่ง onSnapshot ที่เราใช้ในไอเดียที่ 2 เช่นกัน มันจะเปลี่ยนมาโหลดจาก cache ทั้งหมดแทน
ผมก็เลยได้ข้อสรุปจากการทดลองทั้งหมดนี้ว่า
- [กรณี Firebase ล้วน] โหลดจาก bundle มาไว้ก่อน (ไอเดียที่ 1) แต่ถ้าไม่ได้มี update ใหญ่แล้ว ให้เปลี่ยนมาทำการ subscribe (onSnapshot) เพื่อเปลี่ยนมาดึงจาก cache ให้ตอนจังหวะดึงข้อมูลมา update เป็นปริมาณที่ไม่มากแทน (ไอเดียที่ 2) มันจะทำให้เรา weight ราคาระหว่าง Cloud storage และ Firestore ให้เหมาะสมซึ่งกันและกันได้
- [กรณีที่ไม่ใช้ Firebase] ถ้ารู้สึก pricing ของ Cloud storage มันแพง ก็เปลี่ยนไปใช้ตัวอื่นแทนได้ (อาจจะใช้เป็น CDN ที่ทำ caching ในตัวเอง) ก็จะยังคงสามารถใช้วิธี bundle แบบไม่แพงมากได้
- bundle จะมีข้อพิจารณาตอนเวลาเขียน bundle ด้วย ยิ่งข้อมูลเยอะมันใช้เวลาพอสมควรตอนเขียน bundle ขึ้นมา = ไม่แนะนำให้ใช้กับเคส realtime มากเกินไป
และนี่คือภาพที่สมบูรณ์ของเรื่องราวนี้
แชร์ไว้เผื่อใครสนใจอยากลองเข้าไปดูวิธีคำนวนของเรา
https://docs.google.com/spreadsheets/d/12b4t_lRpEFW4WxkT5xPuWvkjkVQ5TU-yMjrI4xolWOs/edit?usp=sharing
ใครสนใจเพิ่มเติมดู code ผ่าน github กันได้
https://github.com/mikelopster/firebase-bundle-cache-expirement
ข้อสรุปของเรื่องนี้
สำหรับผม ผมสนุกกับการทดลองนี้มาก 555 ผมก็ยังไม่แน่ใจนะว่าตัวเองค้นพบ solution แบบสุดทางแล้วหรือยัง ถ้าใครที่แวบมาอ่านก็มาแชร์กันเพิ่มเติมได้เพราะปัญหา Firebase Firestore เป็นปัญหาที่ผมเคยชนกับมันอยู่จริง และมันเคยทำเอาผม pain จนอยากจะเลิกใช้ Firebase ไปเลยก็ว่าได้ (แต่ยังไม่เลิกหรอก คนมันรักกันแล้ว จะให้เลิกกันมันคงยาก)
ถึงยังไงเทคโนโลยีอย่าง Firebase นั้นก็ยังถือว่าอำนวยความสะดวกสบายและยังเหมาะสมสำหรับการใช้งานเคสทั่วๆไปอยู่ดี แต่ถ้าจะต้องใช้ production ก็บริหาร cache ให้ดี หรือไม่งั้นก็ใช้ technology อื่นร่วมกันก็ได้ อาจจะทำให้เราสามารถทำระบบ production ที่สามารถใช้ pricing ที่เหมาะสมออกมาได้ดีกว่านี้ก็ได้นะ
Reference
- https://firebase.blog/posts/2021/04/firestore-supports-data-bundles/
- https://dev.to/moga/decrease-read-costs-of-firestore-using-firestore-data-bundles-30e9
-

- มารู้จัก Svelte และ SvelteKit กันมี Video มี Github
สำรวจโลกแห่งการพัฒนาเว็บไซต์สมัยใหม่ด้วยการแนะนำ Svelte และ SvelteKit ที่ครอบคลุมของเรา

- รู้จักกับ Vector Database และ ChromaDBมี Video มี Github
Vector Database คืออะไร? เจาะลึกฐานข้อมูลสำหรับยุค AI ที่เก็บข้อมูลจาก "ความหมาย" ไม่ใช่แค่คำตรงๆ พร้อมดู Demo การใช้งานจริงกับ ChromaDB

- LLM Local and APIมี Video
แนะนำพื้นฐาน LLM การใช้งานบน Local ด้วย LM Studio และ Ollama พร้อมตัวอย่างการสร้าง API ด้วย FastAPI และการใช้งานร่วมกับ Continue AI