
มาลองเล่น LIFF และ Messaging API กัน
/ 6 min read
 สามารถดู video ของหัวข้อนี้ก่อนได้ ดู video
** บทความนี้เดี๋ยวอาจจะกลับมาเรียบเรียงใหม่ เนื่องจากเป็นบทความที่ใช้ short note ร่วมกับคลิปดังกล่าว หากอ่านแล้วงงอย่างไร ลองดูจากคลิปกันก่อนได้นะครับ 🙏
รู้จักกันก่อนว่า LIFF คืออะไร ?
LIFF (LINE Frontend-end Framework) คือ WebView ที่สามารถรันเว็บไซต์อยู่ภายในแอป LINE ได้โดยตรง
- มีความสามารถในการทำงานร่วมกับ LINE Login เพื่อทำการทำ Authentication คู่่กันกับ LINE ได้ = LINE auto login
- สามารถเข้าถึง User’s Profile (บางส่วน) ของ LINE ได้ เช่น ชื่อ, ภาพ
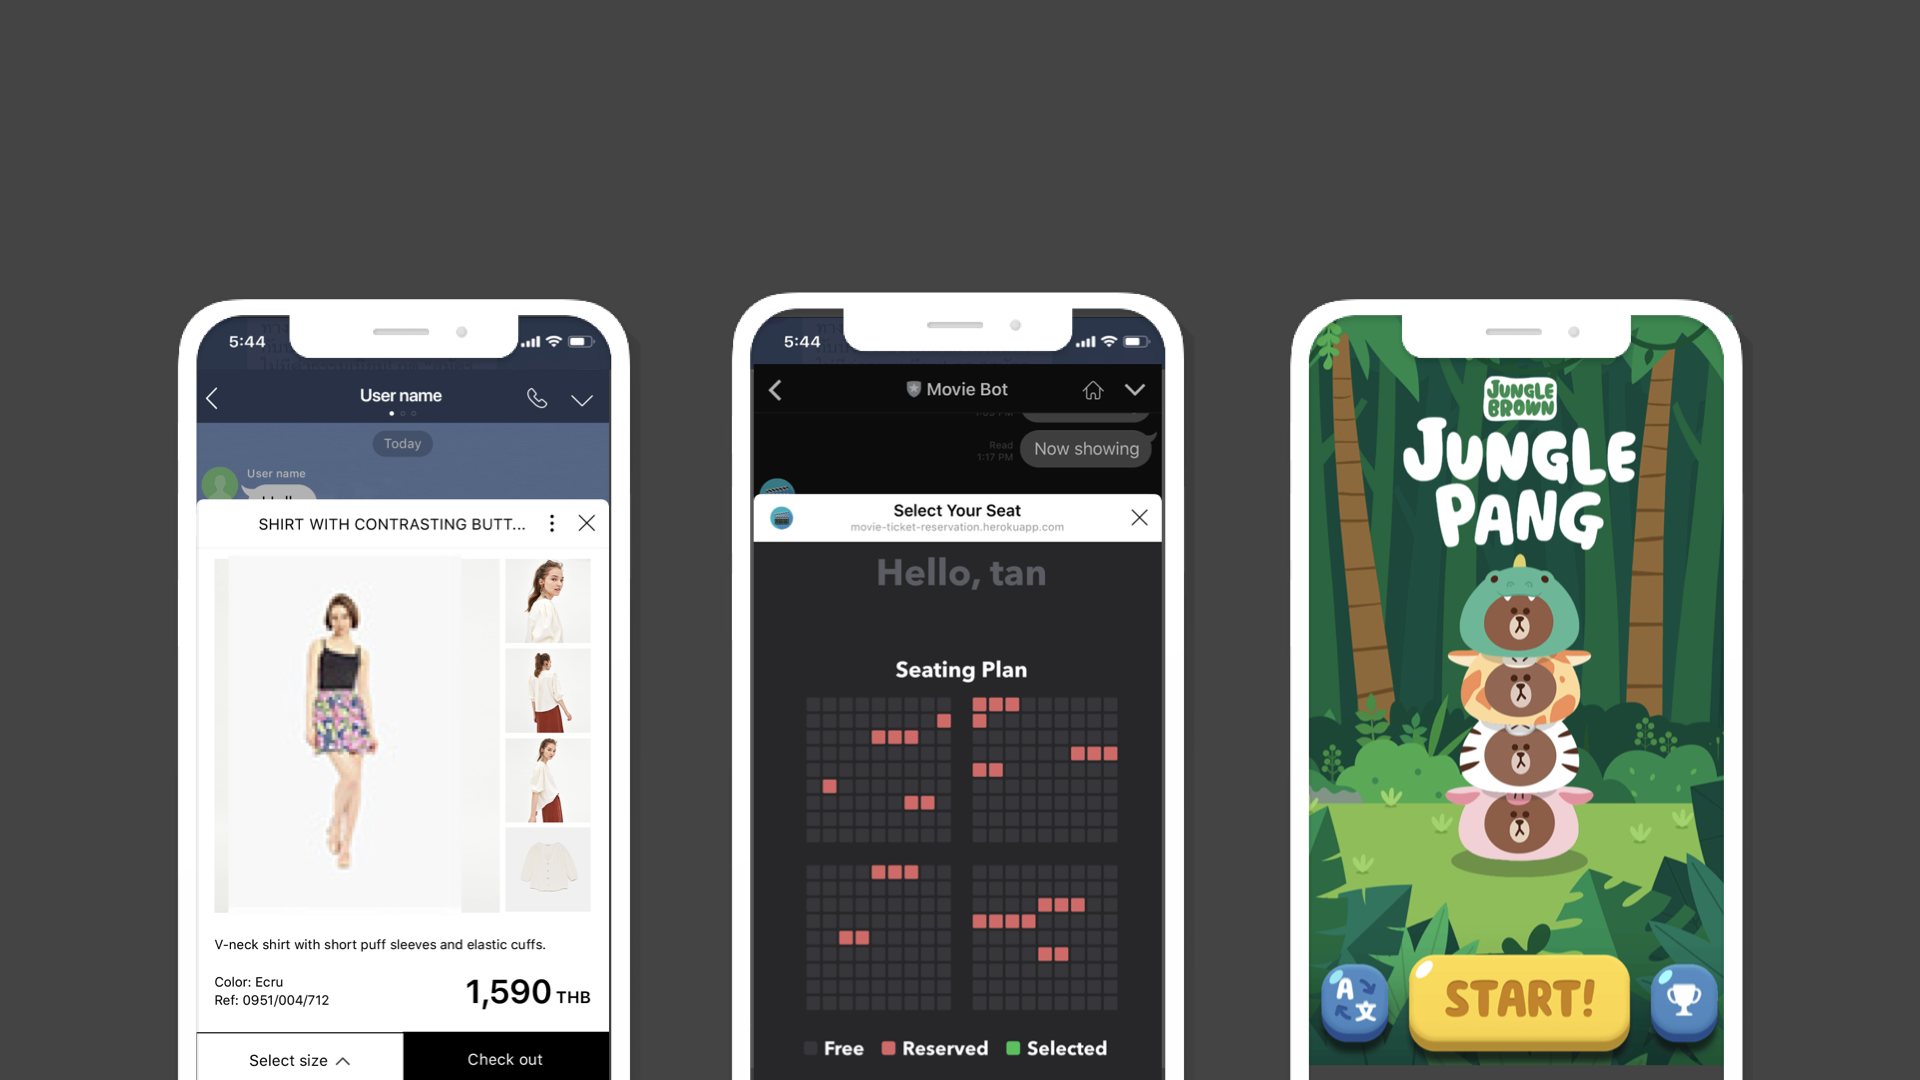
- เนื่องจากทำงานอยู่บน LINE = สามารถใช้งานร่วมกับ Chatbot ของ LINE ได้ (เดี๋ยวเราจะมาดูกันว่า ปัจจุบัน developer ทำอะไรกัน LINE แล้วได้บ้าง)
จุดเด่นที่ LIFF พยายามนำเสนอ
- ใช้งานร่วมกับ LINE = ไม่ต้องให้ลูกค้าจำ Login ตอนใช้งาน
- ใช้งานร่วมกับ LINE OA ที่มีอยู่แล้ว ทำให้ลูกค้ารู้สึกมีประสบการณ์ใช้งานเหมือนกับ application ของร้านค้าเอง
- ถ้ามี website อยู่แล้ว สามารถนำมาพัฒนาต่อยอดแล้วนำมาขึ้นบน LIFF ได้เลย
ปัจจุบัน Developer ทำอะไรกับ LINE ได้บ้าง
Ref: https://developers.line.biz/en/docs/
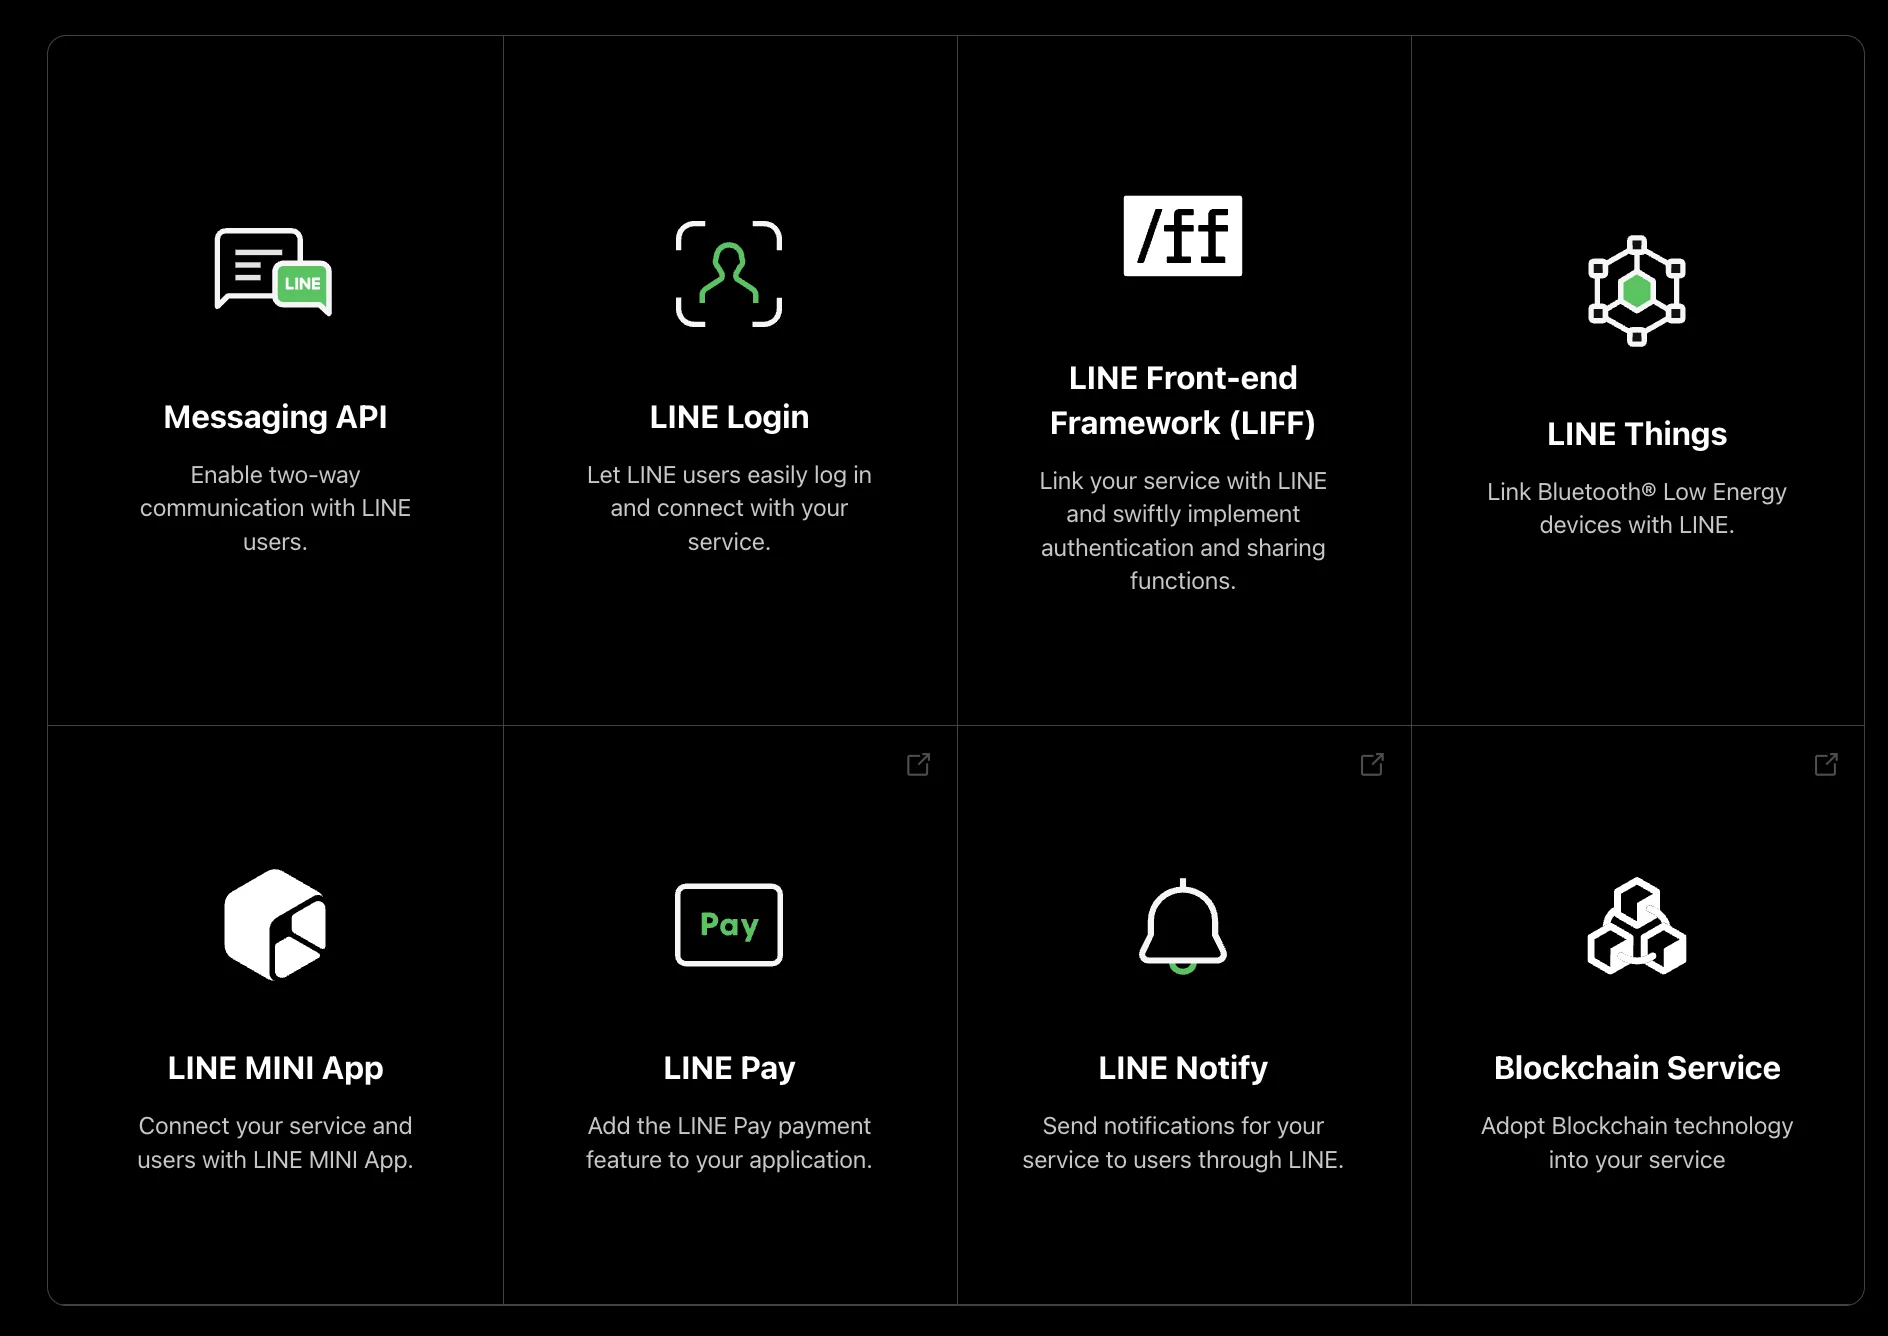
ปัจจุบันนั้น LINE มี service ที่ให้ developer มามีส่วนร่วมหลากหลาย service
เราจะเล่าเฉพาะ service ที่เกี่ยวข้องในวันนี้คือ
- Messaging API = เกี่ยวข้องกับการทำ chatbot บน LINE
- LINE Login = เกี่ยวข้องกับการทำเชื่อมต่อกับ LINE Account
- LIFF (LINE Frontend-end Framework) = Webview ที่สามารถเชื่อมต่อกับ Account ของ LINE ได้
ซึ่งทั้ง 3 service นี้สามารถสื่อสารผ่านตัวกลางหนึ่งที่ชื่อ userId ได้
- userId คือ unique key ที่เป็นตัวแทนของ user ในการสื่อสารกับ service provider ที่เราสร้างเป็น channel (ช่องทาง) ขึ้นมา
- ทุก service ที่อยู่ภายใต้ provider เดียวกัน จะใช้ userId (หรือ uid) เดียวกัน ในการสื่อสาร เช่น
- ถ้า LIFF service ได้ userID นี้มา
- จะเท่ากับ หากเราส่ง Messaging API เข้า userID เดียวกันก็จะสามารถส่งข้อความไปยังคนเดียวกันได้
เดี๋ยวเราจะลองมาเล่นๆไปพร้อมๆกันใน Session นี้
เราจะมา code อะไรกันบ้าง
Session นี้สิ่งที่เราจะทำคือ
- เพิ่มหน้าเว็บสำหรับ LIFF และ LINE Login เข้ามา
- เมื่อนำ LIFF ไปเปิดบน LINE (หรือ LINE Login) จะได้ userId มา เราจะนำ userId นั้นมาเล่นกับ 2 feature ของ Messaging API คือ LINE Message กับ Rich menu กัน
- เราจะลองรับข้อมูลจาก webhook (ที่ได้ userId) มาเหมือนกัน แล้วส่งข้อความกลับไปยัง LINE ของคนๆนั้น
เพื่อมา confirm และผู้ผลลัพธ์ไปพร้อมกันว่า userID ตรงกันหรือไม่
Strucuture project
├── index.html --> สำหรับหน้าเว็บ LIFF├── package.json└── server.js --> nodejs (express)Step แรก: สร้าง channel สำหรับการทำ LIFF และ Messaging API โดย
- เข้า https://developers.line.biz/ > Login LINE
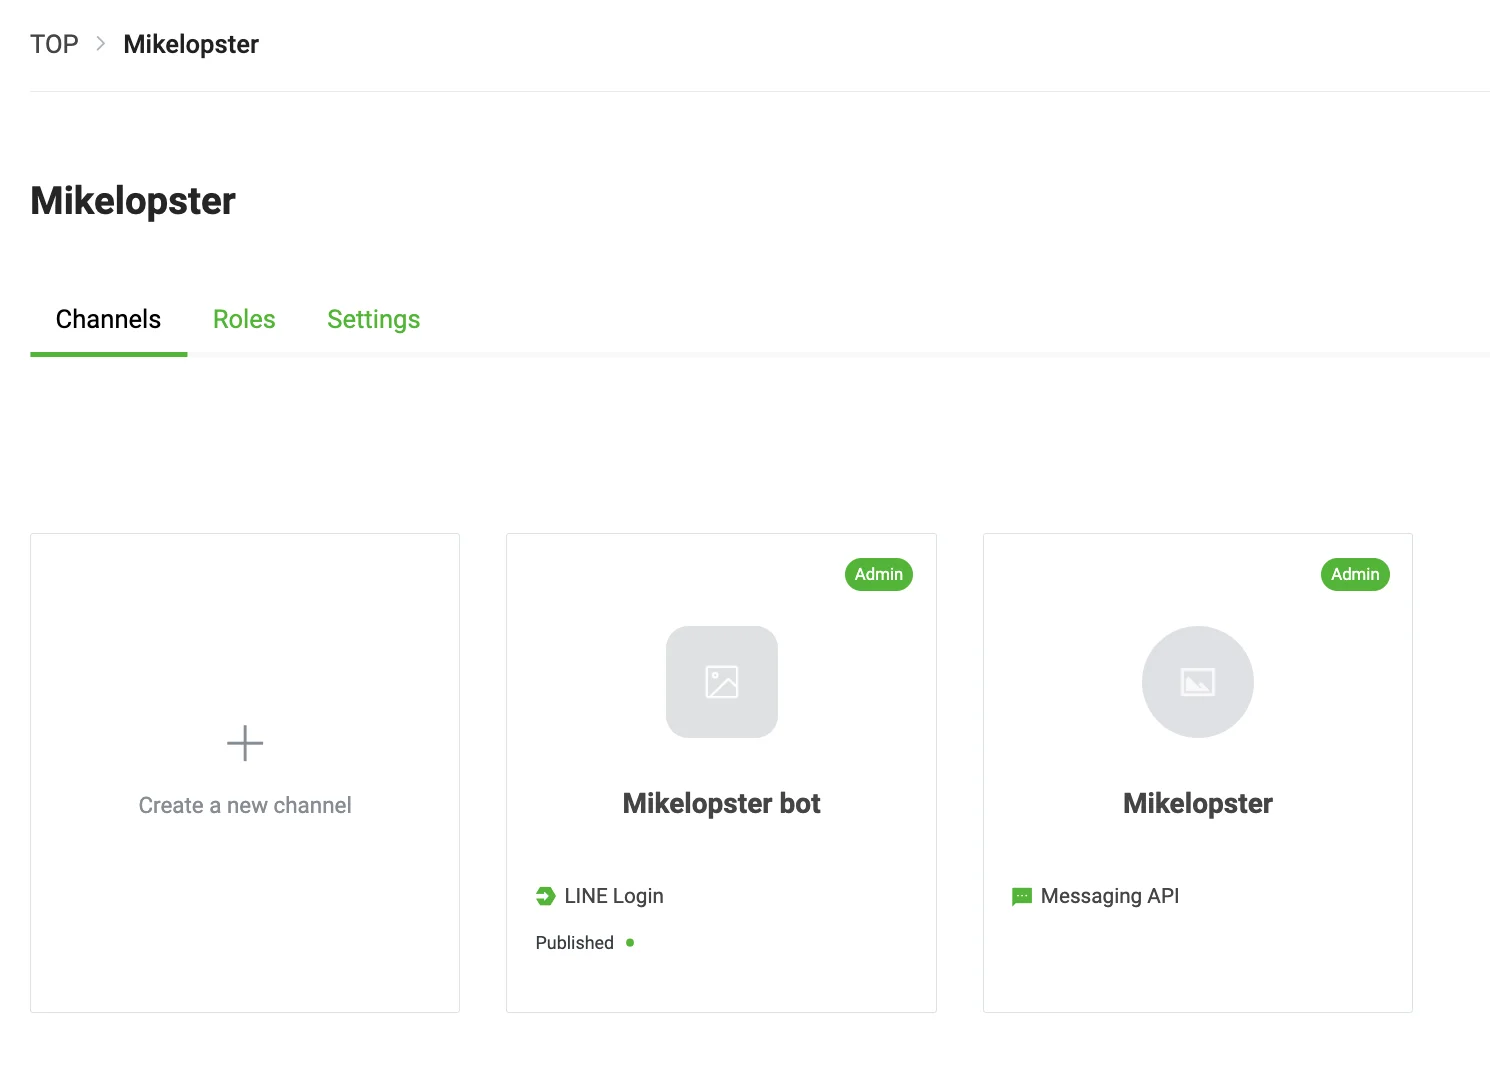
- กดสร้างตรง Provider
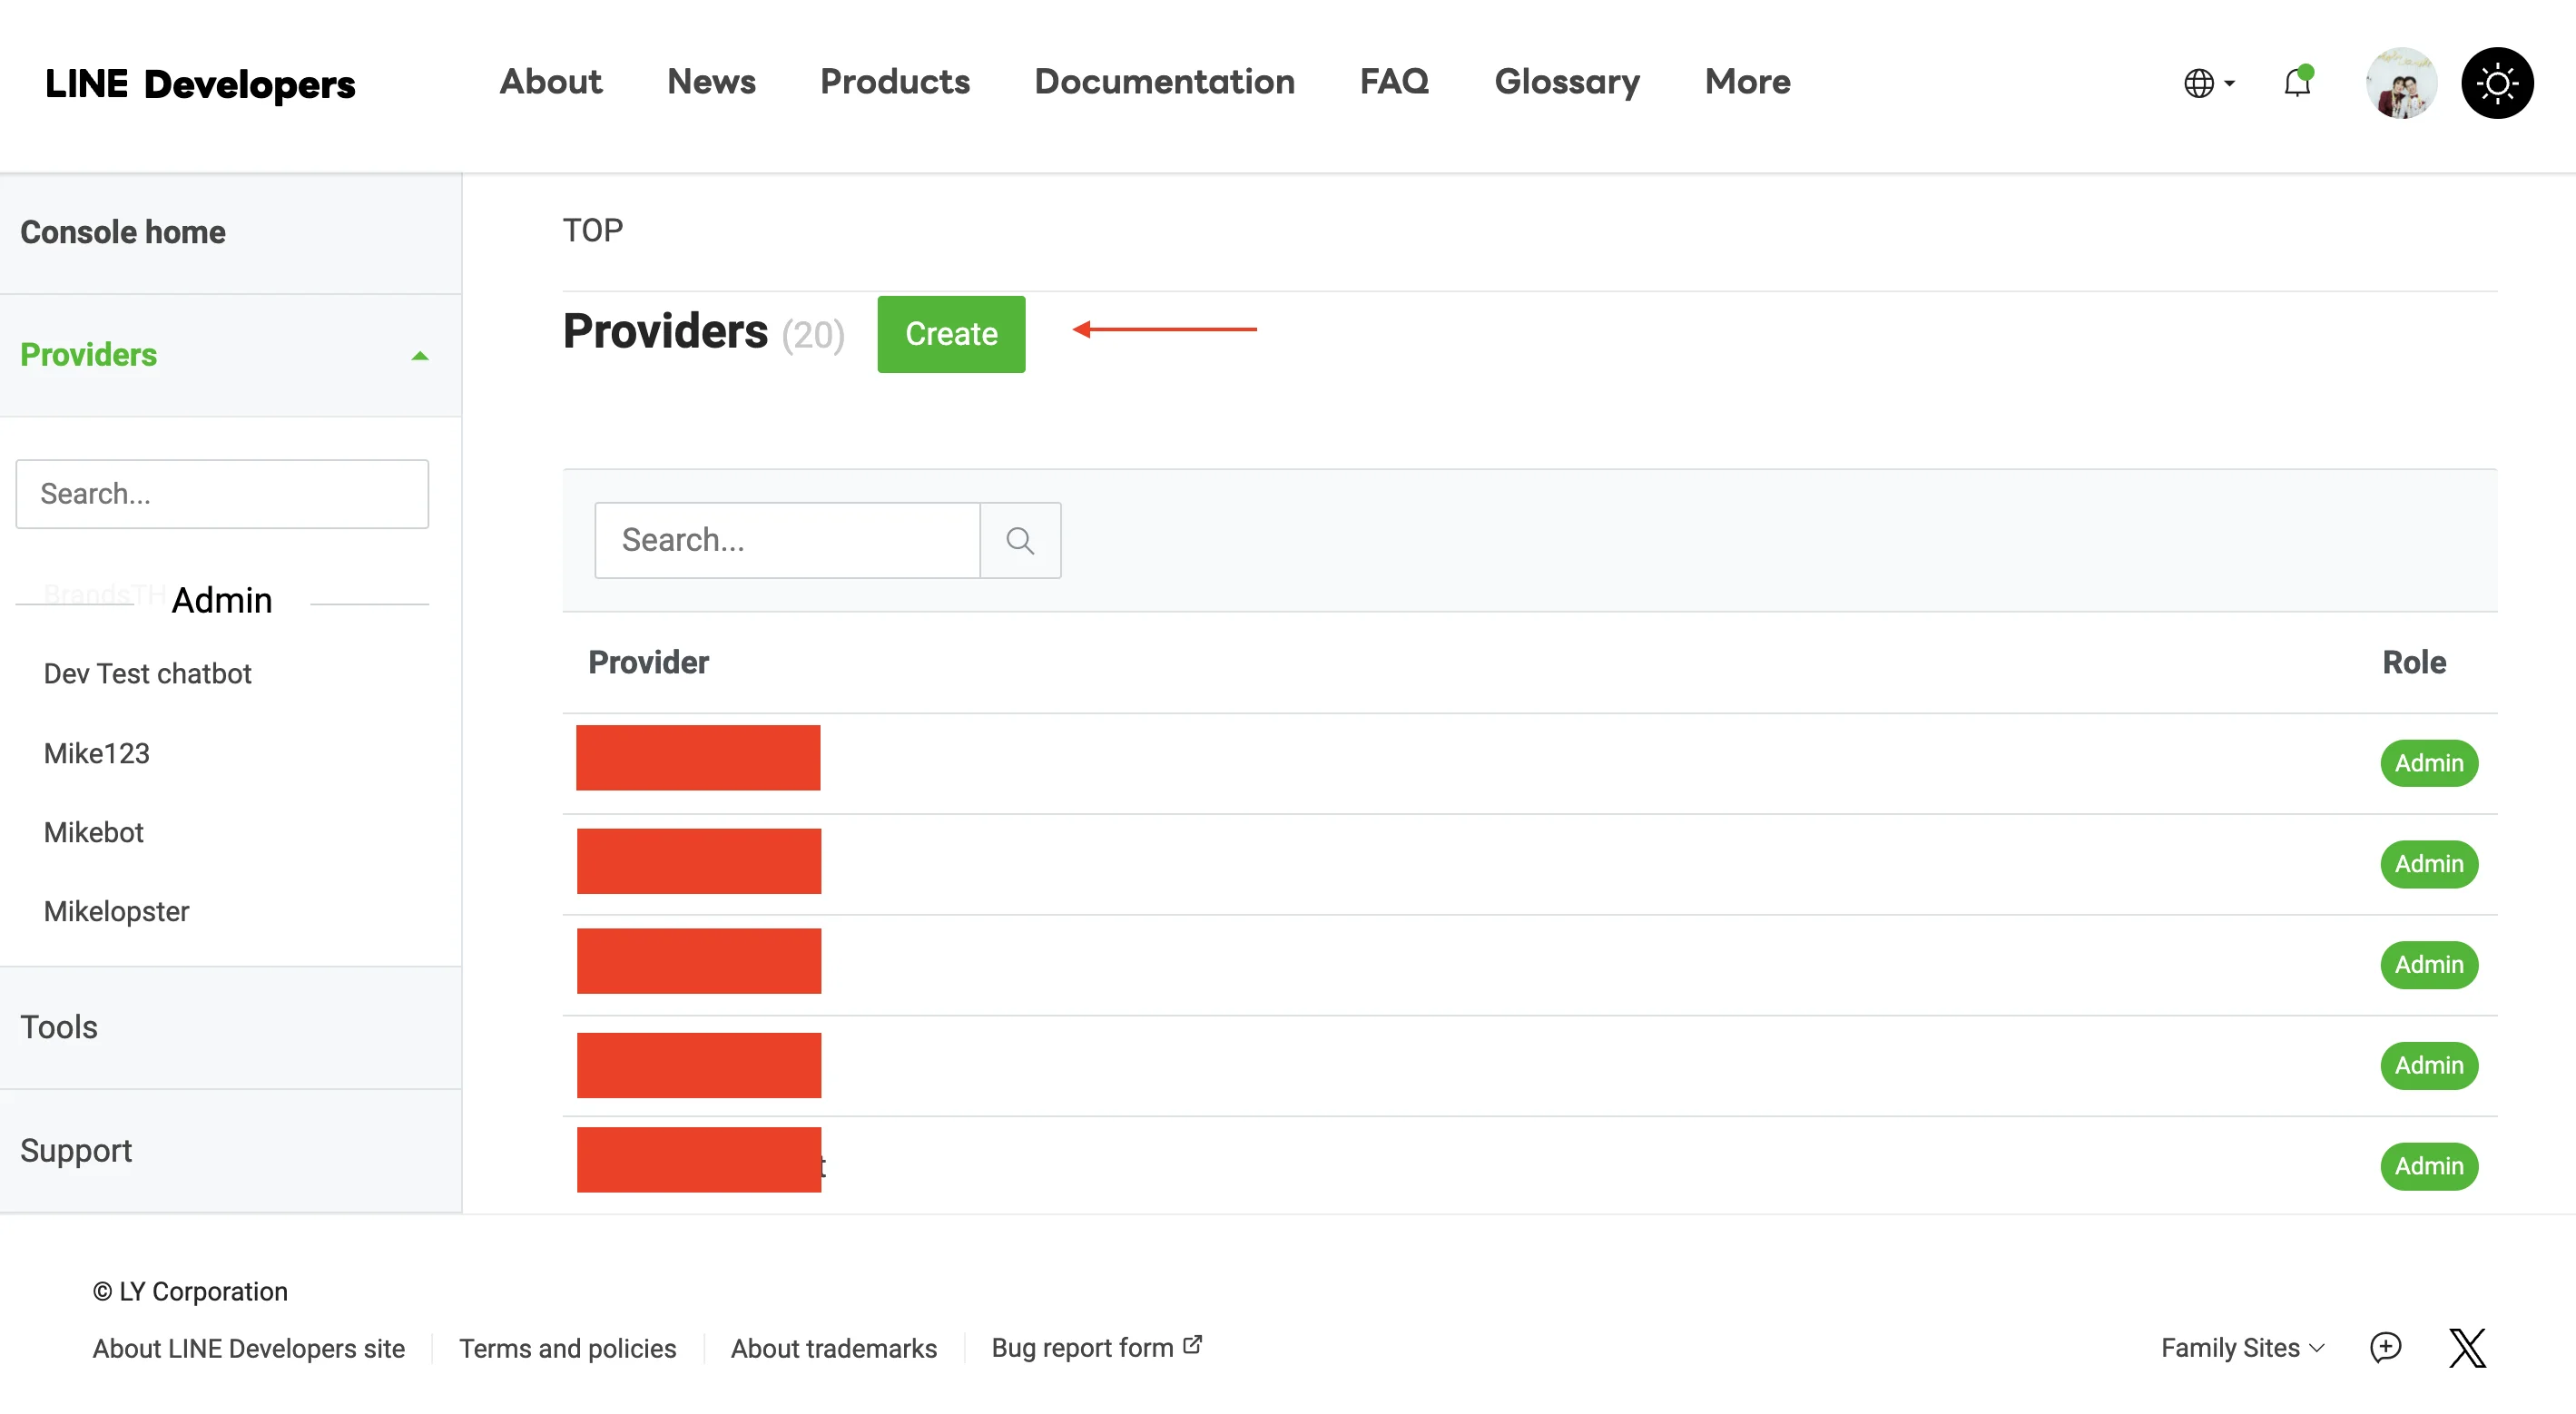
- เสร็จแล้วเมื่อได้ provider มาให้สร้าง channel
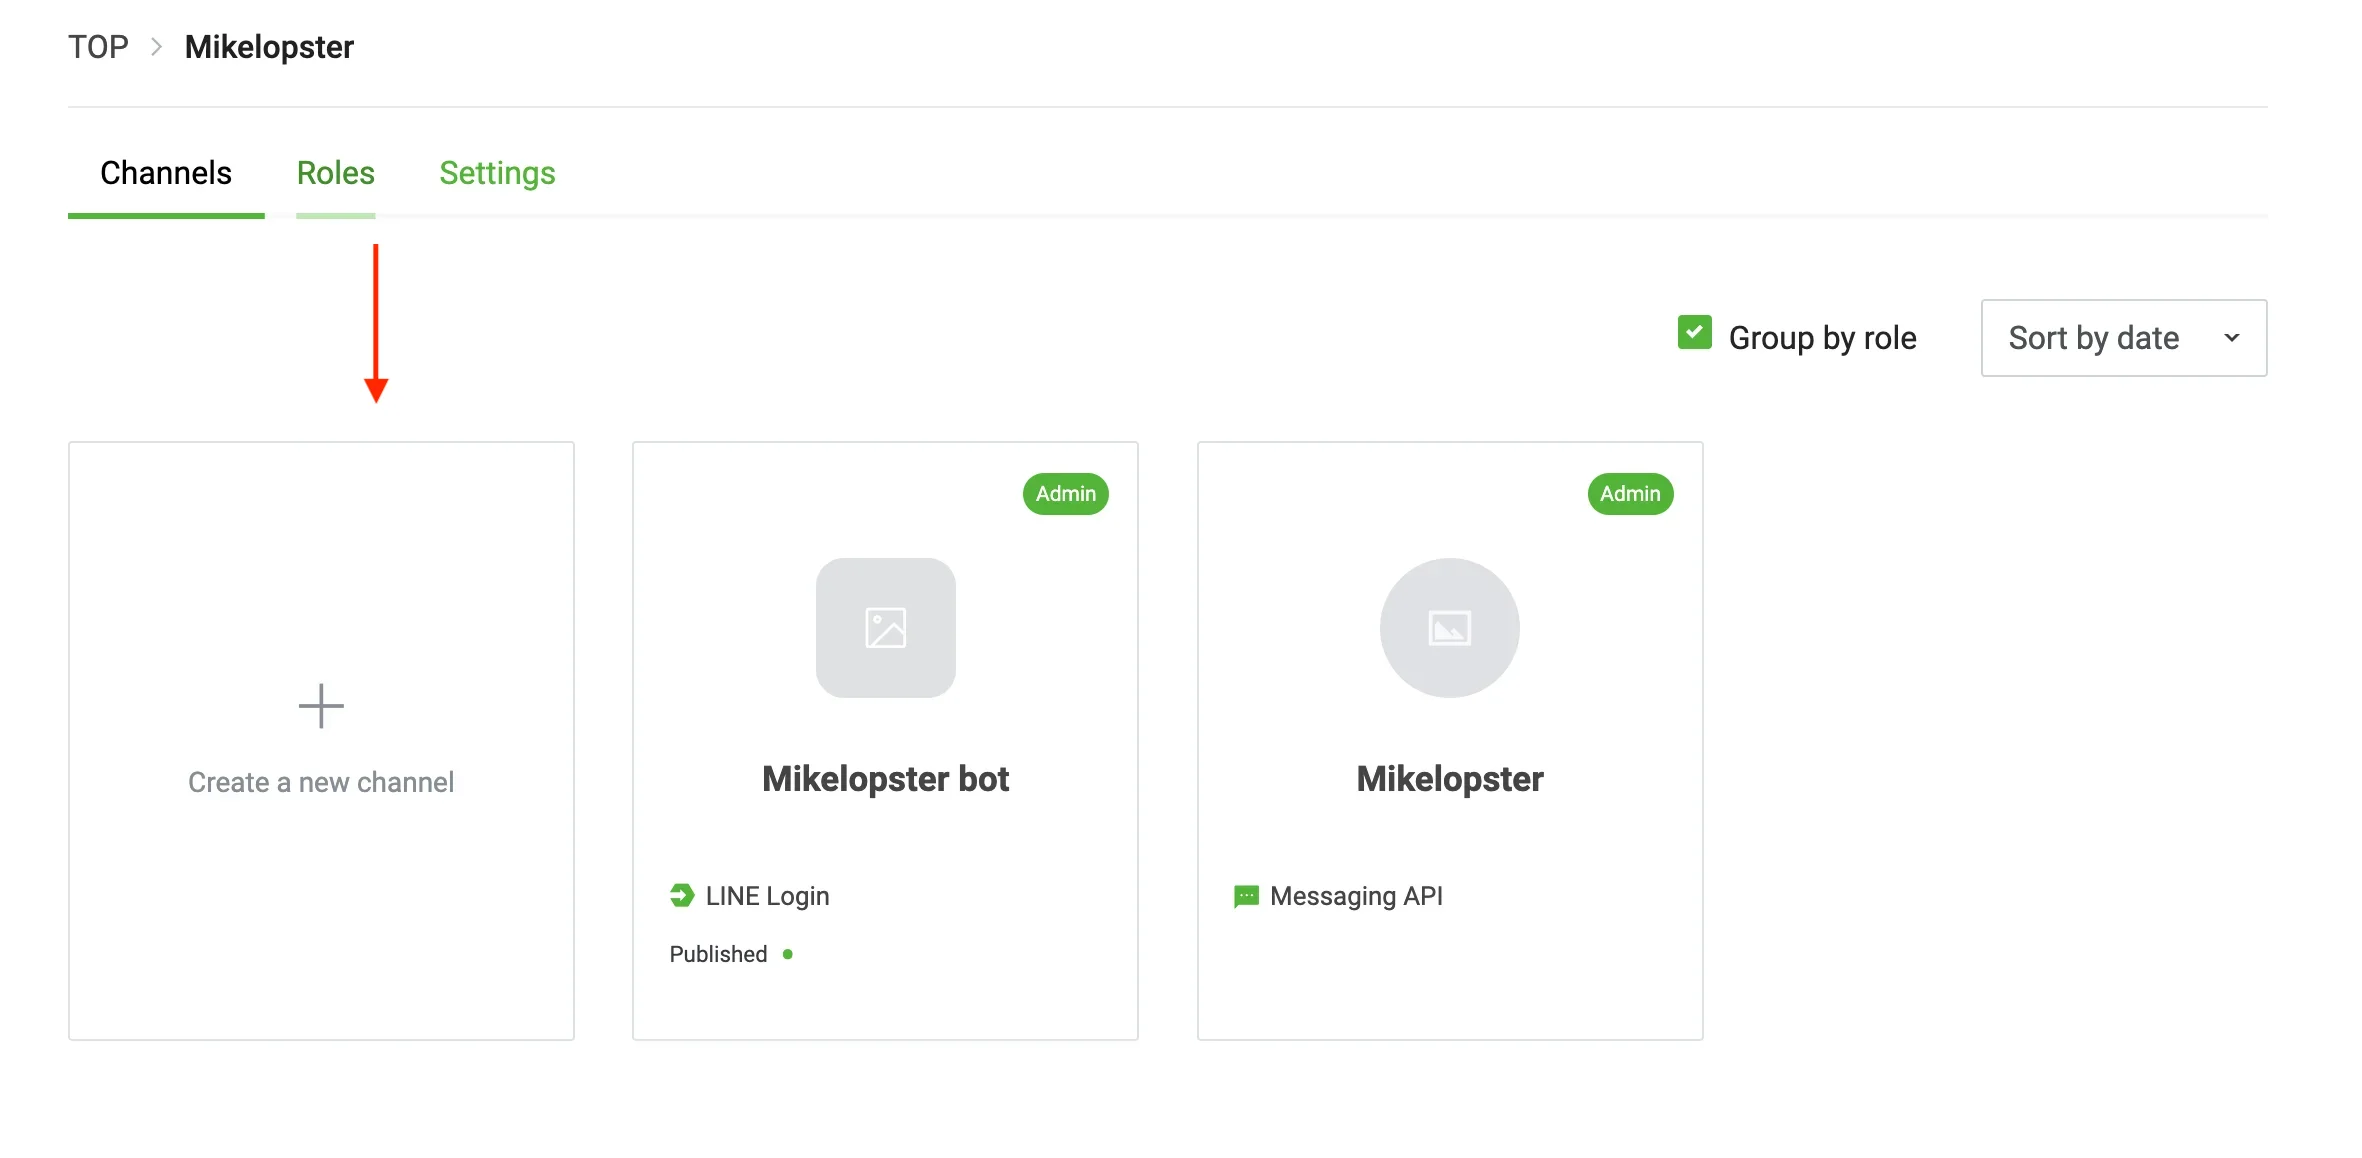
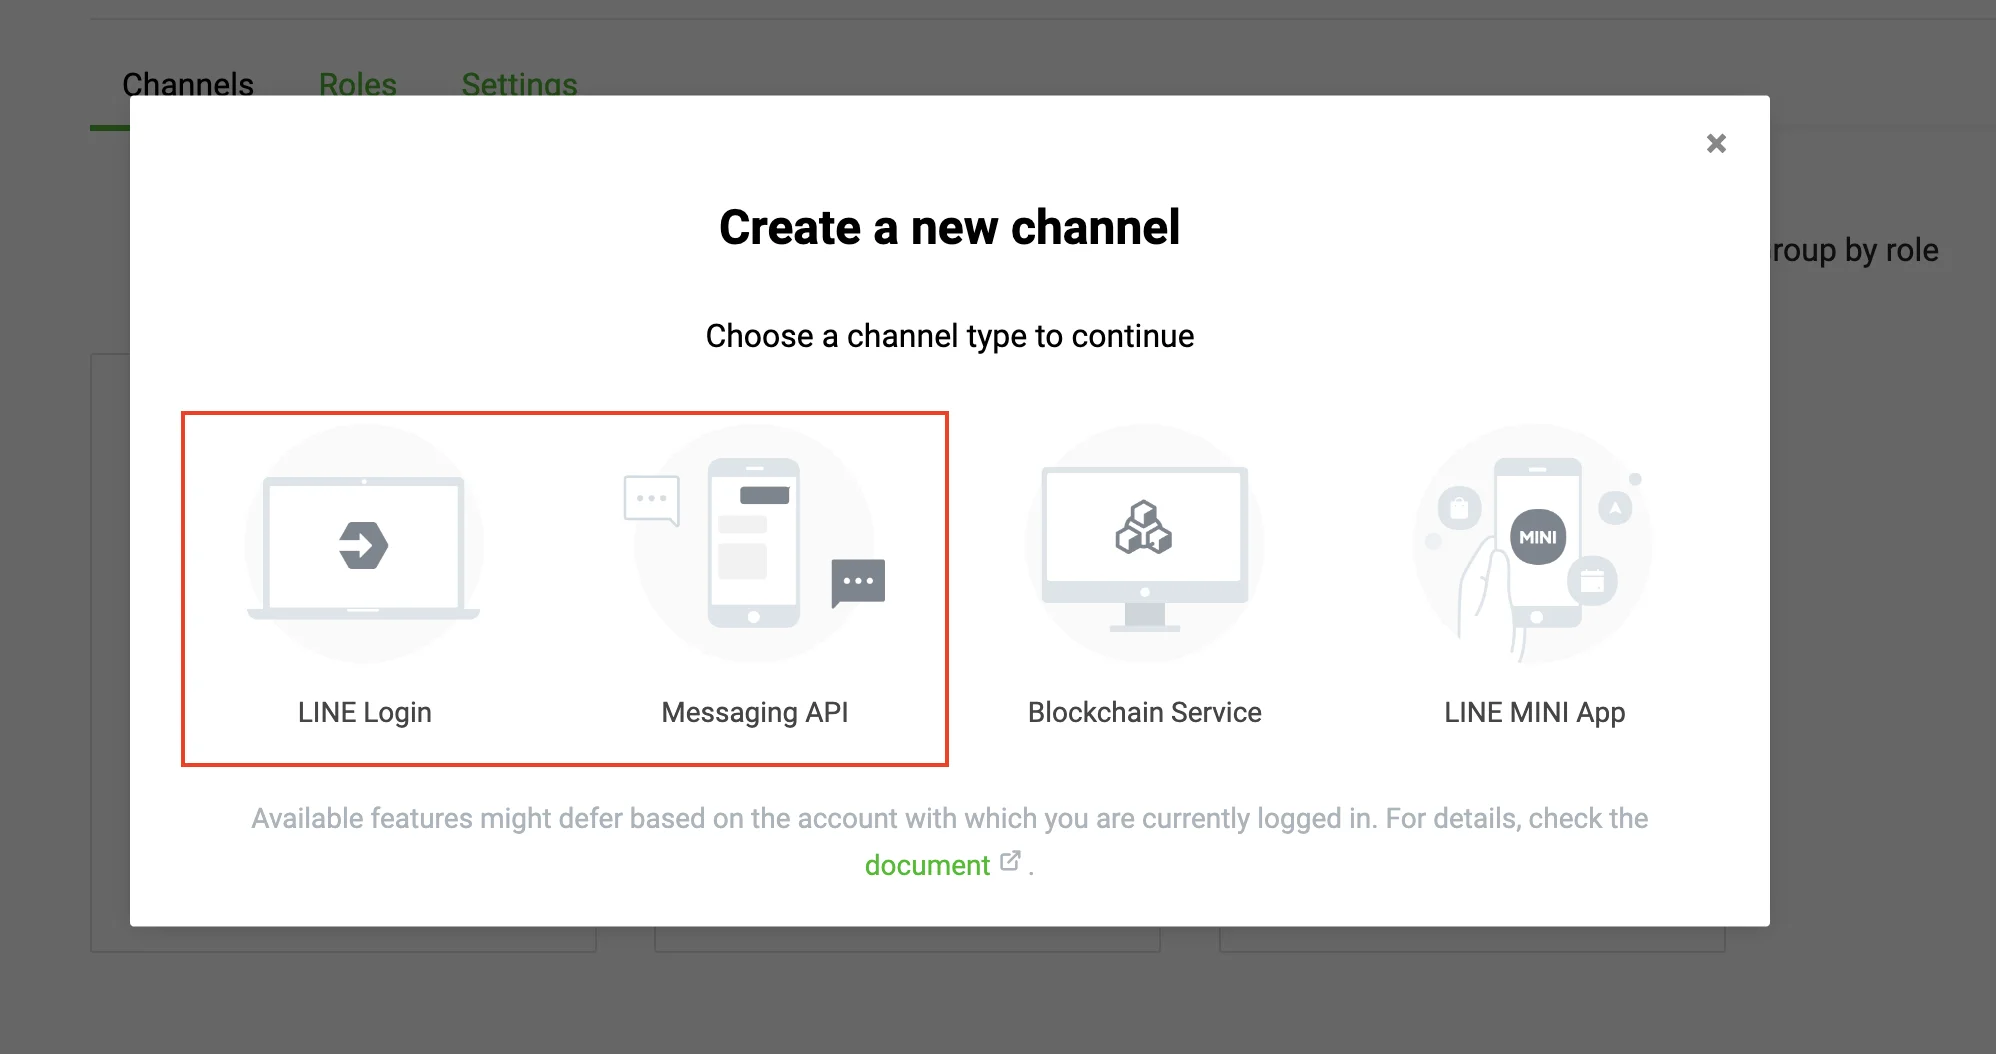
- กดสร้าง LINE Login และ Messaiging API มาคู่กัน
index.html
Note
- เพิ่ม liff login (โดยผูกกับ channel ที่สร้างไว้)
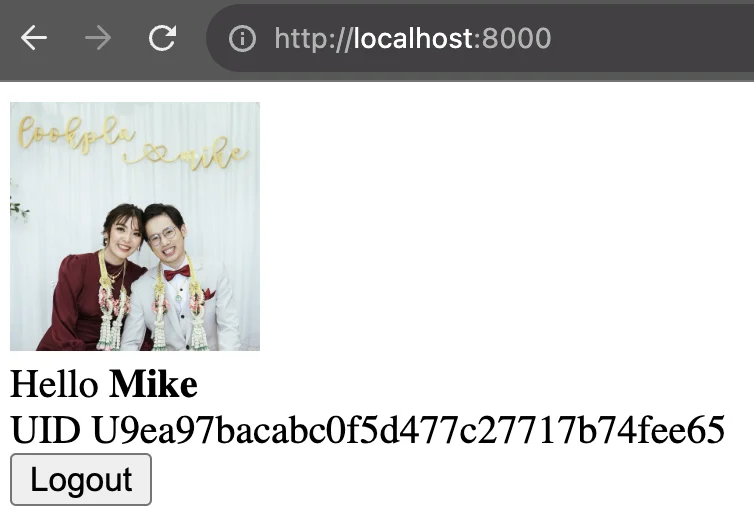
- ทดสอบดึง profile โดยเมื่อดึง profile มาได้ = ให้แสดงออกมาที่หน้าเว็บ (แสดงภาพ, uid ออกมา)
<!doctype html><html lang="en">  <head>    <meta charset="UTF-8" />    <meta name="viewport" content="width=device-width, initial-scale=1.0" />    <title>Document</title>    <style>      .message {        padding: 10px;        background: #ddd;      }    </style>  </head>  <body>    <div id="lineprofile" style="display: none;">      <img width="100px" id="profileImage" src="" />      <div>        Hello <b><span id="profileName">Name</span></b>      </div>      <div>UID <span id="profileUID">UID</span></div>    </div>    <script src="https://static.line-scdn.net/liff/edge/2/sdk.js"></script>    <script>      let userId = "";
      const logOut = () => {        liff.logout();        window.location.reload();      };      const main = async () => {        await liff.init({ liffId: "2000719050-rGVOBePm" });        if (liff.isLoggedIn()) {          const profile = await liff.getProfile();
          // update profile          profileImage.src = profile.pictureUrl;          profileName.innerText = profile.displayName;          profileUID.innerText = profile.userId;
          // collect userId          userId = profile.userId;
          // show profile          lineprofile.style.display = "block";        } else {          liff.login();        }      };      main();    </script>  </body></html>
ผลลัพธ์
server.js
Ref: https://developers.line.biz/en/reference/messaging-api/
Note
- เพิิ่ม API สำหรับการส่ง LINE Message (เข้า Messaging API) ผ่าน userId (ที่ได้จาก LIFF)
const express = require("express");const axios = require("axios");const cors = require("cors");
require("dotenv").config();
const app = express();app.use(cors());const port = 8888;
const LINE_API_URL = "https://api.line.me/v2/bot/message/push";
app.use(express.json());
const headers = {  "Content-Type": "application/json",  Authorization: `Bearer ${LINE_ACCESS_TOKEN}`,};
const sendMessage = async (userUid, message) => {  const body = {    to: userUid,    messages: [      {        type: "text",        text: message,      },    ],  };  const response = await axios.post(LINE_API_URL, body, { headers });  return response;};
app.post("/send-message", async (req, res) => {  const { userUid, message } = req.body;
  try {    const response = await sendMessage(userUid, message);    console.log("=== LINE log", response.data);    res.json({      message: "Message OK",    });  } catch (error) {    console.log("error", error.response.data);    res.status(400).json({      error: error.response,    });  }});
app.listen(port, async () => {  console.log(`Express app listening at http://localhost:${port}`);});
ลองเพิ่มตัวส่งจาก html
<!-- เหมือนเดิม --><body>  <div id="lineprofile" style="display: none;">    <img width="100px" id="profileImage" src="" />    <div>      Hello <b><span id="profileName">Name</span></b>    </div>    <div>UID <span id="profileUID">UID</span></div>
    <div class="message">      <div>Send message</div>      <input id="message" />      <button onclick="sendMessage()">Send</button>    </div>    <button onclick="logOut()">Logout</button>  </div>  <script src="https://static.line-scdn.net/liff/edge/2/sdk.js"></script>  <script    src="https://cdnjs.cloudflare.com/ajax/libs/axios/1.6.1/axios.min.js"    integrity="sha512-m9S8W3a9hhBHPFAbEIaG7J9P92dzcAWwM42VvJp5n1/M599ldK6Z2st2SfJGsX0QR4LfCVr681vyU5vW8d218w=="    crossorigin="anonymous"    referrerpolicy="no-referrer"  ></script>  <script>    let userId = "";
    const main = async () => {      await liff.init({ liffId: "2000719050-rGVOBePm" });      if (liff.isLoggedIn()) {        const profile = await liff.getProfile();
        // update profile        profileImage.src = profile.pictureUrl;        profileName.innerText = profile.displayName;        profileUID.innerText = profile.userId;
        // collect userId        userId = profile.userId;
        // show profile        lineprofile.style.display = "block";      } else {        liff.login();      }    };
    // เพิิ่ม sendMessage มายิงไปยังฝั่ง Backend    const sendMessage = async () => {      try {        if (!message.value) {          alert("message not found");          return false;        }
        const data = {          userUid: userId,          message: message.value,        };        console.log("data", data);        const response = await axios.post("http://localhost:8888/send-message", data);        console.log("response", response.data);      } catch (error) {        console.log("error", error.message);      }    };    main();  </script></body>
Rich menu API
Ref: https://developers.line.biz/en/docs/messaging-api/switch-rich-menus/#richmenu-switch-07
Note
- เราจะลองมาใช้ userID update richmenu กันบ้าง โดยยิงผ่าน Messaging API เพื่อไป update rich menu
- create rich menu
#!/bin/bash
curl -v -X POST https://api.line.me/v2/bot/richmenu \-H 'Authorization: Bearer <access token>' \-H 'Content-Type: application/json' \-d \'{ "size": { "width": 800, "height": 540 }, "selected": false, "name": "Default rich", "chatBarText": "Tap to open", "areas": [ { "bounds": { "x": 0, "y": 0, "width": 800, "height": 540 }, "action": { "type": "richmenuswitch", "richMenuAliasId": "al-menu2", "data": "richmenu=al-menu2" } } ]}'- upload rich menu
#!/bin/bash
curl -X POST https://api-data.line.me/v2/bot/richmenu/richmenu-9f201bd36e1c32db506ad8c043583cbc/content \-H "Authorization: Bearer <access token>" \-H "Content-Type: image/png" \-T ./images/800x540.png
เท่ากับเป็นการสร้าง rich menu เรียบร้อย
- set default rich menu
#!/bin/bash
curl -X POST 'https://api.line.me/v2/bot/user/all/richmenu/richmenu-00f38a8b2edf11419598cdddf9323cdd' -H 'Authorization: Bearer <access token>'- set link rich menu (กรณีที่อยาก link richmenu ไปมา)
#!/bin/bash
curl -X POST https://api.line.me/v2/bot/richmenu/alias \-H 'Authorization: Bearer <access token>' \-H 'Content-Type: application/json' \-d \'{ "richMenuAliasId": "main-1", "richMenuId": "richmenu-9f201bd36e1c32db506ad8c043583cbc"}'- force update rich menu from webhook (รับ userId จาก webhook และ force ยิงเปลี่ยน rich menu จากข้อความ)
ที่ server.js
- เพิ่มคำสั่ง จัดการกับ rich menu ผ่าน webhook
const defaultRichmenu = async () => {  try {    const response = await axios.get(`${LINT_BOT_API_URL}/all/richmenu`, { headers });    return response;  } catch (error) {}};
app.post("/webhook", async (req, res) => {  const { events } = req.body;
  if (!events || events.length <= 0) {    console.log("error event not found");    res.json({      message: "event not found !",    });    return false;  }
  try {    const lineEvent = events[0];    const lineUserID = lineEvent.source.userId;    let commandMessage = "";
    if (lineEvent.type === "message") {      if (lineEvent.message.text === "อยากกลับบ้าน") {        commandMessage = "back";      }    }
    // update richmenu ด้วย userId    if (commandMessage === "back") {      const richmenuResponse = await defaultRichmenu();      const response = await updateRichmenu(lineUserID, richmenuResponse.data.richMenuId);      console.log("=== LINE log", response.data);    }  } catch (error) {    console.log("error", error);  }});
Flex message
- ลองส่งเป็น Flex message
- ที่ server.js
// send Flex Messageconst sendFlexMessage = async (userUid, message) => {  try {    let contents = Object.assign({}, templateJSON);    contents.body.contents[0].text = message;
    const body = {      to: userUid,      messages: [        {          type: "flex",          altText: "this is a flex message",          contents,        },      ],    };    console.log("body", JSON.stringify(body));    const response = await axios.post(LINE_API_URL, body, { headers });    return response;  } catch (error) {    // console.log(error.response)    throw new Error(error.message);  }};
app.post("/send-message", async (req, res) => {  const { userUid, message } = req.body;
try { // เปลี่ยนมายิงผ่าน flex message แทน const response = await sendFlexMessage(userUid, message); console.log("=== LINE log", response.data); res.json({ message: "Message OK", }); } catch (error) { console.log("error", error.response.data); res.status(400).json({ error: error.response, }); }});- ลองนำ LIFF ขึ้นไปเล่นจริงบน LINE
อื่นๆเพิ่มเติม
LON (LINE Official Notification)
LINE shopping API (เชื่อม UID ไม่ได้)
Reference
Richmenu API
- https://medium.com/linedevth/richmenu-swich-action-ba3aa0a9f80a
- https://medium.com/linedevth/%E0%B8%88%E0%B8%B3-action-%E0%B9%84%E0%B8%94%E0%B9%89-%E0%B9%83%E0%B8%8A%E0%B9%89-action-%E0%B9%80%E0%B8%9B%E0%B9%87%E0%B8%99-%E0%B9%83%E0%B8%99-line-messaging-api-99cccc824dcb
- https://developers.line.biz/en/docs/messaging-api/switch-rich-menus/#richmenu-switch-07
- https://linedevth.line.me/th/liff#:~:text=LIFF%20%E0%B8%84%E0%B8%B7%E0%B8%AD%E0%B8%AD%E0%B8%B0%E0%B9%84%E0%B8%A3%3F,%E0%B9%81%E0%B8%AA%E0%B8%94%E0%B8%87%E0%B8%AA%E0%B8%B4%E0%B8%99%E0%B8%84%E0%B9%89%E0%B8%B2%E0%B8%88%E0%B8%B3%E0%B8%99%E0%B8%A7%E0%B8%99%E0%B8%A1%E0%B8%B2%E0%B8%81%20%E0%B9%80%E0%B8%9B%E0%B9%87%E0%B8%99%E0%B8%95%E0%B9%89%E0%B8%99
Github
https://github.com/mikelopster/liff-experiment
- รู้จักกับ React Hook และ Componentมี Video
พาทัวร์ feature ต่างๆของ React กันแบบรวดเร็วกัน สำรวจไปทุกๆ feature พร้อมกัน

- แนะนำ Dynamic programming แบบนิ่มนวลที่สุดมี Video
บทความนี้จะแนะนำเบื้องต้นเกี่ยวกับ Dynamic programming เทคนิคหนึ่งที่ใช้สำหรับแก้ปัญหาที่ ปัญหาย่อยที่ทับซ้อนกัน (overlapping subproblem)

- ลอง Rust Basic (2)มี Video
มาทำความรู้จักกับภาษา Rust กันต่อ พาเจาะลึก Concept ที่จะช่วยทำให้เราสามารถนำไปพัฒนา application ที่มีความยืดหยุ่นได้มากขึ้น
- รู้จักกับ Drizzle ORM ผ่าน Next.jsมี Video
มาทำความรู้จัก Drizzle ORM กัน ว่ามันคืออะไร และทำไมถึงเป็นที่นิยมในวงการนักพัฒนา และลองเล่นกับ Next.js ด้วยกัน