

มารู้จักกับ Elasticseach ที่ใช้ทำ Search engine กัน
/ 5 min read
 สามารถดู video ของหัวข้อนี้ก่อนได้ ดู video
Elasticsearch คืออะไร ?
Elasticsearch คือเครื่องมือสำหรับค้นหาและวิเคราะห์ข้อมูลแบบกระจาย (distributed) โจทย์ใหญ่ๆของ Elasticsearch คือช่วยทำให้ค้นหาสิ่งต่างๆใน DB ได้ง่ายและรวดเร็วขึ้น (คิดภาพเหมือนพวก Search Engine เลย)
องค์ประกอบใหญ่ๆของ Elasticsearch จะมีอยู่ 3 ส่วนคือ
- Database index = เอาข้อมูลทั้งหมด (ที่เป็น raw data) มาใส่ index (inverted index) จัดเรียงใหม่ (ให้อารมณ์เหมือนทำสารบัญหนังสือ)
- Relevancy = ใช้หลักการ TF-IDF (Term Frequency-Inverse Document Frequency) มาช่วยในการค้นหา
- Dashboard = ใช้ร่วมกับ kibana สำหรับการแสดงผล Dashboard filter ข้อมูลต่างๆและกราฟสรุปข้อมูลออกมาได้
ซึ่งปกติ Elasticsearch จะใช้กับ
- ระบบ Log = เนื่องจาก log ในแต่ละระบบมันเยอะมาก Elasticsearch ก็จะช่วยทำให้เราค้นหา log ในแต่ละระบบได้ง่ายขึ้น (มันใช้ทำพวก log analytic เช่น Fraud Detection)
- ระบบ Search engine = เช่น ค้นหาสินค้าจากหน้าบ้าน จะช่วยทำให้ค้นหาสินค้าได้ไวขึ้นมาก
- ระบบ Monitoring = สำหรับเก็บข้อมูลขนาดใหญ่ และ filter ข้อมูลมาวิเคราะห์ได้
มองง่ายๆมันคือ “ระบบเก็บข้อมูลขนาดใหญ่ทีี่ค้นหาได้ไวและกระจายตัวได้” อะไรที่เราต้องการทำภายใต้โจทย์นี้ = Elasticsearch ทำได้หมด
ทำไมต้อง Elasticsearch มันเหนือว่า NoSQL ทั่วไปยังไงบ้าง ?
แน่นอน คนชอบเปรียบเทียบ Elasticsearch กับ NoSQL ที่เป็น Database document เหมือนกัน คำถามก็คือมันมีความแตกต่่างกันยังไงระหว่าง 2 ตัวนี้
Elasticsearch คือ “เครื่องมือ” สำหรับการค้นหาที่ build on top อยู่บน Apache Lucene จริงอยู่ที่เบื้องหลังมันเป็น NoSQL เหมือนกัน แต่ด้วยความที่มันเป็นเครื่องมือที่ bulid มาเสริม NoSQL มันจึงได้คุณสมับัติเพิ่มเติมเข้ามาจาก NoSQL ทั่วๆไป (เทียบกับ MongoDB, Cassandra, Couchbase)
ข้อดีของ Elasticsearch เทียบกับ NoSQL ทั่วไป
- Full-Text Search Capabilities = ทำ search text กับ field ของข้อมูลได้, ทำทีละหลาย field พร้อมกันก็ได้ หรือทำทีละหลาย index (เทียบง่ายๆทีละหลาย table ในฐานข้อมูล) ก็ได้
- Ranking = สามารถจัด Ranking ความเหมือนของข้อความออกมาได้ (ใช้ทำกับ Similarity search ออกมาได้)
- Scalability = มี feature Horizontal scale มาในตัวเลย (มัน support การ scale แบบ cluster ให้อยู่แล้ว เพราะตัวมันโดน design มาแบบ distributed อยู่แล้ว)
- Real-Time Indexing = ทำ index ให้อัตโนมัติทันทีที่ insert ข้อมูลเข้าไป
- RestFUL API support = มี API ที่สามารถยิงทดสอบใช้งานได้ทันที (โดยไม่ต้องลงอะไรเพิ่มเลย)
มันเลยจะมองว่าเป็นฐานข้อมูลอย่าง NoSQL ตรงๆก็ไม่ได้ มันควรถูกมองเป็นเครื่องมือ
หลักการ Elasticsearch
graph TD
  A[Client] --> B[Cluster]
  B --> C1[Node 1]
  B --> C2[Node 2]
  C1 --> D1[Index 1]
  C1 --> D2[Index 2]
  D1 --> E1[Shard 1]
  D1 --> E2[Shard 2]
  D2 --> E3[Shard 3]
  D2 --> E4[Shard 4]
  E1 --> F1[Document 1]
  E2 --> F2[Document 2]
  E3 --> F3[Document 3]
  E4 --> F4[Document 4]
หลักการของ Elasticsearch คือ
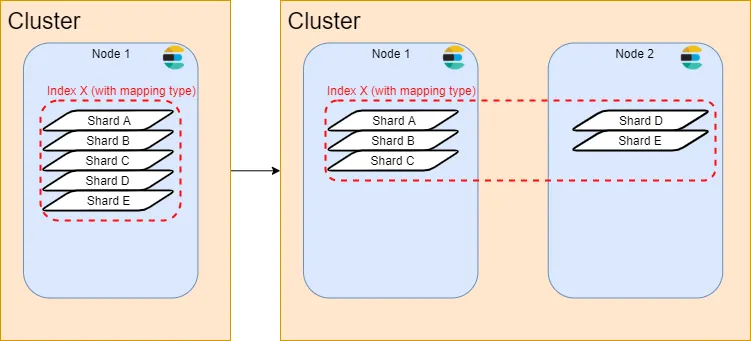
- เราจะมี node สำหรับเก็บข้อมูลของ Elasticsearch (ซึ่งสามารถ run พร้อมกันหลาย node รวมกันเป็น Cluster ได้)
- ในแต่ละ node มี Index ที่เก็บเป็น configuration ไว้ว่า ข้อมูลชุดนี้ (เปรียบได้กับ collection ของ Mongo หรือ table ใน SQL) จะมีข้อมูลอะไรจัดเก็บไว้บ้าง, มีรูปแบบการเก็บยังไงและ field ไหนบ้าง รวมถึงจะมีการเก็บข้อมูลเอาไว้ด้วยว่า ข้อมูลชุดนี้จะต้องมีกี่ Shard ในการกระจายข้อมูลบ้าง
- Shard คือ หน่วยของการเก็บข้อมูล (index คือเก็บ structure, shard คือเก็บข้อมูล) โดย index จะทำการกระจายตัวข้อมูลออกมาเป็น shard เพื่อให้สามารถกระจายข้อมูลออกจากกันได้ (โดยจะเก็บในรูปแบบของ JSON Document)
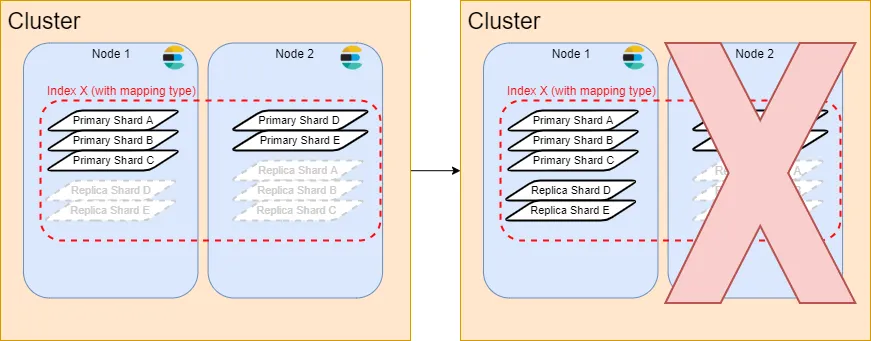
ซึ่ง Shard ก็จะมี 2 ประเภทคือ Primary Shard และ Replica Shard
- Primary Shard = ที่เก็บข้อมูลหลักของ document ใน index นั้น (ถ้ามีมากกว่า 1 Primary Shard = ข้อมูลจะกระจายออกจากแต่ละ Shard ประมาณเท่าๆกัน)
ซึ่งจริงๆ เราสามารถ scale โดยใช้ Primary Shard กระจายตัวไปแบบภาพบนก็ได้ แต่การทำแบบนี้ต้นทุน index จะสูงขึ้นเรื่อยๆ (เพราะมันต้องระบุตำแหน่งว่าข้อมุลนี้ อยู่ shard ไหนเครื่องไหนด้วย) รวมถึงตอนปรับ Primary shard ต้องมีการ reindex เพื่อปรับตอน Primary shard เปลี่ยนไปด้วย
Elasticsearch เลยมีอีกตัวหนึ่งคือ “Replica shard” เตรียมเอาไว้ 2. Replica Shard = Shard ที่ copy ข้อมูลจาก Primary shard เอาไว้ (อารมณ์ DB replica read ของพวกที่จัดการ DB เป็น cluster เลย) มีจุดประสงค์คือสำรองข้อมูลไว้กับ node อื่น และช่วยกระจาย read ของการอ่านข้อมูลใน Shard ของแต่ละตัวออกจากกันด้วย (ทำให้ Elasticsearch แข็งแกร่งในแง่)
เคสที่เราจะมาทำวันนี้
- เล่น Elasticsearch กันผ่าน docker-compose โดยจะลองเรียกข้อมูลผ่าน Rest API ของ Elasticsearch
- และลองเรียกผ่าน Express เพื่อส่งผลลัพธ์เป็น JSON ตามที่เราต้องการ
- เราจะลอง config Shard เพิ่มเติมเพื่อให้เห็นภาพการ Scale ของ Elastic search (เราจะมาเรียนรู้องค์ประกอบของ Elasticsearch กัน)
setup project
มีเพียง 3 files เท่านั้น
├── docker-compose.yml├── index.js└── package.jsonโดย docker-compose จะทำการสร้าง container ของ 2 services คือ Elasticsearch และ Kibana
version: "3"
services:  es01:    image: docker.elastic.co/elasticsearch/elasticsearch:7.15.0    container_name: es01    environment:      - node.name=es01      - cluster.name=es-docker-cluster      - discovery.seed_hosts=es02      - cluster.initial_master_nodes=es01,es02      - bootstrap.memory_lock=true      - "ES_JAVA_OPTS=-Xms512m -Xmx512m"    ulimits:      memlock:        soft: -1        hard: -1    volumes:      - es01-data:/usr/share/elasticsearch/data    ports:      - 9200:9200    networks:      - esnet
  es02:    image: docker.elastic.co/elasticsearch/elasticsearch:7.15.0    container_name: es02    environment:      - node.name=es02      - cluster.name=es-docker-cluster      - discovery.seed_hosts=es01      - cluster.initial_master_nodes=es01,es02      - bootstrap.memory_lock=true      - "ES_JAVA_OPTS=-Xms512m -Xmx512m"    ulimits:      memlock:        soft: -1        hard: -1    volumes:      - es02-data:/usr/share/elasticsearch/data    networks:      - esnet
  kibana:    image: docker.elastic.co/kibana/kibana:7.14.0    container_name: kibana    environment:      - ELASTICSEARCH_HOSTS=http://es01:9200    ports:      - 5601:5601    depends_on:      - es01    networks:      - esnet
networks:  esnet:
volumes:  es01-data:  es02-data:
ที่ package.json จะทำการลง package ไว้ดังนี้
{ "name": "elasticsearch-basic", "version": "1.0.0", "description": "", "main": "index.js", "scripts": { "start": "npx nodemon index.js", "test": "echo \"Error: no test specified\" && exit 1" }, "author": "", "license": "ISC", "dependencies": { "@elastic/elasticsearch": "^7.17.11-patch.1", "@faker-js/faker": "^8.1.0", "express": "^4.18.2" }, "devDependencies": { "nodemon": "^3.0.1" }}โดย package ที่เราจะลงจะประกอบด้วย
expressสำหรับทำ APIfakerสำหรับ mock data (ที่จะใส่ elasticsearch เข้าไป)@elastic/elasticsearchlibrary node สำหรับจัดการ Elastic search
เริ่มลอง API Elasticsearch กันก่อน
ลองใส่ข้อมูลเข้า Elasticsearch
POST http://localhost:9200/books/_doc
BODY:{  "title": "The Great Gatsby",  "author": "F. Scott Fitzgerald",  "genre": "Fiction",  "published_date": "1925-04-10"}
นับจำนวนข้อมูลใน index
GET http://localhost:9200/books/_countลอง search ข้อมูลผ่าน Elasticsearch
- ดึงทั้งหมด
POST http://localhost:9200/books/_search?pretty
BODY:{ "size": 100, "query": { "match_all": {} }}- ค้นหาเฉพาะ title
POST http://localhost:9200/books/_search?pretty
BODY:{ "size": 100, "query": { "match": { "title": "test" } }}- ค้นหาแบบหลาย field
POST http://localhost:9200/books/_search?pretty
BODY:{  "query": {    "multi_match": {      "query": "gatsby",      "fields": ["title", "author", "category"]    }  }}
ดูว่าข้อมูลถูกเก็บอยู่ที่ไหนบ้าง
GET http://localhost:9200/_cat/shards/books?vมาลองผ่าน Express กัน
เราจะมาทำ 3 API กัน
GET /initสำหรับทดลองใส่ข้อมูลจำนวนมากเข้าไป (เราจะวนลูปยิงไป)GET /search?q=<text>สำหรับทดสอบการค้นหาPOST /insert?index=<index_name>สำหรับนำข้อมูลเข้า index เข้าไป
setting กันก่อน เราจะเพิ่มสิ่งเหล่านี้กันไปก่อน
- library elasticsearch และทำการ connect ไปยัง localhost:9200
- library faker สำหรับเตรียมใช้ faker ข้อมูล
const express = require("express");const { Client } = require("@elastic/elasticsearch");const { faker } = require("@faker-js/faker");
const app = express();app.use(express.json());
const PORT = 8000;
const genres = [  "Fantasy",  "Science",  "Mystery",  "Historical",  "Romance",  "Horror",  "Biography",  "Adventure",];
const getRandomGenre = () => {  const randomIndex = Math.floor(Math.random() * genres.length);  return genres[randomIndex];};
// Instantiate Elasticsearch clientconst client = new Client({ node: "http://localhost:9200" });
/* เดี๋ยวเราจะเพิ่ม code ตรงนี้กัน */
app.listen(PORT, () => {  console.log(`Express server started on http://localhost:${PORT}`);});
1. GET /init
app.get("/init", async (req, res) => { // จำนวนที่จะ gen for (let i = 0; i < 10000; i++) { let book = { title: faker.commerce.productName(), author: faker.person.fullName(), genre: getRandomGenre(), }; console.log("position ", i, "title", book.title); await client.index({ index: "old_books", body: book, }); } res.send({ success: true, message: "Books indexed!" });});2. GET /search?q=<text>
app.get("/search", async (req, res) => {  const { q } = req.query;
  if (!q) {    return res.status(400).send({ error: "Query parameter q is required." });  }
  try {    const result = await client.search({      index: "books",      body: {        query: {          match: {            title: q,          },        },      },    });
    res.send(result.body.hits.hits);  } catch (error) {    console.error("Elasticsearch error:", error);    res.status(500).send({ error: "Failed to search." });  }});
3. POST /insert?index=<index_name>
app.post("/insert", async (req, res) => {  const data = req.body;  const { index } = req.query;
  if (!data) {    return res.status(400).send({ error: "Data payload is required." });  }
  try {    const result = await client.index({      index,      body: data,    });
    res.json({      success: true,      result,    });  } catch (error) {    res.status(500).json({      message: "Failed to insert data.",      error,    });  }});
การ deploy Elasticsearch ในปัจจุบัน
- ถ้าเป็นสมัยก่อน ทุกคนจะพูดเป็นเสียงเดียวกันว่า “Amazon Elasticsearch Service”
- ปัจจุบัน Elastic search ก็มี service เป็นของตัวเองอยู่ที่นี่ https://www.elastic.co/pricing/
- จะไป deploy เองผ่าน cloud cluster อย่าง kube ก็ได้ (ปัจจุบัน Elastic search ไม่ใช่ Open source แล้ว แต่ยังคงใช้ free ได้)
- และ AWS เปลี่ยนเป็น “https://docs.aws.amazon.com/opensearch-service”
Ref: https://dev.to/aws-builders/elastic-search-and-open-search-a-brief-history-of-the-license-war-52cb
Reference
https://morphos.is/th/blog/faster-and-scalable-search-engine-using-elasticsearch https://medium.com/insightera/%E0%B9%80%E0%B8%A3%E0%B8%B4%E0%B9%88%E0%B8%A1%E0%B8%95%E0%B9%89%E0%B8%99%E0%B8%81%E0%B8%B2%E0%B8%A3%E0%B8%88%E0%B8%B1%E0%B8%94%E0%B9%80%E0%B8%81%E0%B9%87%E0%B8%9A%E0%B8%82%E0%B9%89%E0%B8%AD%E0%B8%A1%E0%B8%B9%E0%B8%A5%E0%B8%82%E0%B8%99%E0%B8%B2%E0%B8%94%E0%B9%83%E0%B8%AB%E0%B8%8D%E0%B9%88%E0%B8%94%E0%B9%89%E0%B8%A7%E0%B8%A2-elasticsearch-4d70dbe6a79d
- Redux และ Reactมี Video มี Github
รู้จักกับ Redux state management ที่ช่วยทำให้ application จัดการ state ได้สะดวกสบายยิ่งขึ้นกัน
- สรุปเนื้อหา Exploring the Power of Gemini (I/O Extend 24)มี Github มี Slide
สรุปเนื้อหา use case Gemini ทั้ง 3 ประเภท Chat, API และ RAG คืออะไรและมี use case ประมาณไหนบ้าง

- Agent ส่งข้อมูลไปยัง Frontend ยังไง ?มี Video
วิธีเชื่อมต่อ AI Agent (LangChain/LangGraph) กับ Frontend ด้วย FastAPI ครอบคลุมทั้งการทำ REST API และ Streaming (SSE)

-
